SQM with NanoPi for 1 Gbps Lines With OpenWrt
I made a new significant discovery on 2024.01.07 that makes the NanoPi R6S capable of pushing past 1400+ Mbps with cake on!!! Hooray! See it here. Or here.

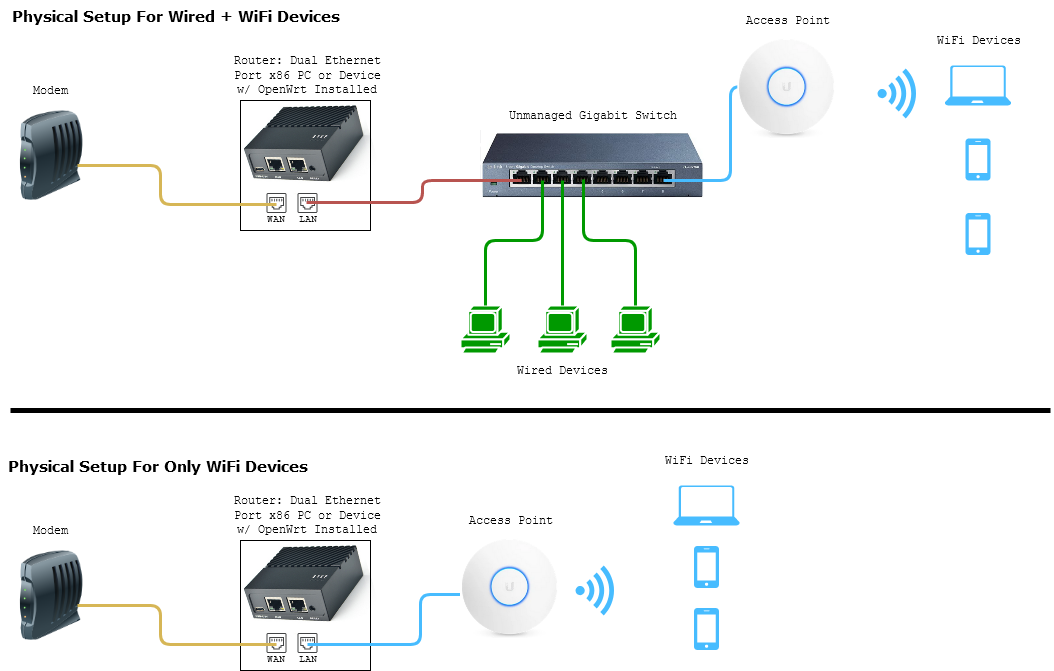
Pictured Gigabit Switch: TP-Link 8-Port Gigabit Ethernet Switch (Amazon Referral Link)
Pictured Access Point - Ubiquiti Unifi 6 Pro (Official Link) Note: If Ubiquiti is out of stock you or if you don't like them, I heard that the TP-Link EAP670 (Amazon Referral Link) from their Omada lines work just as great. I just have never tried it myself as I've been using Ubiquiti APs.
Pictured OpenWrt Device: NanoPi R4SE (Official Link). As for the power supply I'd recommend the CanaKit Raspberry Pi power supply (Amazon Referral Link) over the one FriendlyElec provides. The SE version has eMMC which means you can run off the devices storage instead of running on the MicroSD like it's predecessor the R4S
The new one is the NanoPi R6S (Official Link) which has a better CPU. You may need to source your own 18W PD and USB-C to USB-C PD Cable.
Note: The NanoPis from Amazon are not from official sources. FriendlyElec would be direct from manufacturer.
R4SE - Can do cake SQM up to 630 Mbps. Also has official OpenWrt software available.
R6S - Can do cake SQM up to 1500 Mbps. Only has official FriendlyWrt software for now. It's actually possible to push past 1500 Mbps cake on this machine, however you need to fix the cpu_affinity that was set by default which limited it to 800 Mbps. I explain how you can do this in the performance tweak section.
If you're interested in using cake SQM on an x86 machine please refer to this page instead: https://wiki.stoplagging.com/books/technical-guides/page/sqm-for-beyond-1-gbps-lines-with-openwrt
1.1 Introduction and Why?
The diagram above demonstrates how you would install a more powerful ARM PC, the nanoPi as a router into your network. Building your home network infrastructure like this, is more reliable and better than consumer routers which try to put the modem, routing, and wireless all in one.
The reason why we would want to do this is so we can stop bufferbloat at higher bandwidths with SQM (Smart Queue Management) turned on. Currently consumer routers usually can't push past 350 Mbps with cake or fq_codel SQM they are limited by their CPU power. Most consumer routers have underpowered CPUs so that's why the NanoPis are a solid choice. They are low power usage, small and have solid CPU that can handle cake at 630 Mbps (R4SE) and 1400+ Mbps (R6S w/ CPU fixes)
What is Bufferbloat and why stop it?
It is lag or ping spikes in video games or zoom calls that is caused when you or someone else uses up all your bandwidth. It could be torrenting, 4k streaming, bulk downloads, or even a speedtest. SQM algorithms (fq_codel or cake) which are available on OpenWrt, can completely mitigate these pings and ensures low latency even under full load. Overall, you do sacrifice a little max speed 5-10% for guaranteed low latencies.
NanoPi R4S / R4SE Performance on fq_codel vs cake
Back when my measured bandwidth without SQM from my ISP was 920Mbps DL and 35Mbps UL. My NanoPi R4S running FriendlyWrt can do SQM with fq_codel (simplest.qos) up to 750Mbps without issue. With cake (piece_of_cake.qos) the best speeds I could get with SQM was up to 630 Mbps.
Video: htop of the 6 core NanoPi R4S with SQM (fq_codel w/ simplest.qos) The numbers 0-5 represent the load of each CPU core.
Video: htop of the 6 core NanoPi R4S with SQM (cake w/ piece_of_cake.qos). The performance capped out around 630Mbps on my gigabit connection. Notice the CPU 5 almost hit 100% load. Cake is much more CPU intensive than fq_codel.
As you can see although cake is the slightly better algorithm it is more CPU intensive and seems to cap out around ~630 Mbps. I'd recommend fq_codel if you want to squeeze out the extra ~100 Mbps.
NanoPi R6S Performance
By default, the FriendlyWrt firmware on R6S uses the slower A55 cores for IRQ. This causes the cap to be around 800 Mbps.
The solution is to change the IRQ for each interface to the faster A76 cores. I was able to get the beyond gigabit performance (1400Mbps+) by making it so that 2 of the A76 cores were assigned to ETH2 and the other 2 A76 cores are assigned to ETH1.
Note anytime you save new SQM settings you have to redo the CPU Affinity tweaks again.. I'm still figuring out how to automate it
NanoPi Software Installation
Installation is easy. You just need to flash a microSD card with friendlyWrt. They have a tutorial here for R4SE: https://wiki.friendlyelec.com/wiki/index.php/NanoPi_R4S#Install_OS
And a tutorial here for R6S: https://wiki.friendlyelec.com/wiki/index.php/NanoPi_R6S#Install_OS_to_eMMC
All you have to do to install is...
1. Plug in a microSD card to your computer.
2. Download the appropriate image (usually the eflasher) from the FriendlyWrt wiki
3. Get win32diskimager and launch it.
4. On win32diskimager select your image file that you downloaded and select your microSD drive letter. Then flash!
5. After flashing is done eject microSD and unplug.
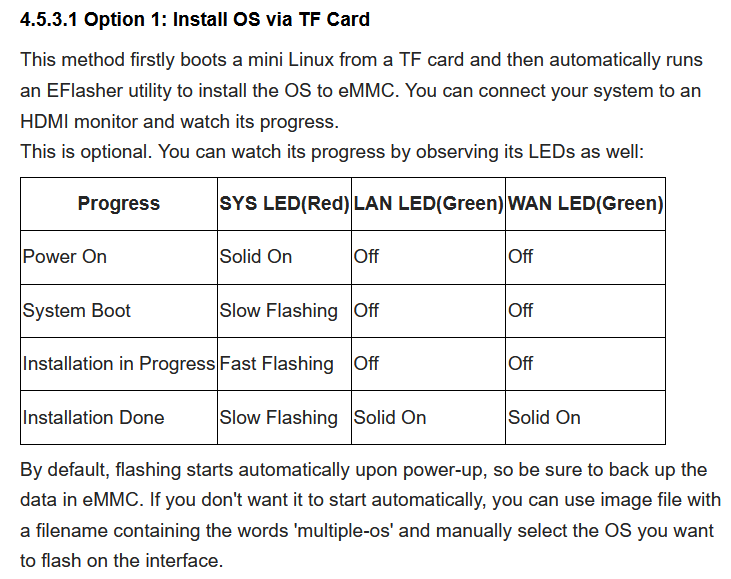
6. Plug in microSD into your NanoPi and wait for it to flash (LEDs pictured below for reference)
7. Hook up WAN to your modem. Hook up LAN to either your switch which connects to a computer or hook up LAN directly to your computer.
8. Power on. Wait about 3 minutes.
9. On the computer that is connected to the switch or NanoPi's LAN port. Go to web browser and enter in http://192.168.2.1 to access your router
That's it! All that is left is to configure SQM with fq_codel as shown . There's no need to install luci-app-sqm because the FriendlyWrt image has everything already! You just need to enable SQM via the official openWrt guide or my guide.
Either way feel free to improve it further with the advanced cake config section of this page
If you want to fine tune cake further you can see the section below this page: https://wiki.stoplagging.com/books/technical-guides/page/sqm-for-up-to-800-mbps-lines-with-openwrt#bkmrk-1.4-advanced-cake-co
1.3 What Access Point to Get?
I keep hearing raving reviews about the Ubiquiti APs and use one myself. I have extremely stable WiFi with these and never have to reboot them. Ubiquiti also advertises up to 200 concurrent users as well! If you have a recommendation better than these I'd like to know.
Ubiquiti Unifi 6 Pro (Official Link)
If you plan on only having one Ubiquti AP I recommend installing via the phone so you don't have to bother with more complicated things like AP Controllers.
If you're on a budget and can't buy a dedicated AP. You can try turning your old router into an access point by putting it into AP mode instead of routing mode. This is important because you should be letting the OpenWrt device do the routing to prevent bufferbloat not your old router.
Another option you could try that I've heard are good are the TP-Link EAP670 (Amazon Referral Link). I have no real world experience with these as I don't own any, but I heard they are solid products in the /r/homenetworking community.
Facts about WiFi
If you need more coverage you should get more APs not one single AP with a bunch of antennas, because those are marketing gimmicks.
WiFi has limited range due to the physics of their frequency bands.
5Ghz can handle more bandwidth, but will usually be about half the range of 2.4Ghz.
1.4 Advanced Cake Configuration
This section is for my own reference and these were recommended by the official docs: https://openwrt.org/docs/guide-user/network/traffic-shaping/sqm-details#sqmqueue_discipline_tab
It's not necessary to do this but if you want even further ping stability under load it might be worthwhile!
Under the Queue Discipline tab of SQM.
Enable the checkmark for advanced configuration and save& apply.
This turns on squash_dscp, squash_ingress, ECN on ingress and NOECN on egress. Leave them as defaults as they are good the way they are. (If you have symmetrical fiber then ECN can be enabled on egress.
Next checkmark and enable "Dangerous Configuration" which is below the "Advanced Configuration" section. We are going to disable triple-isolate and enable per host isolation... Here's a short explanation.
To quote the docs, by default, cake will use triple-isolate: “which will first make sure that no internal or internal host will hog too much bandwidth and then will still guarantee for fairness for each host. In that mode, Cake mostly does the right thing. It would ensure that no single stream and no single host could hog all the capacity of the WAN link. However, it can’t prevent a BitTorrent client – with multiple connections – from monopolizing most of the capacity.” You can enable per host isolation, which will identify all source/destination information.
To enable that, Add the following to the “Advanced option strings” (in the Interfaces → SQM-QoS page; Queue Discipline tab, look for the Dangerous Configuration options):
For queueing disciplines handling incoming packets from the internet (internet-ingress): nat dual-dsthost ingress
For queueing disciplines handling outgoing packets to the internet (internet-egress): nat dual-srchost
For me that means Qdisc options (ingress) I wrote in "nat dual-dsthost ingress" while for
Qdisc options (egress) I wrote in "nat dual-srchost"
1.5 Performance Tweaks for R6S
The R4S no longer needs the performance tweaks anymore as it's built into the firmware past August 2022.
The R6S machines on the other hand need this if you want to push past 1400 Mbps
Performance Tweak: References used: 1, 2, 3
CPU Performance Tweak Script
To use this script SSH into your NanoPi R6S.
Start by installing nano with opkg update and opkg install nano so you can use nano as the text editor
Then do the follow commands
touch performancetweak.sh
chmod +x performancetweak.sh
nano performancetweak.sh
These commands create a performancetweak.sh file located at /root/performancetweak.sh
They then take you to the nano text editor.
Copy paste in the following script below.
performancetweak.sh
#!/bin/bash

# Save the output of /proc/interrupts in a variable
interrupts=$(cat /proc/interrupts)

# Extract the numbers associated with eth1-0 and eth2-0 using grep and awk
eth1_0=$(echo "$interrupts" | grep "eth1-0" | awk '{print $1}' | tr -d ':')
eth2_0=$(echo "$interrupts" | grep "eth2-0" | awk '{print $1}' | tr -d ':')

# Display current CPU cores assigned to current IRQs and queues
echo "CPU Affinity for ETH1 2.5gbs LAN was $(cat /proc/irq/"$eth1_0"/smp_affinity)"
echo "CPU Affinity for ETH2 2.5gbs WAN was $(cat /proc/irq/"$eth2_0"/smp_affinity)"
echo "CPU cores assigned to ETH0 queue rx-0 was: $(cat /sys/class/net/eth0/queues/rx-0/rps_cpus)"
echo "CPU cores assigned to ETH1 queue rx-0 was: $(cat /sys/class/net/eth1/queues/rx-0/rps_cpus)"
echo "CPU cores assigned to ETH2 queue rx-0 was: $(cat /sys/class/net/eth2/queues/rx-0/rps_cpus)"

# Set the CPU affinity for IRQs using variables
echo -n ff > /sys/class/net/eth2/queues/rx-0/rps_cpus
echo -n ff > /sys/class/net/eth1/queues/rx-0/rps_cpus
echo -n ff > /sys/class/net/eth0/queues/rx-0/rps_cpus
echo -n 30 > /proc/irq/"$eth2_0"/smp_affinity
echo -n c0 > /proc/irq/"$eth1_0"/smp_affinity

# Display new CPU cores assigned to new IRQs and queues
echo "CPU Affinity for ETH1 2.5gbs LAN is now $(cat /proc/irq/"$eth1_0"/smp_affinity)"
echo "CPU Affinity for ETH2 2.5gbs WAN is now $(cat /proc/irq/"$eth2_0"/smp_affinity)"
echo "CPU cores assigned to ETH0 queue rx-0 is now: $(cat /sys/class/net/eth0/queues/rx-0/rps_cpus)"
echo "CPU cores assigned to ETH1 queue rx-0 is now: $(cat /sys/class/net/eth1/queues/rx-0/rps_cpus)"
echo "CPU cores assigned to ETH2 queue rx-0 is now: $(cat /sys/class/net/eth2/queues/rx-0/rps_cpus)"
Once pasted. Press Ctrl+O to save.
To run the script do the following command.
./performancetweak.shLastly you might want to have the script run on reboot.
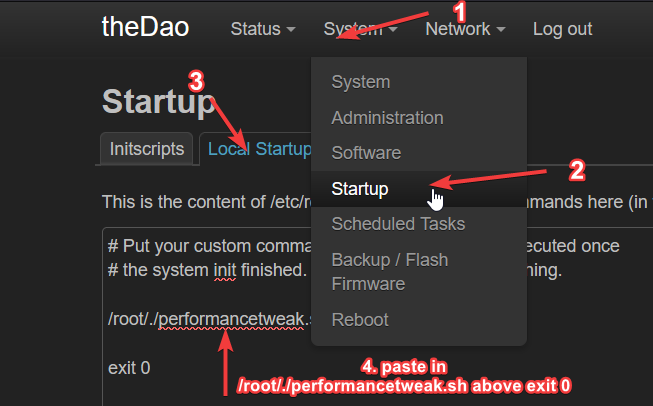
You can do this by going to System > Startup > Local Startup
and put in the command to run the script above exit 0 pictured below.
/root/./performancetweak.shAs of 2024.01.07... The Local Startup script does not work for me. I don't know what the solution is. It runs but the cpu affinity still gets reverted back to the old values.
We can solve a different problem where everytime sqm is changed the cpu affinity reverts back to the old values.
We will need to modify sqm's init.d so that it starts the performancetweak.sh script each time a change is made in sqm. To begin...
nano /etc/init.d/sqm#!/bin/sh /etc/rc.common
START=50
USE_PROCD=1
service_triggers()
{
procd_add_reload_trigger "sqm"
}
reload_service()
{
stop "$@"
start "$@"
}
start_service()
{
/usr/lib/sqm/run.sh start "$@"
}
stop_service()
{
/usr/lib/sqm/run.sh stop "$@"
}
boot()
{
export SQM_VERBOSITY_MIN=5 # Silence errors
start "$@"
}/root/performancetweak.sh#!/bin/sh /etc/rc.common
START=50
USE_PROCD=1
service_triggers()
{
procd_add_reload_trigger "sqm"
}
reload_service()
{
stop "$@"
start "$@"
/root/performancetweak.sh
}
start_service()
{
/usr/lib/sqm/run.sh start "$@"
/root/performancetweak.sh
}
stop_service()
{
/usr/lib/sqm/run.sh stop "$@"
/root/performancetweak.sh
}
boot()
{
export SQM_VERBOSITY_MIN=5 # Silence errors
start "$@"
/root/performancetweak.sh
}The Performance Tweak! (Manual way)
I'd recommend the scripting way above as you can set it to start on reboot. However feel free to go thru the manual way so you can better understand what the script does.
## Step1: Get CPU Frequencies to confirm that cores 4, 5, 6, and 7 are the faster cores. CPU0 starts from the top.
cat /sys/devices/system/cpu/cpu*/cpufreq/cpuinfo_max_freq

## Step2: Get IRQ ##s (In my example below they are 31 for eth0 and 88 for eth1 yours may be different)
grep eth /proc/interrupts

## My output of Step2 yours may be different
grep eth /proc/interrupts
 74:          0          0          0          0          0          0          0          0     GICv3 266 Level     eth0
 75:          0          0          0          0          0          0          0          0     GICv3 265 Level     eth0
128:          0          0      61981          0          0          0          0    2335426   ITS-MSI 570949632 Edge      eth1-0
144:          0          0    1236903          0          0          0          0          0   ITS-MSI 570949648 Edge      eth1-16
146:          0          0          0          0          0          0          0          0   ITS-MSI 570949650 Edge      eth1-18
149:          0          0          0          0          5          0          0          3   ITS-MSI 570949653 Edge      eth1-21
160:          0          0          0     148716    4732058          0          0          0   ITS-MSI 428343296 Edge      eth2-0
176:          0          0          0    1559148          0          0          0          0   ITS-MSI 428343312 Edge      eth2-16
178:          0          0          0          0          0          0          0          0   ITS-MSI 428343314 Edge      eth2-18
181:          0          0          0          0          0          0          0          7   ITS-MSI 428343317 Edge      eth2-21

## What is your IRQ ##?
By default eth2-0 is the WAN port and eth1-0 is the 2.5gbps LAN port on the R6S. So the lines of interest are below:
160:          0          0          0     148716    4732058          0          0          0   ITS-MSI 428343296 Edge      eth2-0
128:          0          0      61981          0          0          0          0    2335426   ITS-MSI 570949632 Edge      eth1-0

Your IRQ number might be different from mine whcih is 160 for 2.5 Gbps WAN and 128 for 2.5Gbps LAN

## Optional Step: List CPU Cores Assigned to Current IRQs
cat /proc/irq/160/smp_affinity
cat /proc/irq/128/smp_affinity

## Optional Step: List CPU Cores Assigned Current Queues
cat /sys/class/net/eth0/queues/rx-0/rps_cpus
cat /sys/class/net/eth1/queues/rx-0/rps_cpus

The optional steps above are to see what the values are currently. Nowe we will change them!

## Step3: The Performance Tweaks. The idea here is to put IRQ cpu affinities on Faster A76 Cores.
And assign all CPU cores to the queues.

#ETH0 irq on core 4,5 (a76 core) replace 160 with your actual IRQ number for WAN
echo -n 30 > /proc/irq/160/smp_affinity

#ETH1 irq on core 6,7 (a76 core) replace 128 with your actual IRQ number for WAN
echo -n c0 > /proc/irq/128/smp_affinity

#ETH0 queues on all CPU cores
echo -n ff > /sys/class/net/eth0/queues/rx-0/rps_cpus

#ETH1 queues on all CPU cores
echo -n ff > /sys/class/net/eth1/queues/rx-0/rps_cpus

#ETH2 queues on all CPU cores
echo -n ff > /sys/class/net/eth1/queues/rx-0/rps_cpus
If you restart Smart Queue Management or change SQM settings, it will reset the CPU affinity and you will need to re-apply the performance tweaks again. I'm still trying to figure out how to make this always the case...
Optional understanding of CPU Affinity
This section below is optional and is for my understanding of how the hex value selects certain CPU cores.
## Performance Tweaks Quick Reference R6S
Binary   = hex ## = cpu core
00000001 = hex 1 = cpu core 0 (A55) selected
00000010 = hex 2 = cpu core 1 (A55) selected
00000100 = hex 4 = cpu core 2 (A55) selected
00001000 = hex 8 = cpu core 3 (A55) selected
00010000 = hex 10 = cpu core 4 (A76) selected
00100000 = hex 20 = cpu core 5 (A76) selected
01000000 = hex 40 = cpu core 6 (A76) selected
10000000 = hex 80 = cpu core 7 (A76) selected

## Examples (Note CPU0 starts on the right. CPU7 ends on the left. Read from right to left)
00001111 = hex 0f = cpu cores 0, 1, 2 and 3 selected
11111111 = hex ff = all cpu cores selected
11110000 = hex f0 = cpu cores 4, 5, 6, 7 selected
00110000 = hex 30 = cpu cores 4, 5 selected
11000000 = hex c0 = cpu cores 6, 7 selected

Just use binary and covert it to hex, 1 = select that cpu core and 0 = unselect that cpu core.
1.6 Contact
If you need help or consultation please join my rocket.chat server at https://chat.stoplagging.com/invite/zaMu6X you can message me @Starfroz by looking me up under the globe icon after registering and logging in.
External Resources for Nano Pi R4S
R4S Benchmarks by Van Tech Corner on Youtube: https://www.youtube.com/watch?v=t5xuTy1xn64
R6S Benchmarks by Van Tech Corner on Youtube: https://www.youtube.com/watch?v=2bCf8Xchrfc
R4S Performance Tweaking: https://forum.openwrt.org/t/nanopi-r4s-rk3399-4g-is-a-great-new-openwrt-device/79143/406


