# Valorant Guides
# Valorant Mechanics for Beginners
#### Spray Patterns
When you point your crosshair in one location and don't move your mouse when spraying the bullets will go above your crosshair.
**Video 1: Uncontrolled Spray**
To compensate you should pull your crosshair in the opposite direction of the spray pattern. Each gun has a different spray pattern. I recommend you learn the first 10 bullets of the high tier guns such as the Spectre, Phantom, and Vandal.
**Video 2: Controlled Spray**
#### Movement & Shooting
You don't want to shoot while your character is running. This is what happens.
**Video 3: Extreme Inaccuracy when running and shooting**
Instead if you want to avoid getting shot while being accurate at the same time... you should move, pause, shoot, move, pause, shoot in bursts as shown below.
**Video 4: Move, Pause, Then Shoot in Bursts**
Alternatively, you can walk or crouchwalking while shooting with good accuracy.
**Video 5: Walking While Shooting**
#### Shooting at Apex of A D A D Movement
When you shoot at the moment you change directions it will be very accurate. I call this shooting at the "apex" of your left right movement.
[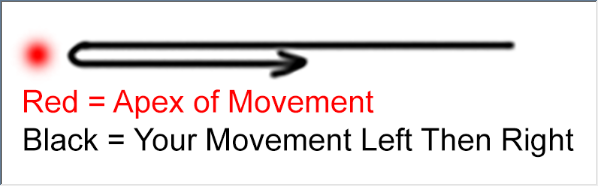](https://wiki.stoplagging.com/uploads/images/gallery/2020-07/image-1587328163830.png)
**Video 6: Shooting at the Apex of A D A D Movement**
#### Peeking Techniques
Watch Adren's Video as he explains the "proper way" to peek very well. Here is the link: [https://www.youtube.com/watch?v=U9mvXfnY8wU](https://www.youtube.com/watch?v=U9mvXfnY8wU)
After you learned how to peek the Adren way, snapping to corners. You may want to combine it with the A D peek for common spots players normally play. You usually want to peek like this if you're a solo player with no teammates. If you have teammates who can trade you then snapping to a corner style is ideal.
You want to peek purely with A and D as much as possible. Peeking with WA and WD makes you an easier target because it brings you closer to them.
**Video 7: Adren's Peek + A D Peek (Aka NiKo Peek)**
Video 7 below is an example of a pro CS:GO player applying these concepts.
****
**Video 8: How this CS GO Faze NiKo Peeks by Ron Rambo Kim**
#### Aim at Head Height All the Time
It's always best to place your cross hair at head height at all times even when no one is around. That way you'd only have to focus on moving the mouse left and right instead of up down left right to readjust your aim if someone comes at you. Make it a habit and you'll win more fights!
One tip if you don't know where head height is at, is to look at a team mate. Head height is the same across all distances on a flat plane. So you can use your team mates head as reference. The only time you should aim for body shots is if you have an Operator.
**Video 9: Head Height is the same across all distances on flat plane!**
#### Mouse Acceleration Turn it Off!
First off, disable mouse acceleration By unchecking "Enhance pointer precision." That way if you move 30cm in one direction fast or slow your cross hair will still move the same distance instead of a varying distance.. Mouse acceleration will definitely throw your aim off because it's unpredictable. It's usually under control panel > mouse > pointer options.
[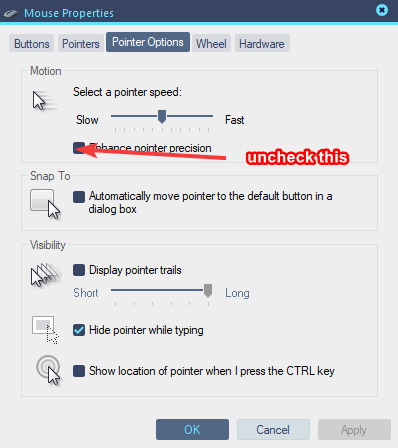](https://wiki.stoplagging.com/uploads/images/gallery/2020-07/image-1587420640589.png)
#### Choosing a Mouse Sensitivity & Calculations
Try to choose a mouse sensitivity where it takes 1 swipe to do a 180. Somewhere between 25cm / 360 up 55cm / 360. There is a calculator here than can help: [https://www.mousesensitivity.net/](https://www.mousesensitivity.net/)
My sensitivity personally is 52cm / 360. My mouse is set at 800 DPI.
In order to achieve that sensitivity in CS:GO I have to set a sensitivity of 1.
In order to achieve the same sensitivity in Valorant I divide CS:GO sensitivity by 3.181818. [New research](https://old.reddit.com/r/VALORANT/comments/h7h1vj/youre_converting_your_csgo_sensitivity_wrong_here/), indicates that this number may be closer to 3.3735 instead of 3.181818.
So my 30cm / 360 in Valorant is 0.314.
This may not be comfortable for you so choose a sensitivity between 25-55 cm / 360. Lower sensitivity, that is more than 55cm doesn't hurt if you're comfortable with it, but anything below 25cm/360 is too high sensitivity for this kind of game. If you want to learn more about mouse sensitivity and aim trainers check out Aimer7's guide it is more comprehensive than what I cover here: [https://www.dropbox.com/s/vaba3potfhf9jy1/KovaaK%20aim%20workout%20routines.pdf?dl=0](https://www.dropbox.com/s/vaba3potfhf9jy1/KovaaK%20aim%20workout%20routines.pdf?dl=0)
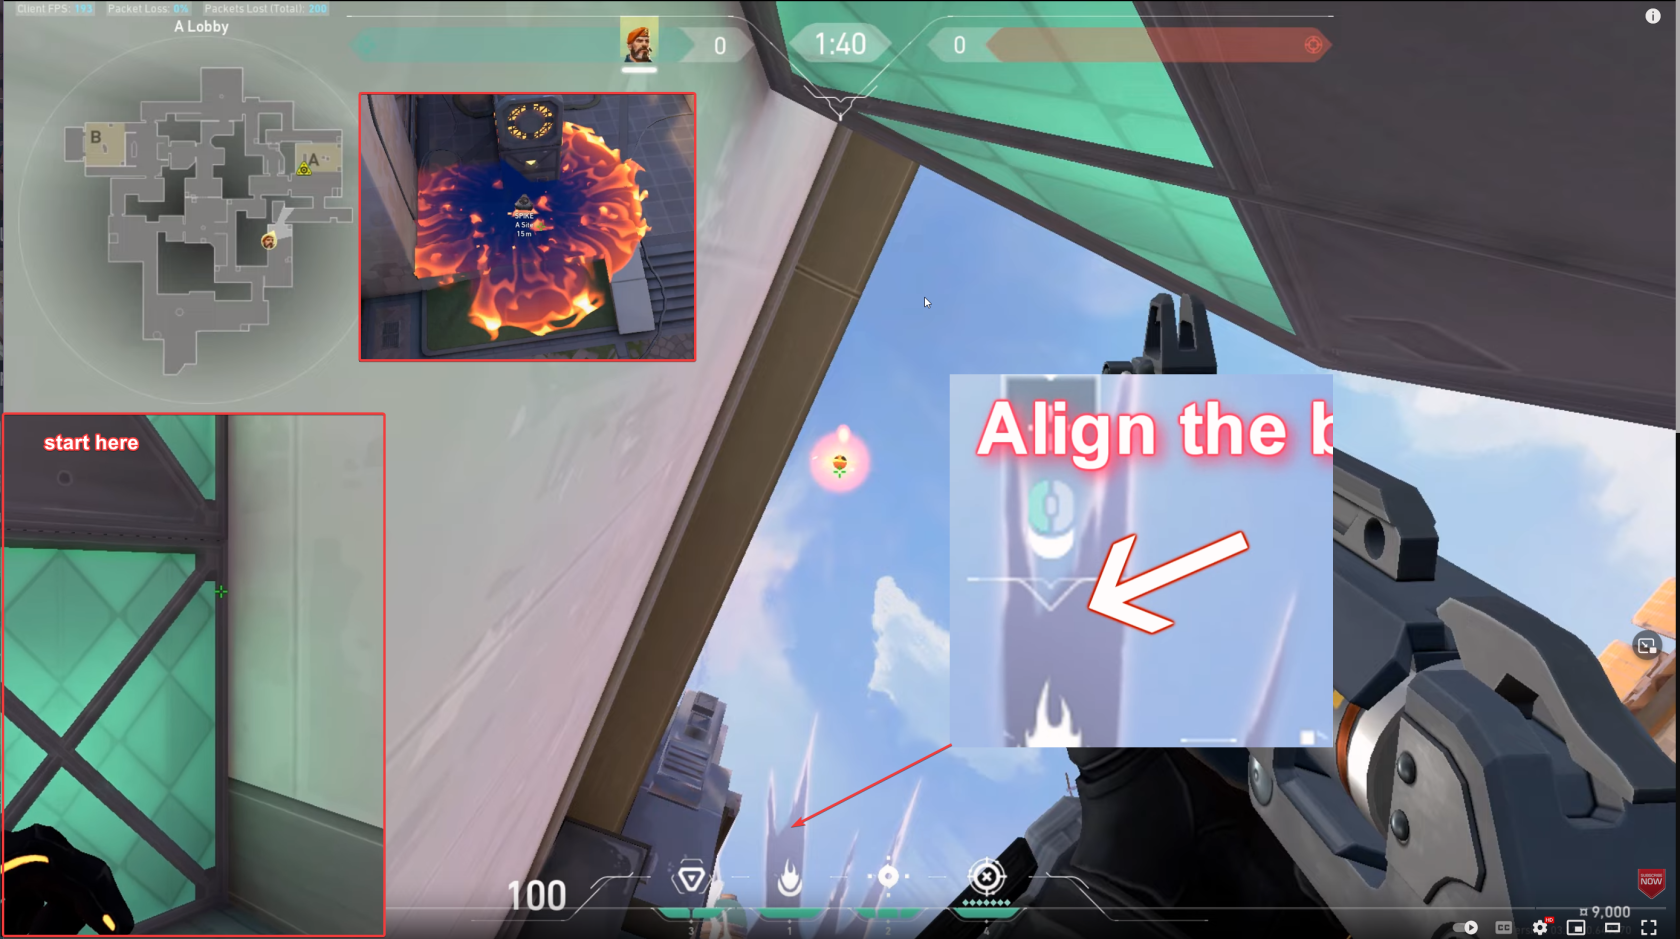
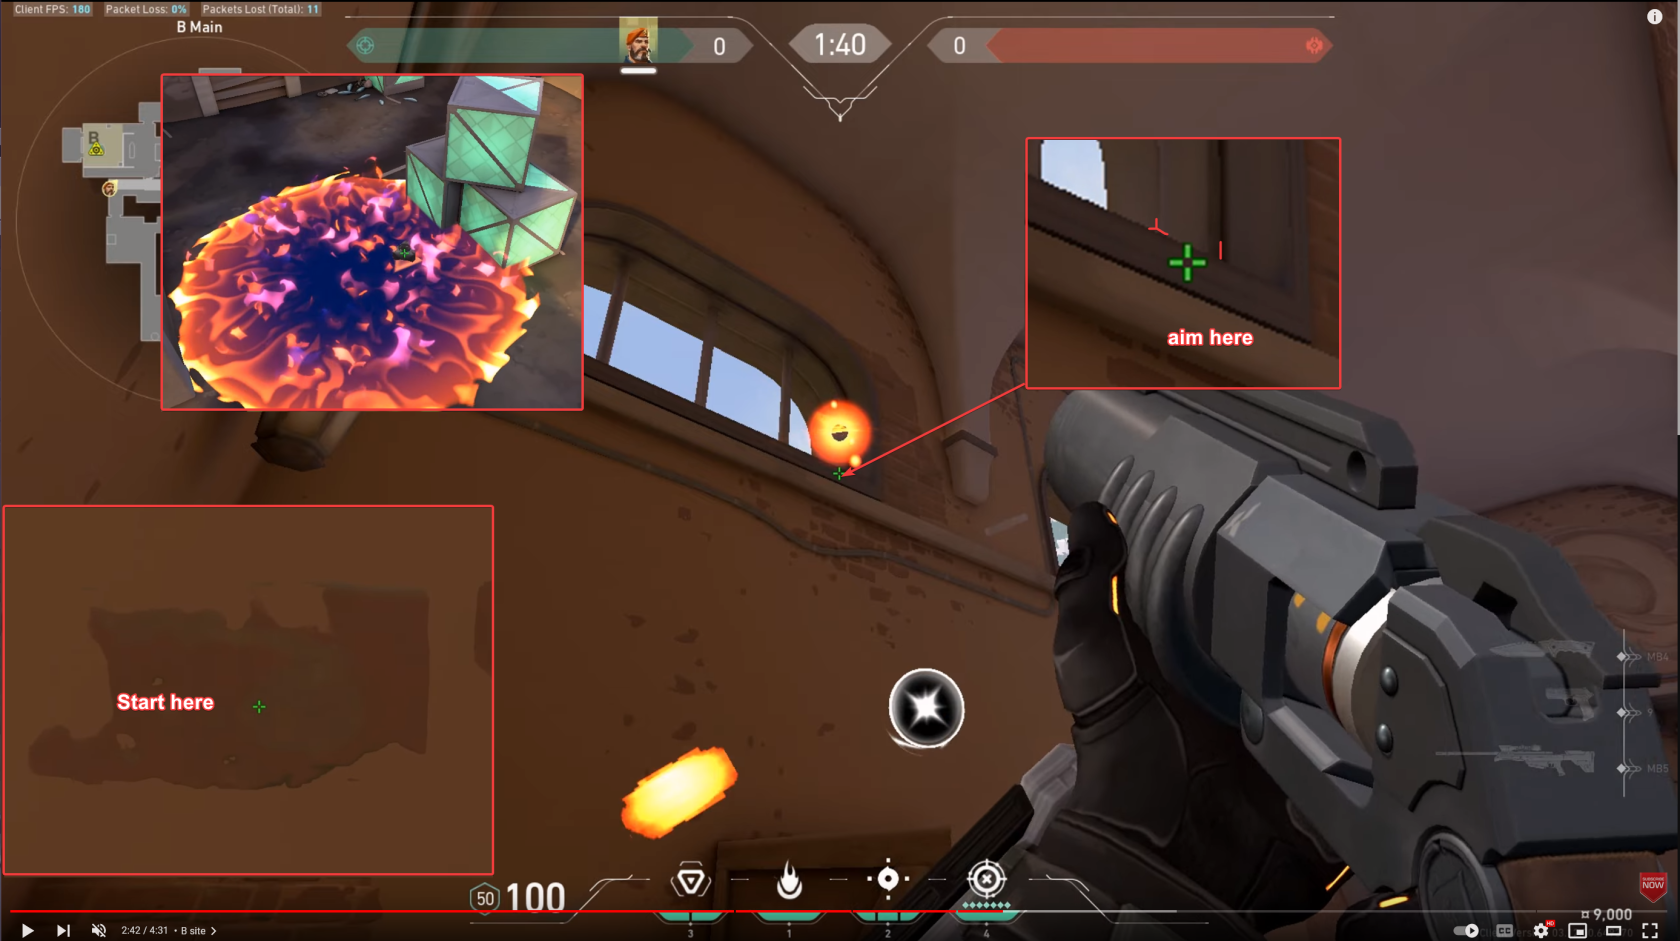
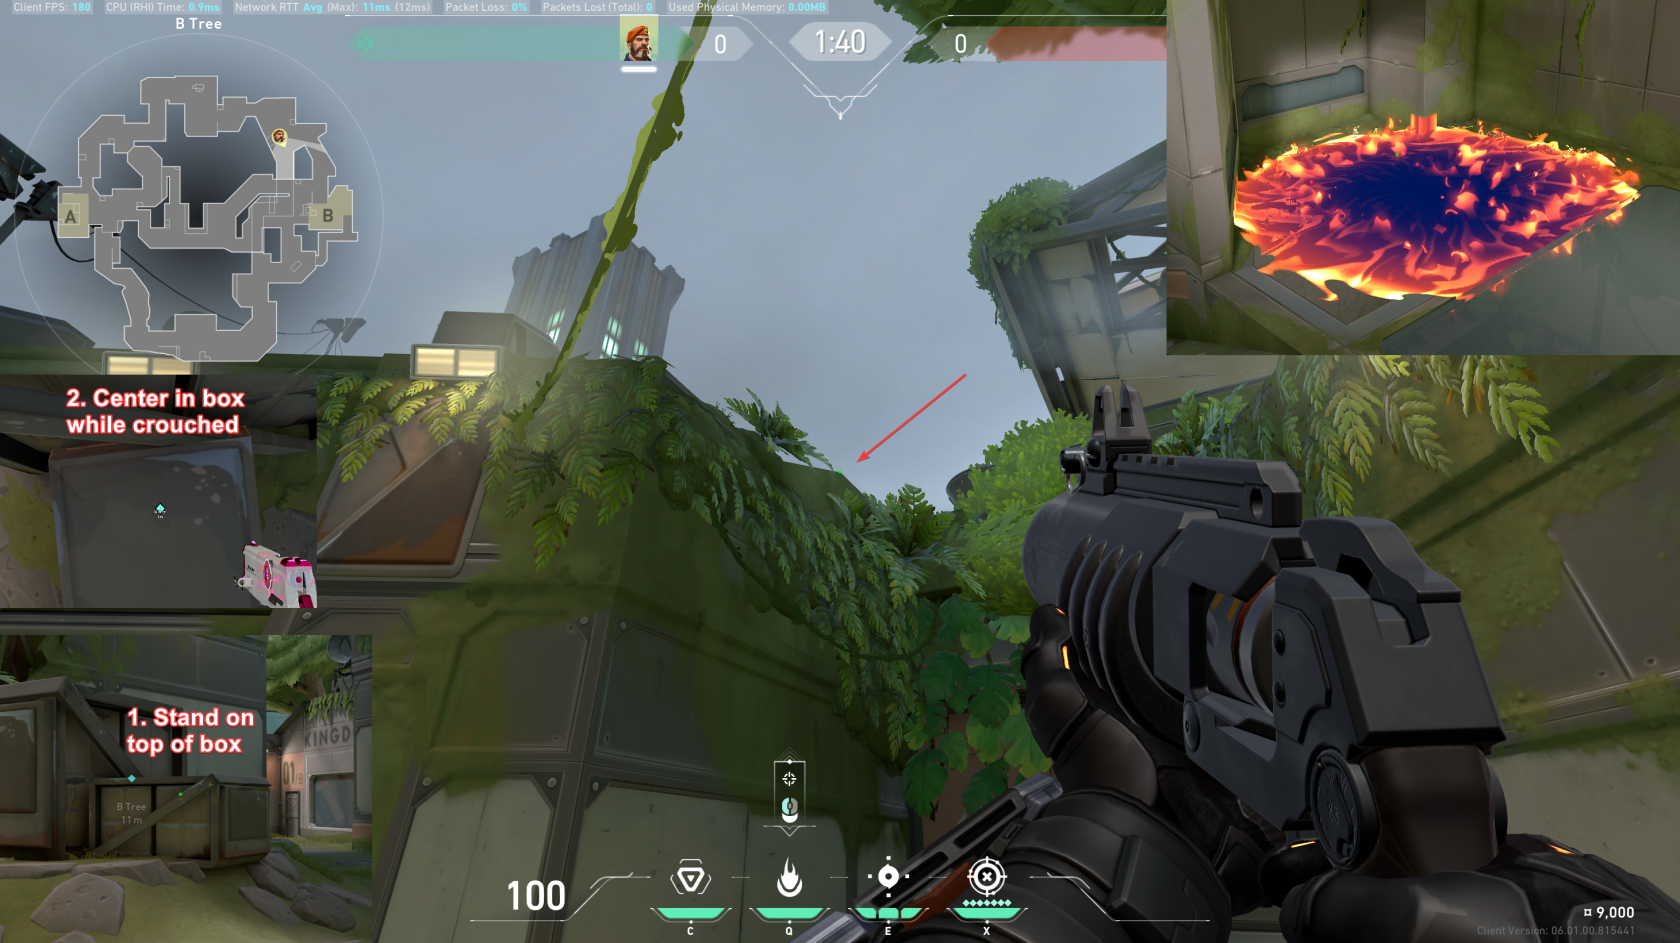
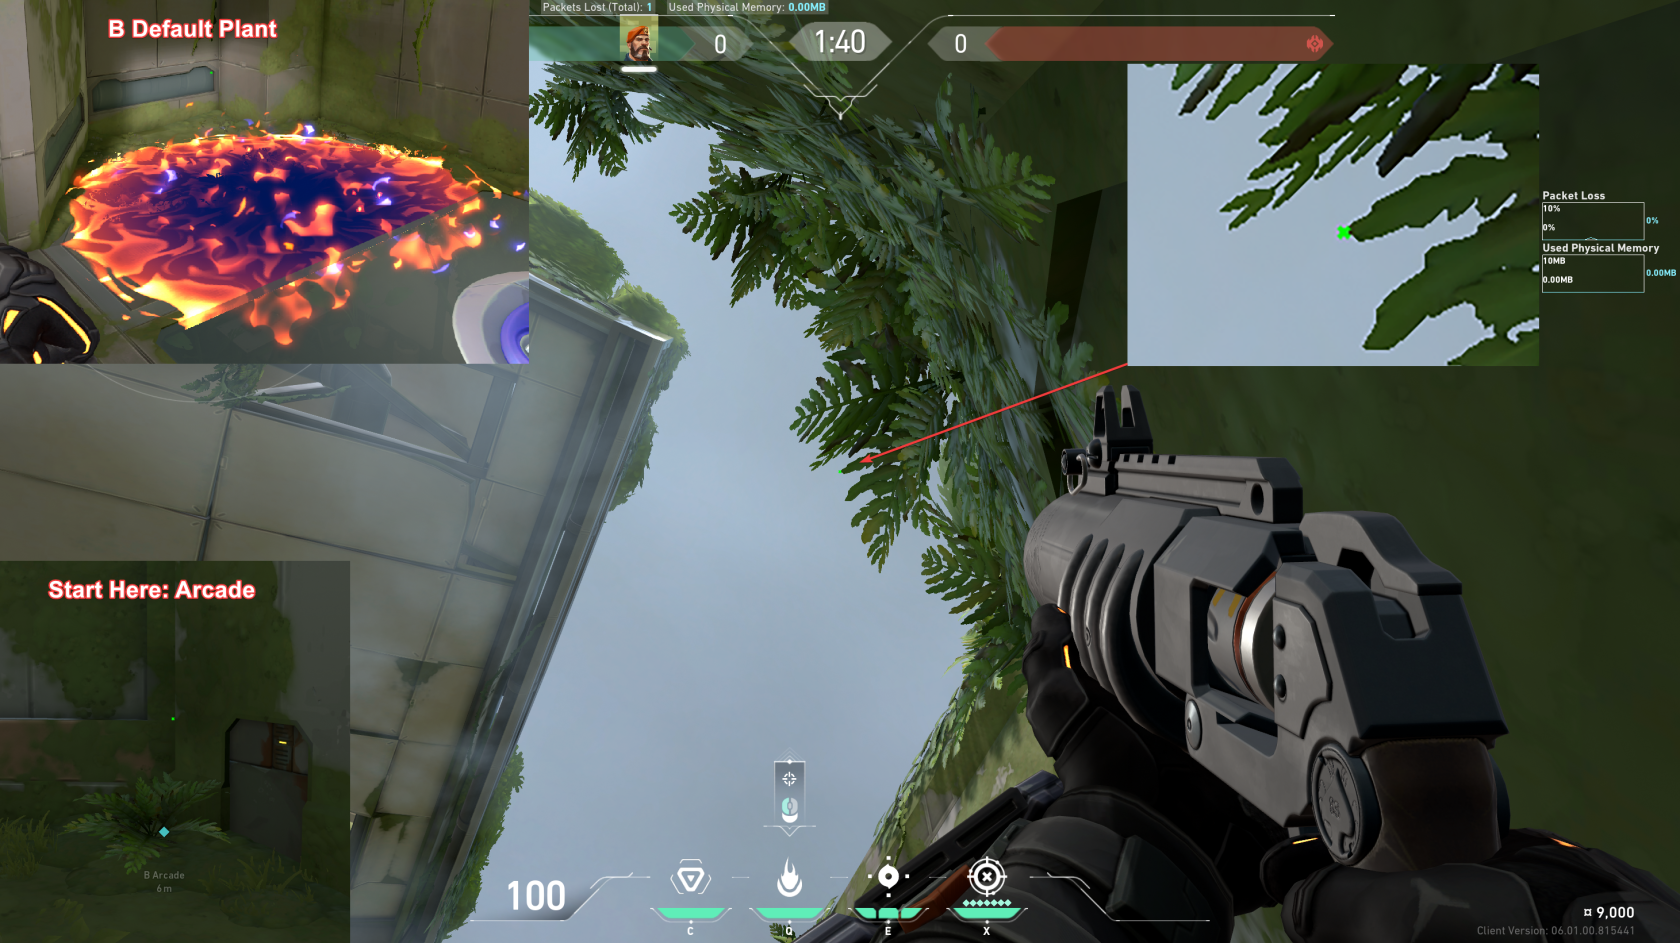
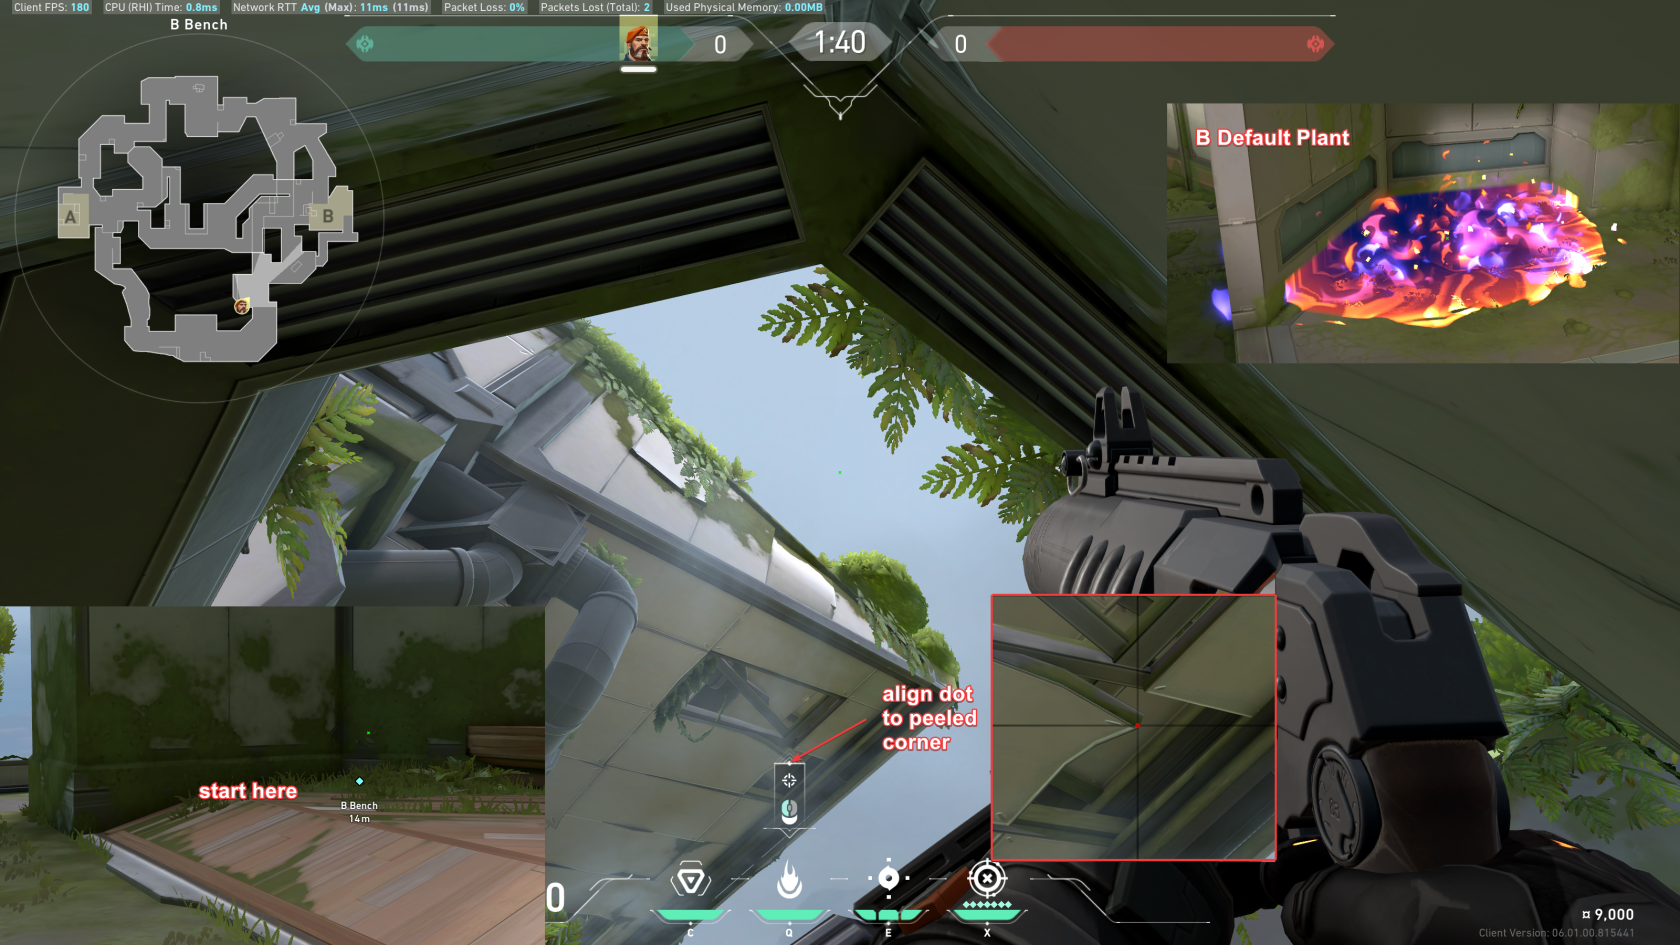
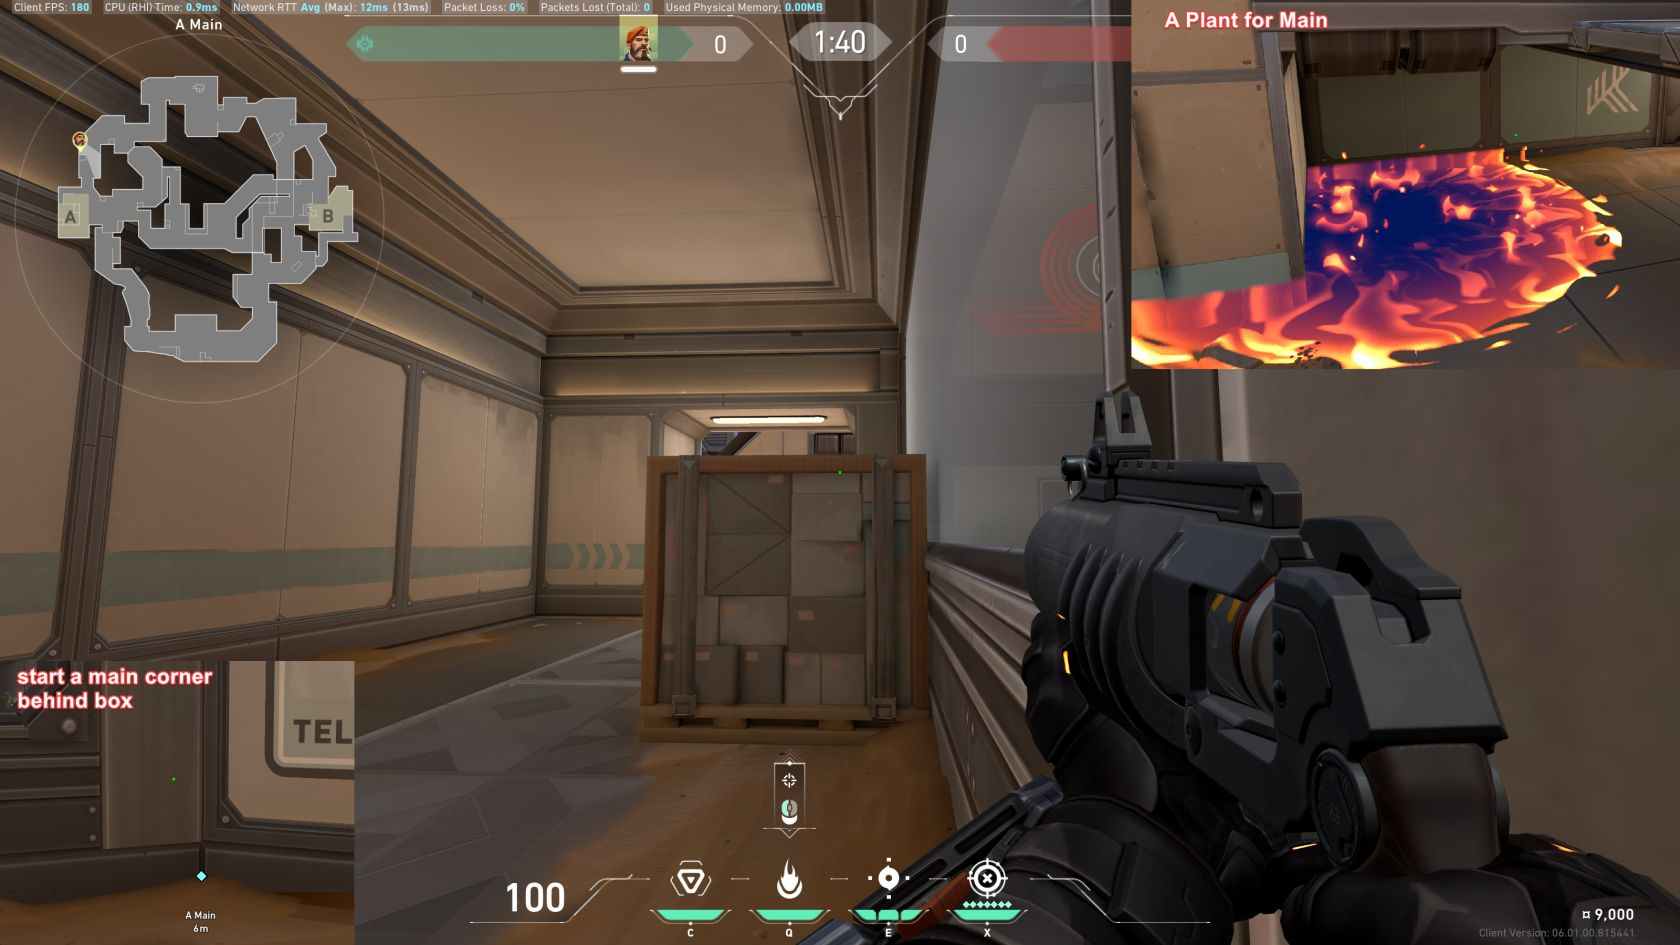
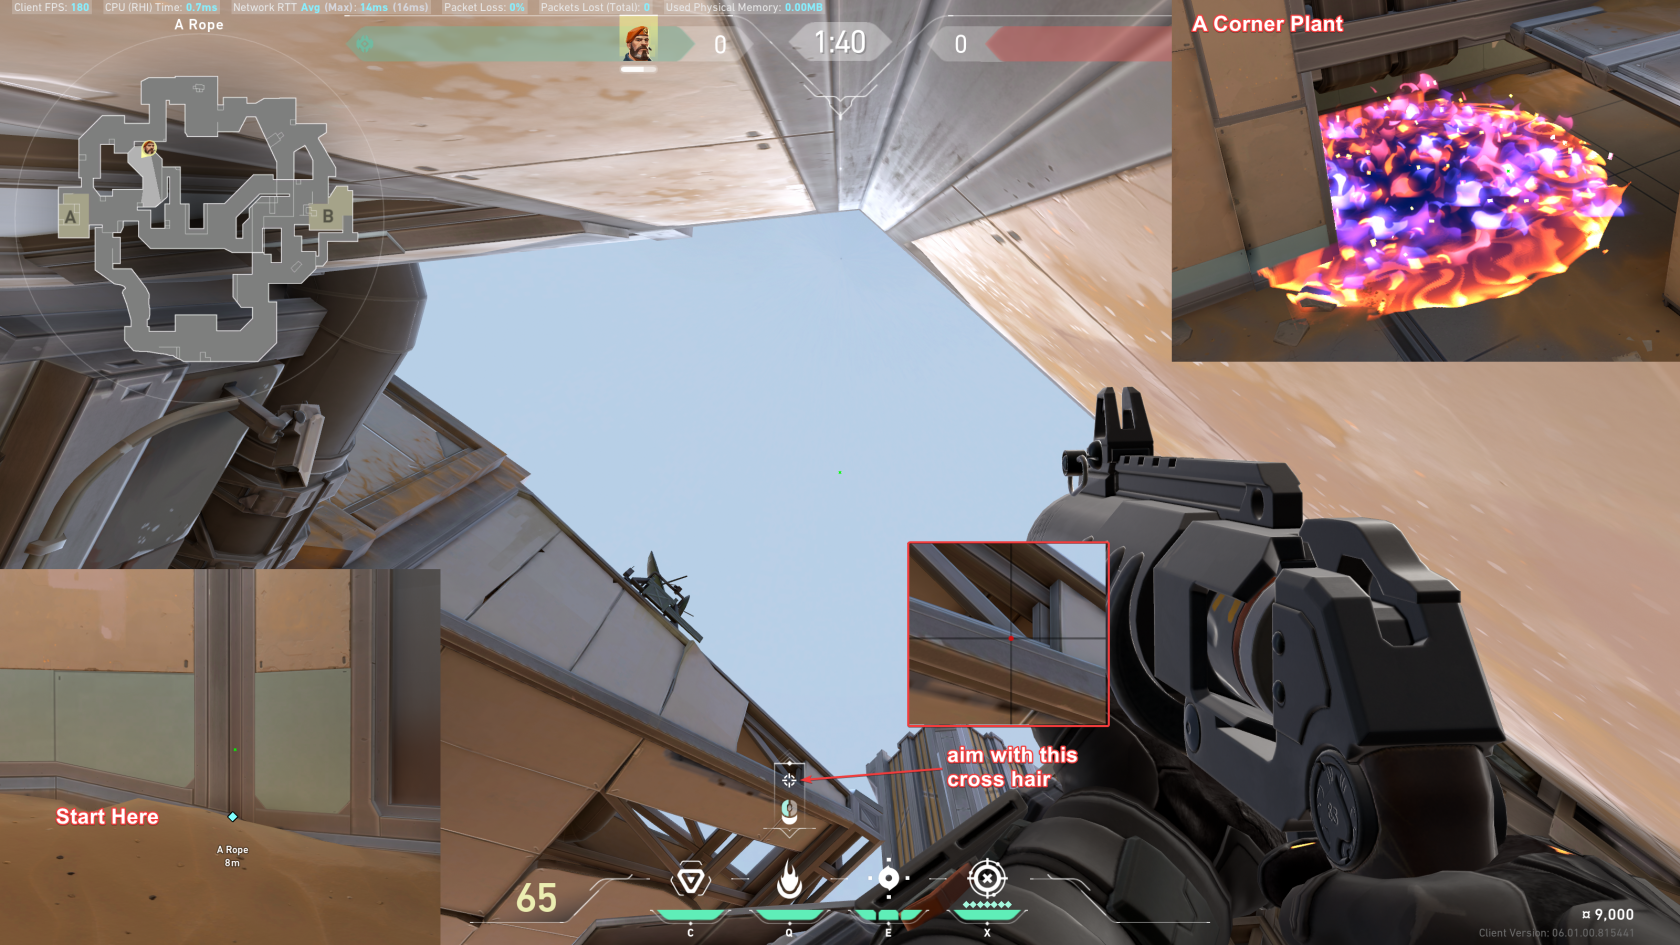
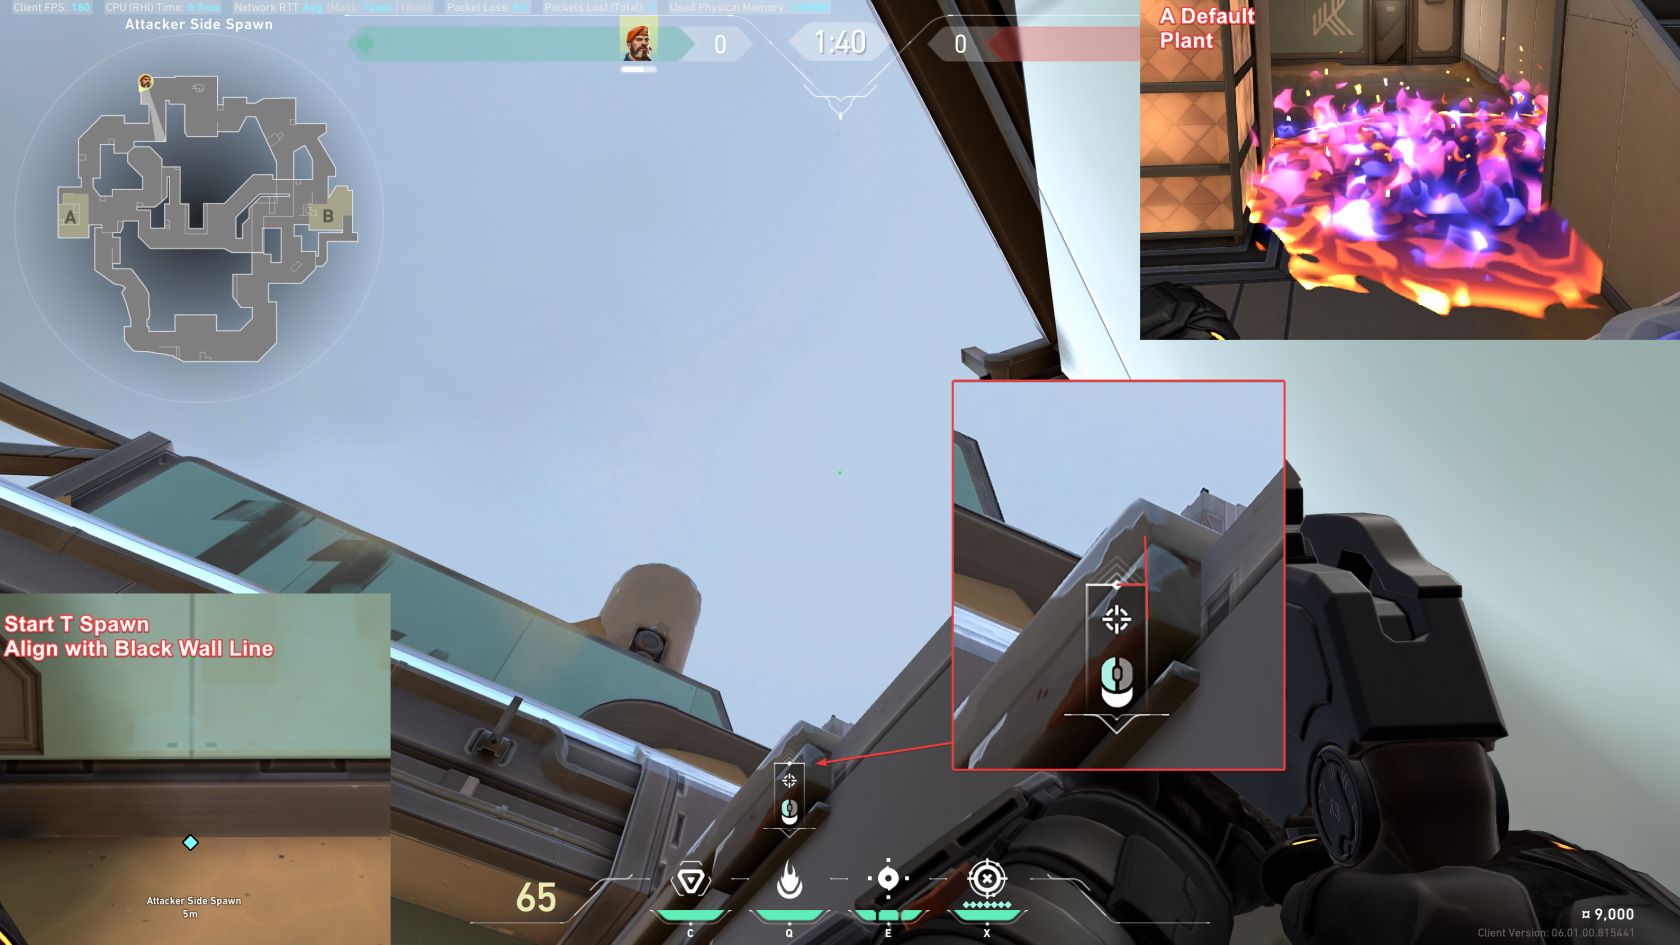
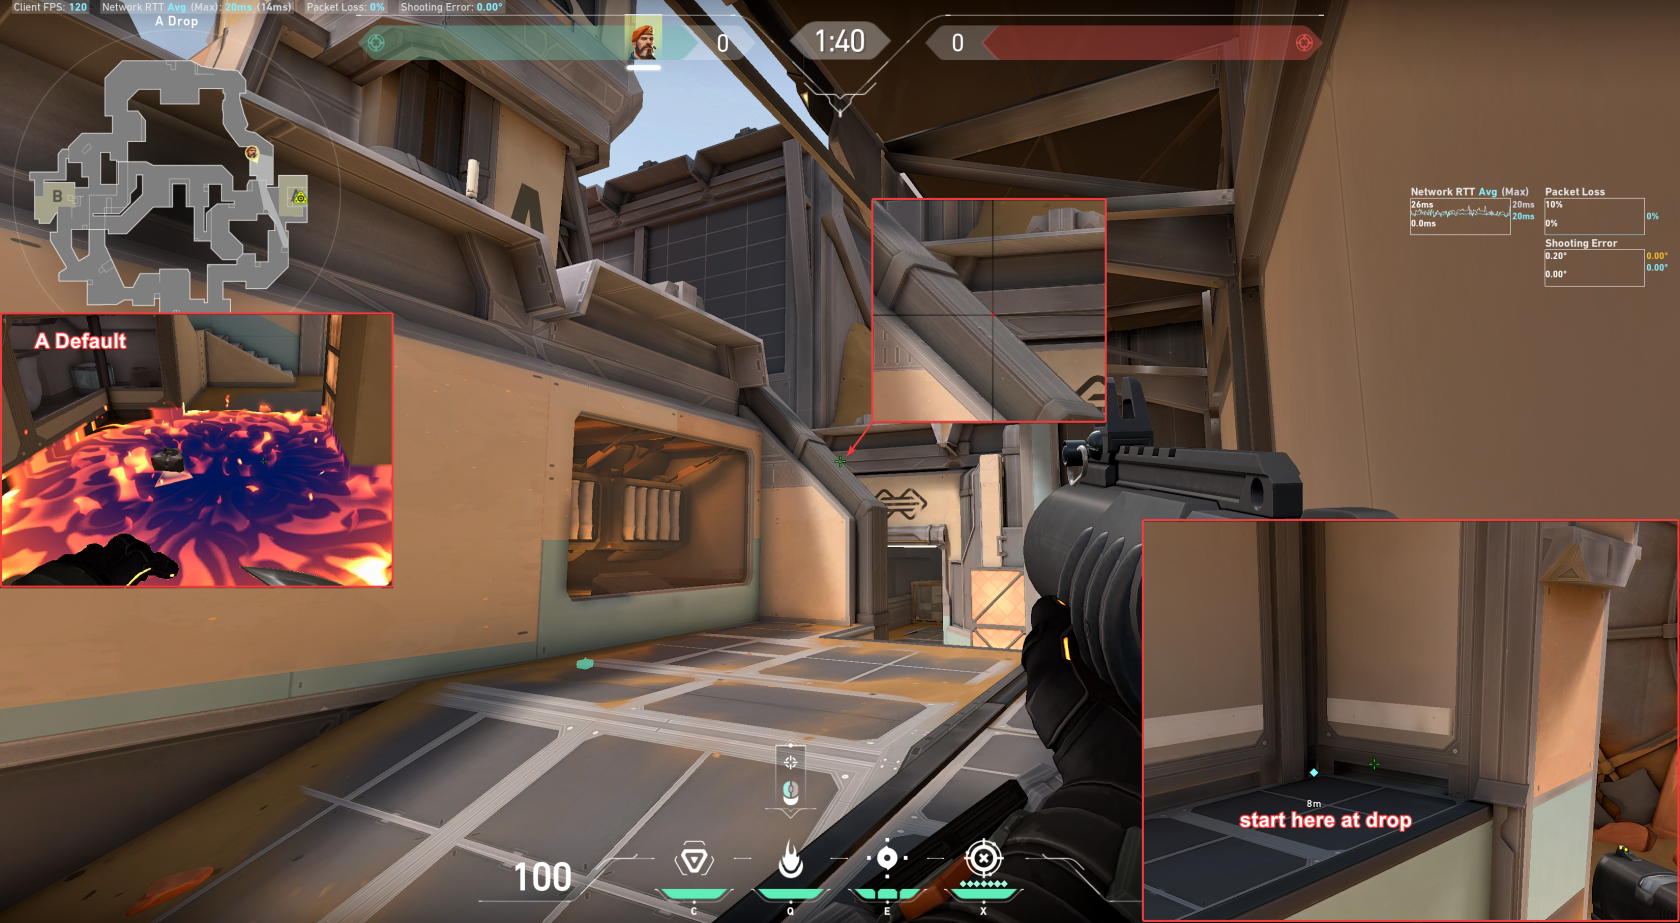
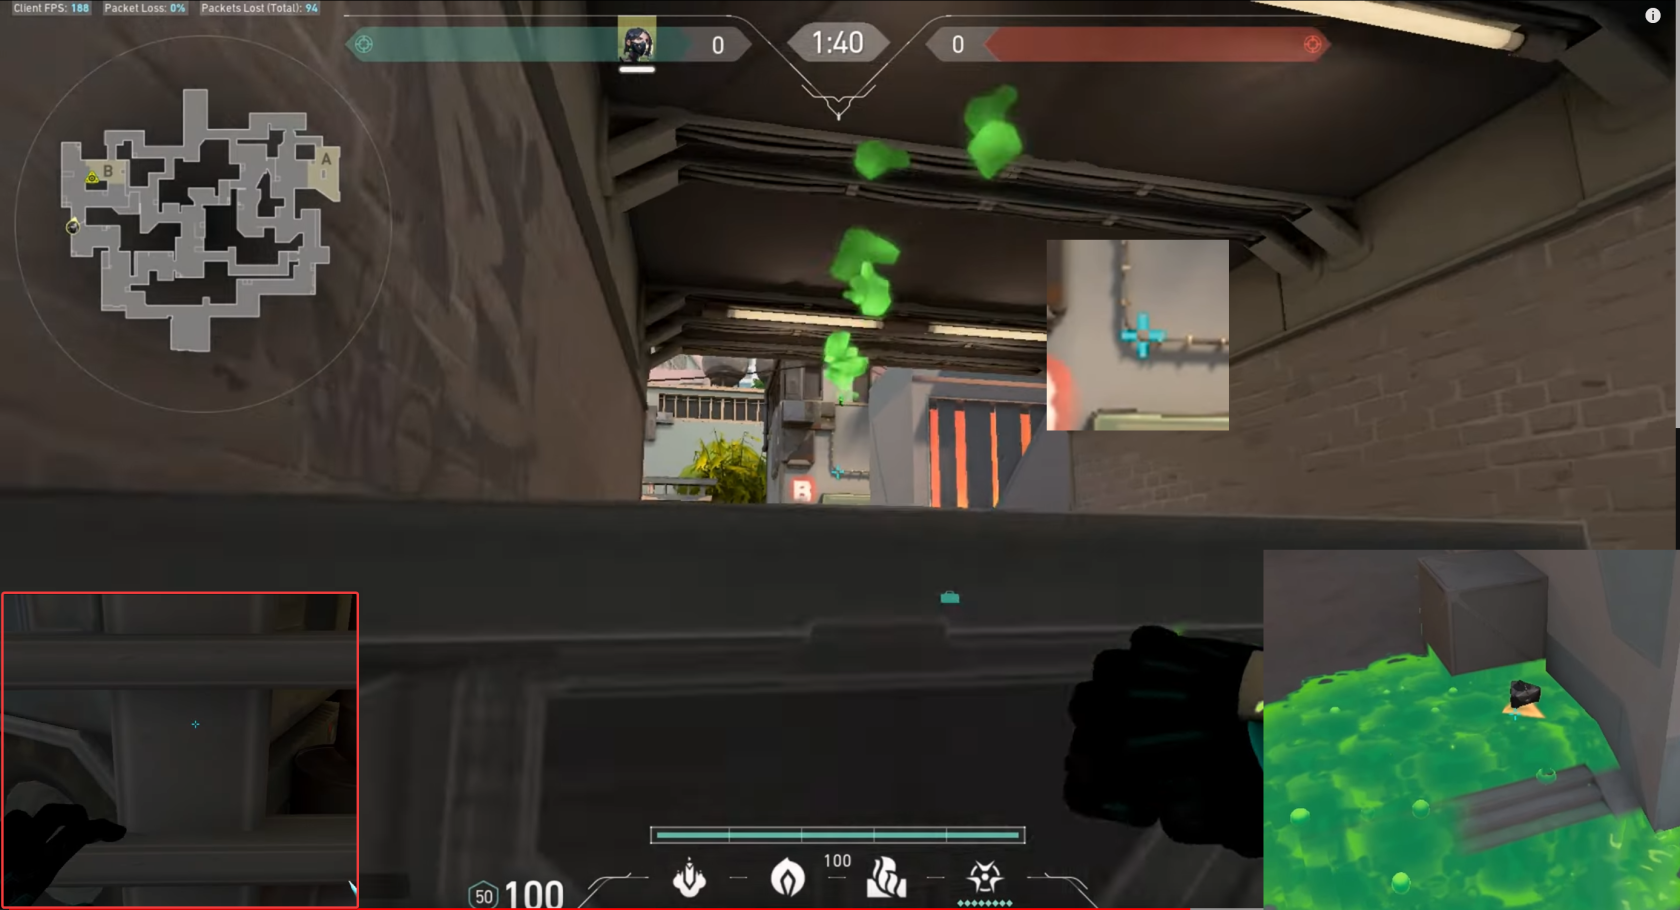
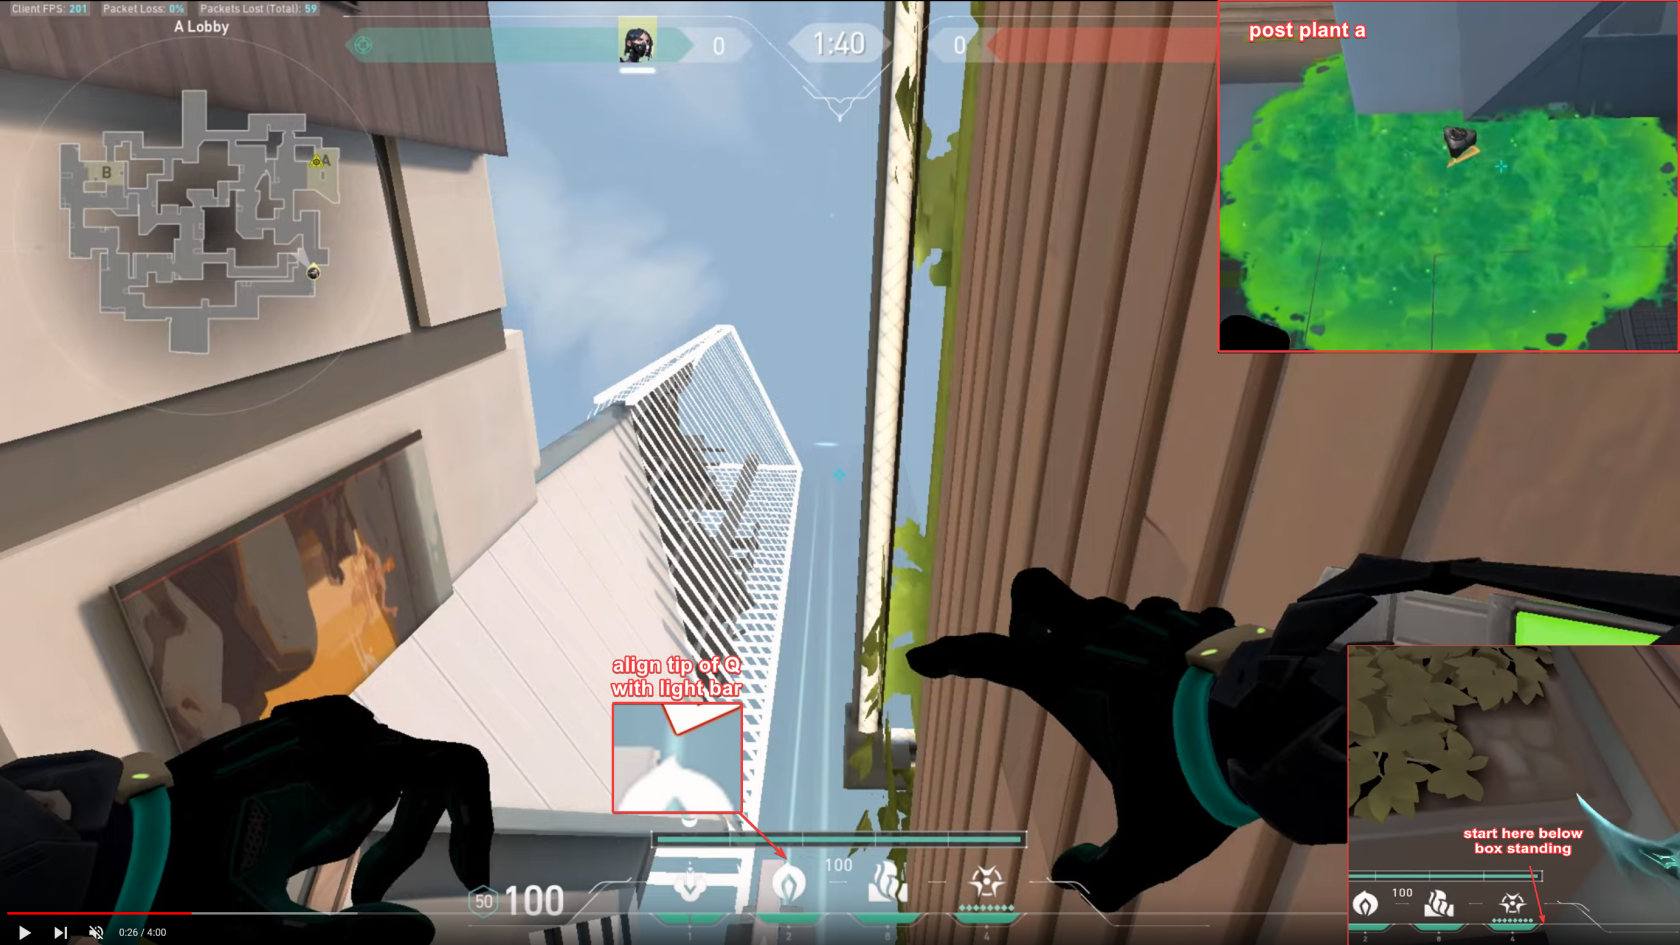
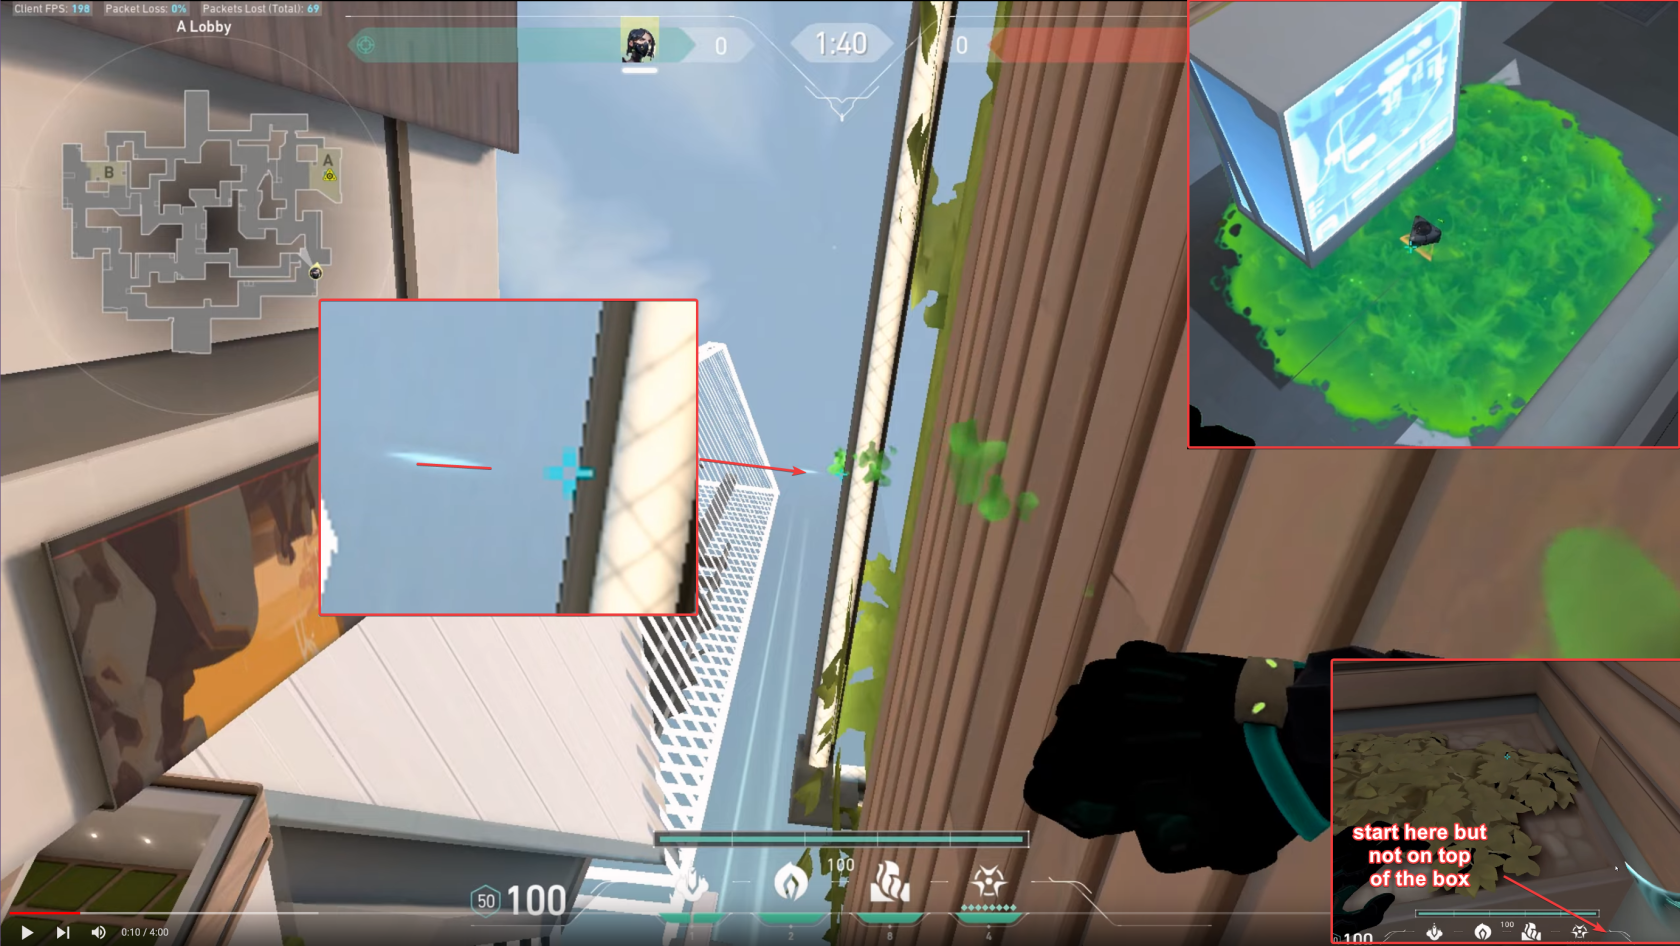
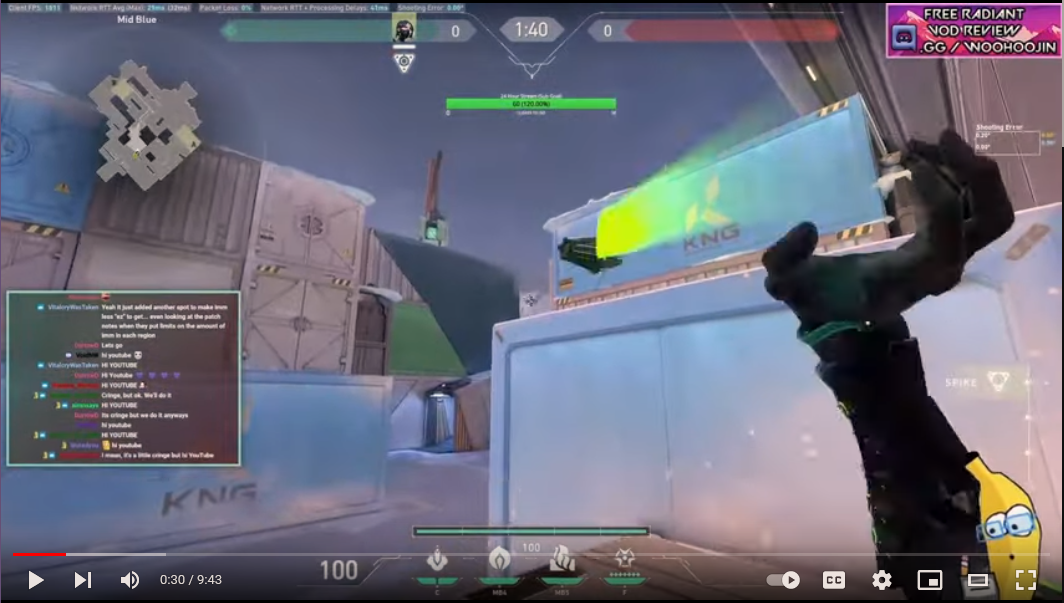
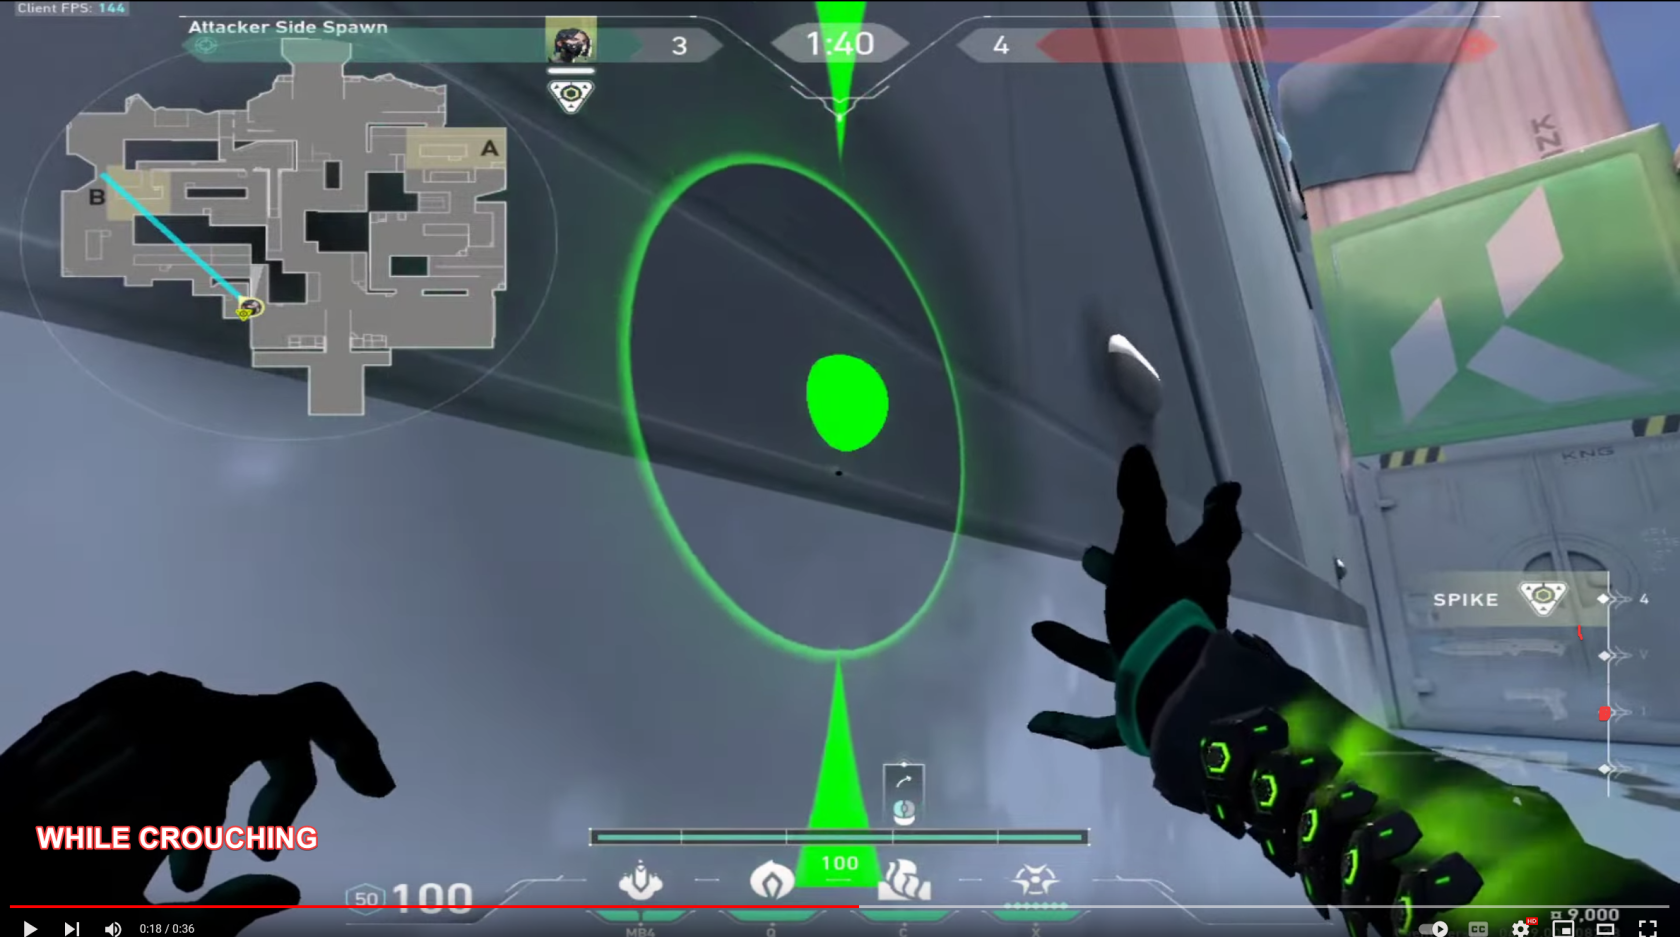
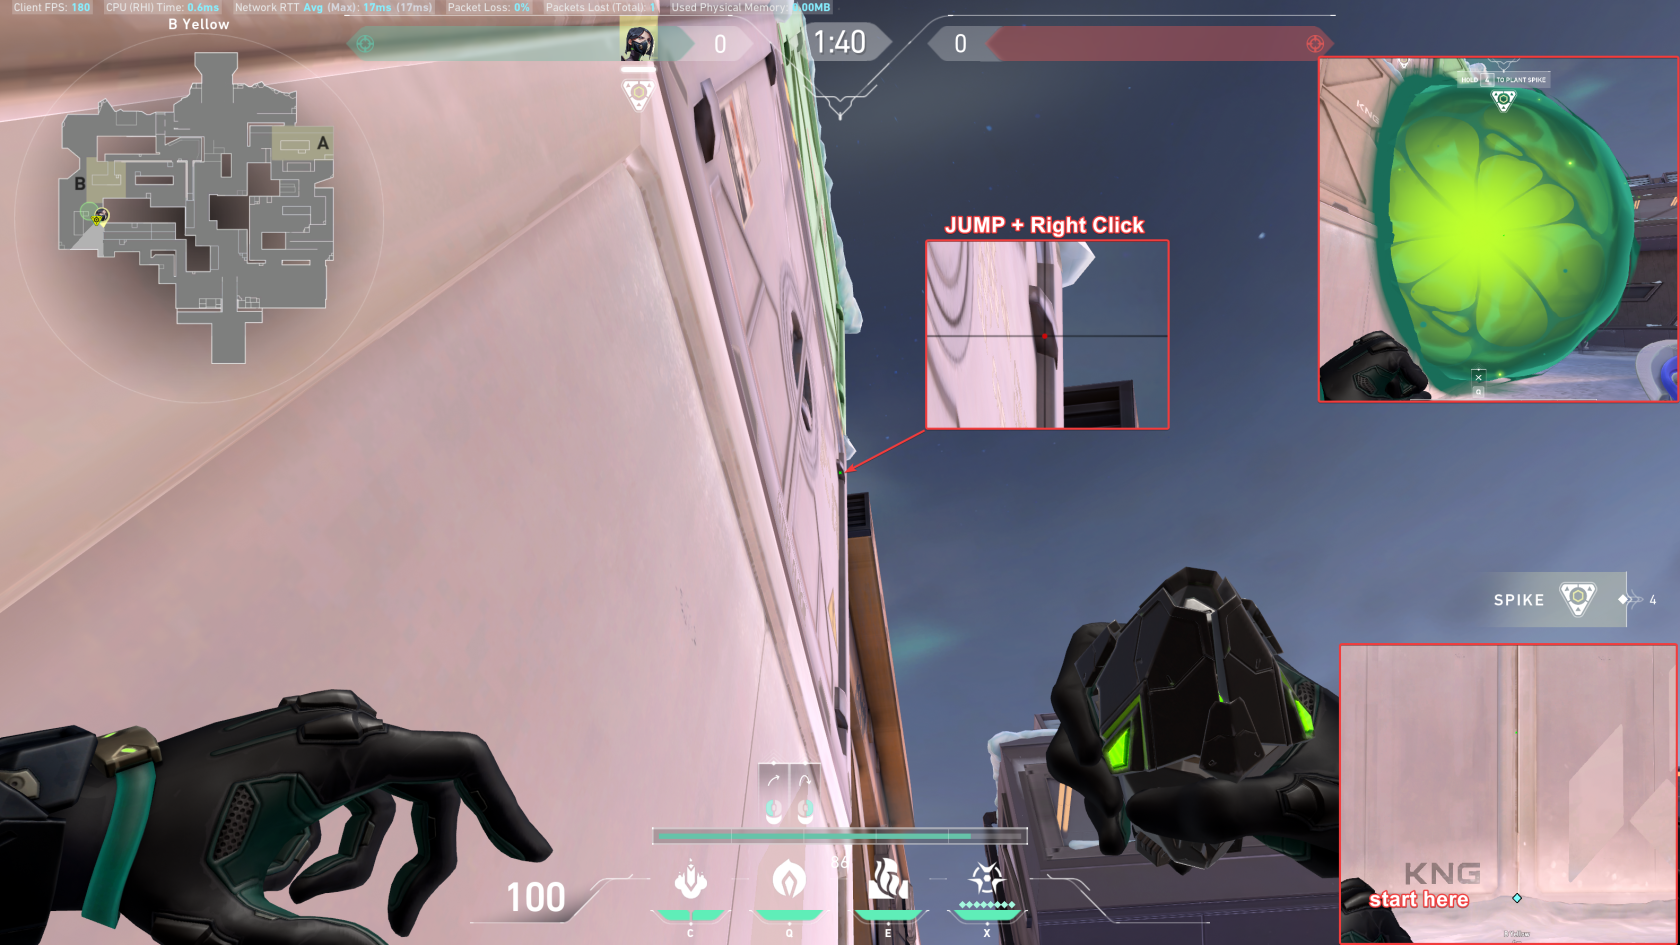
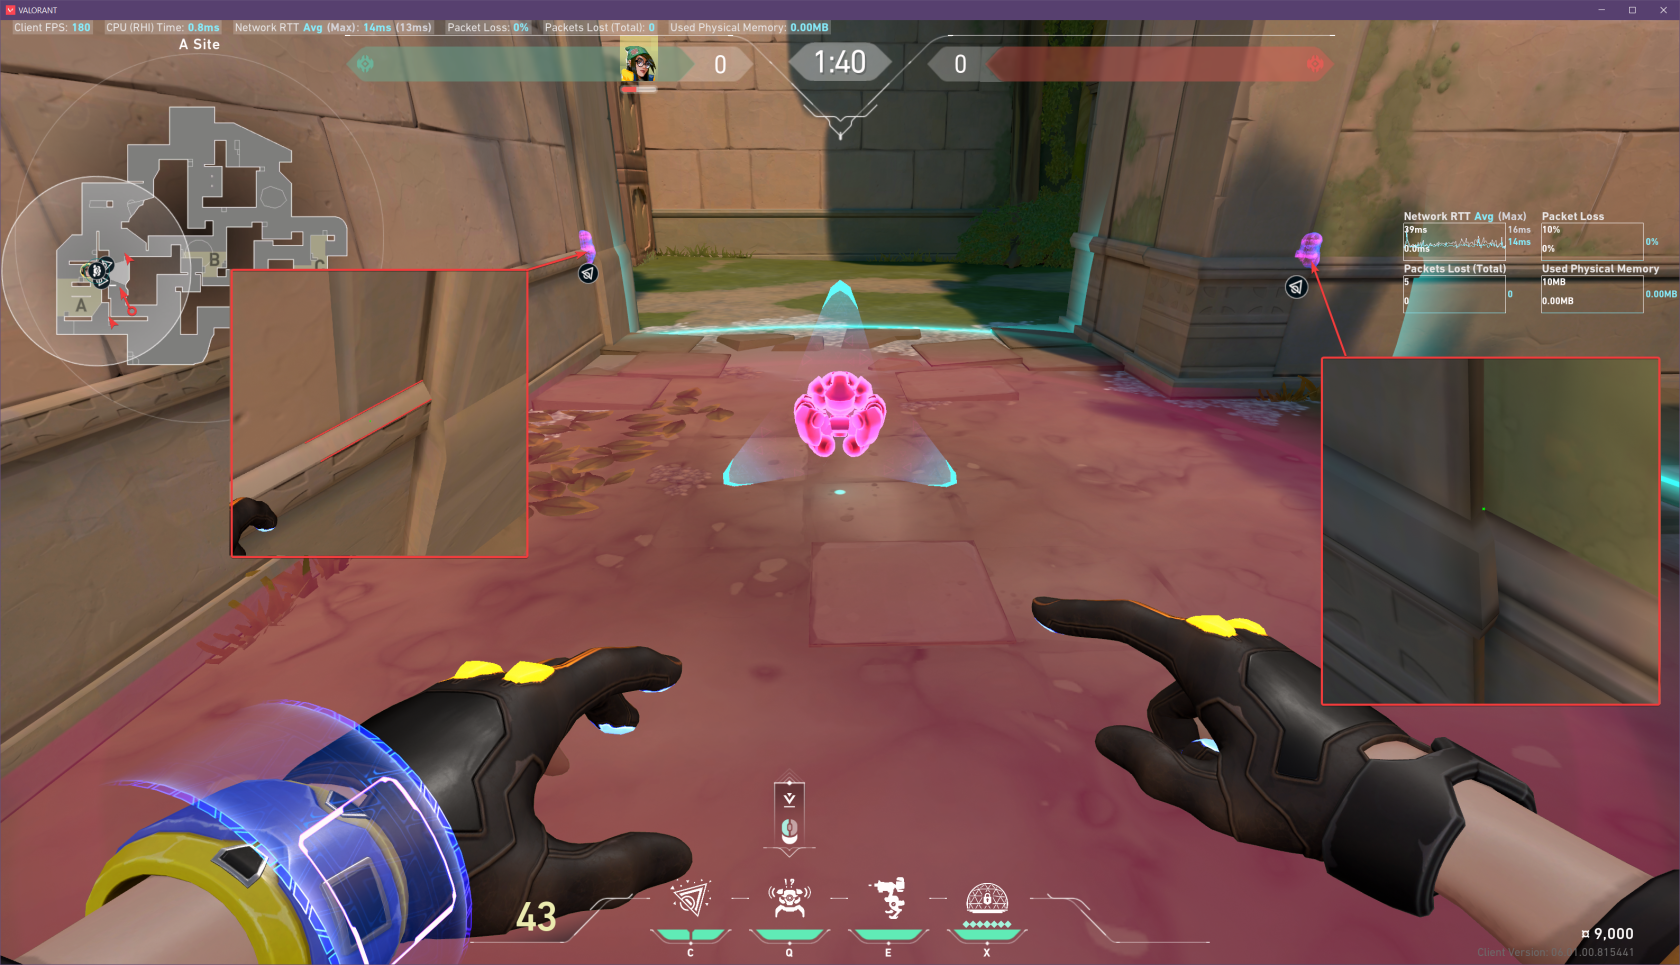
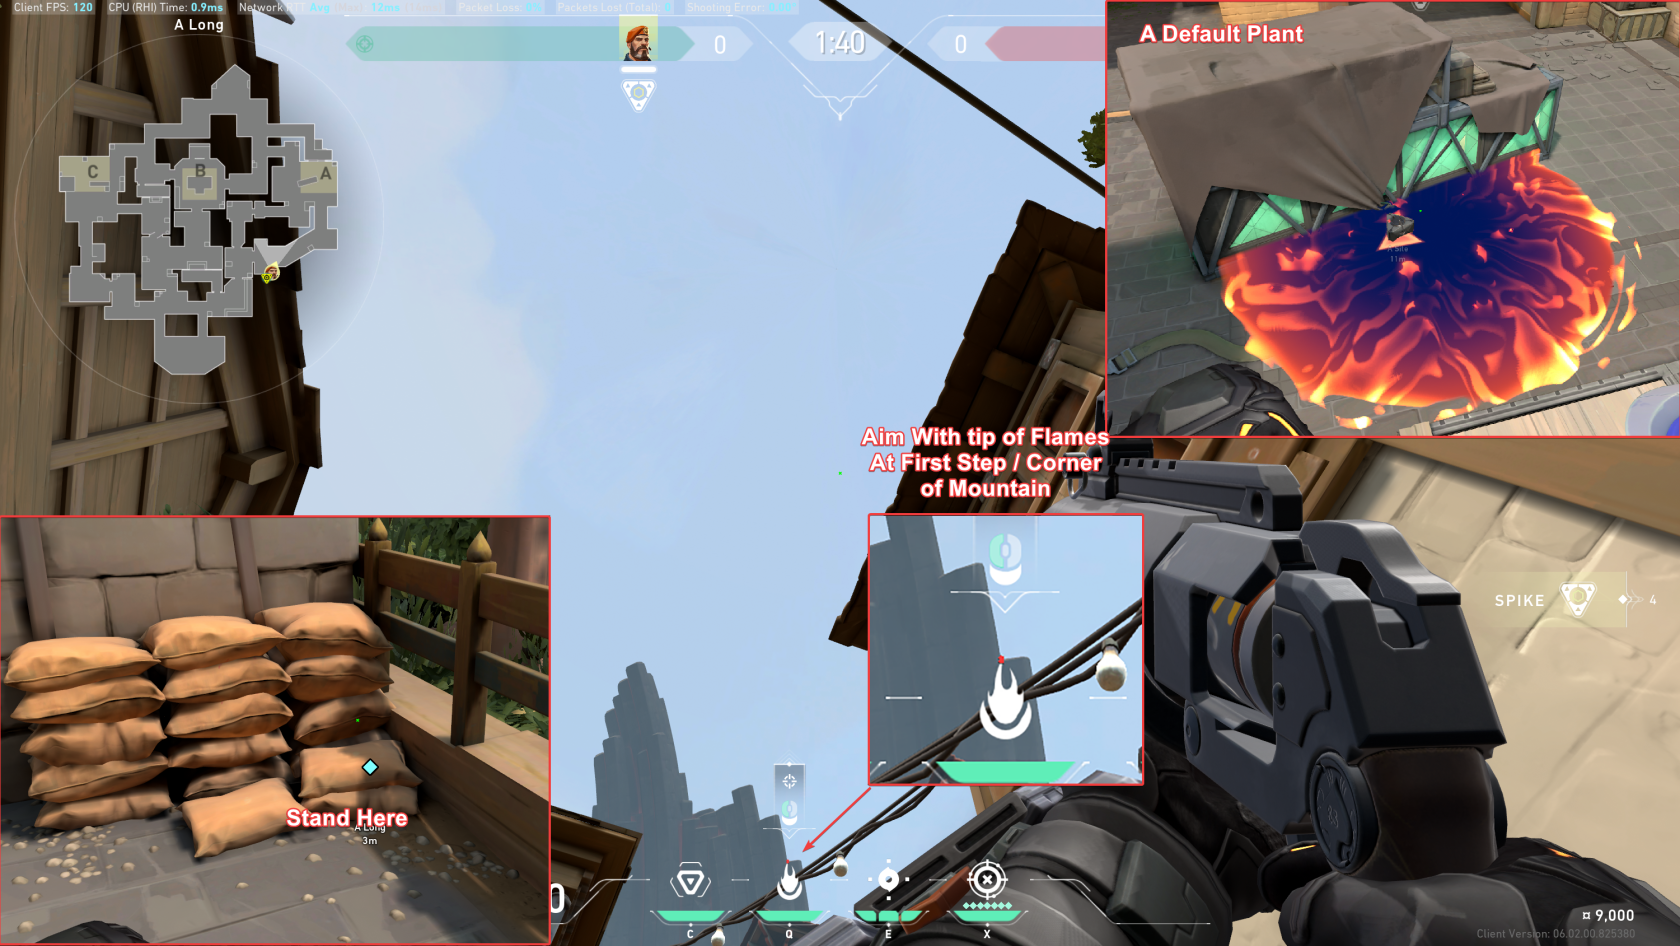
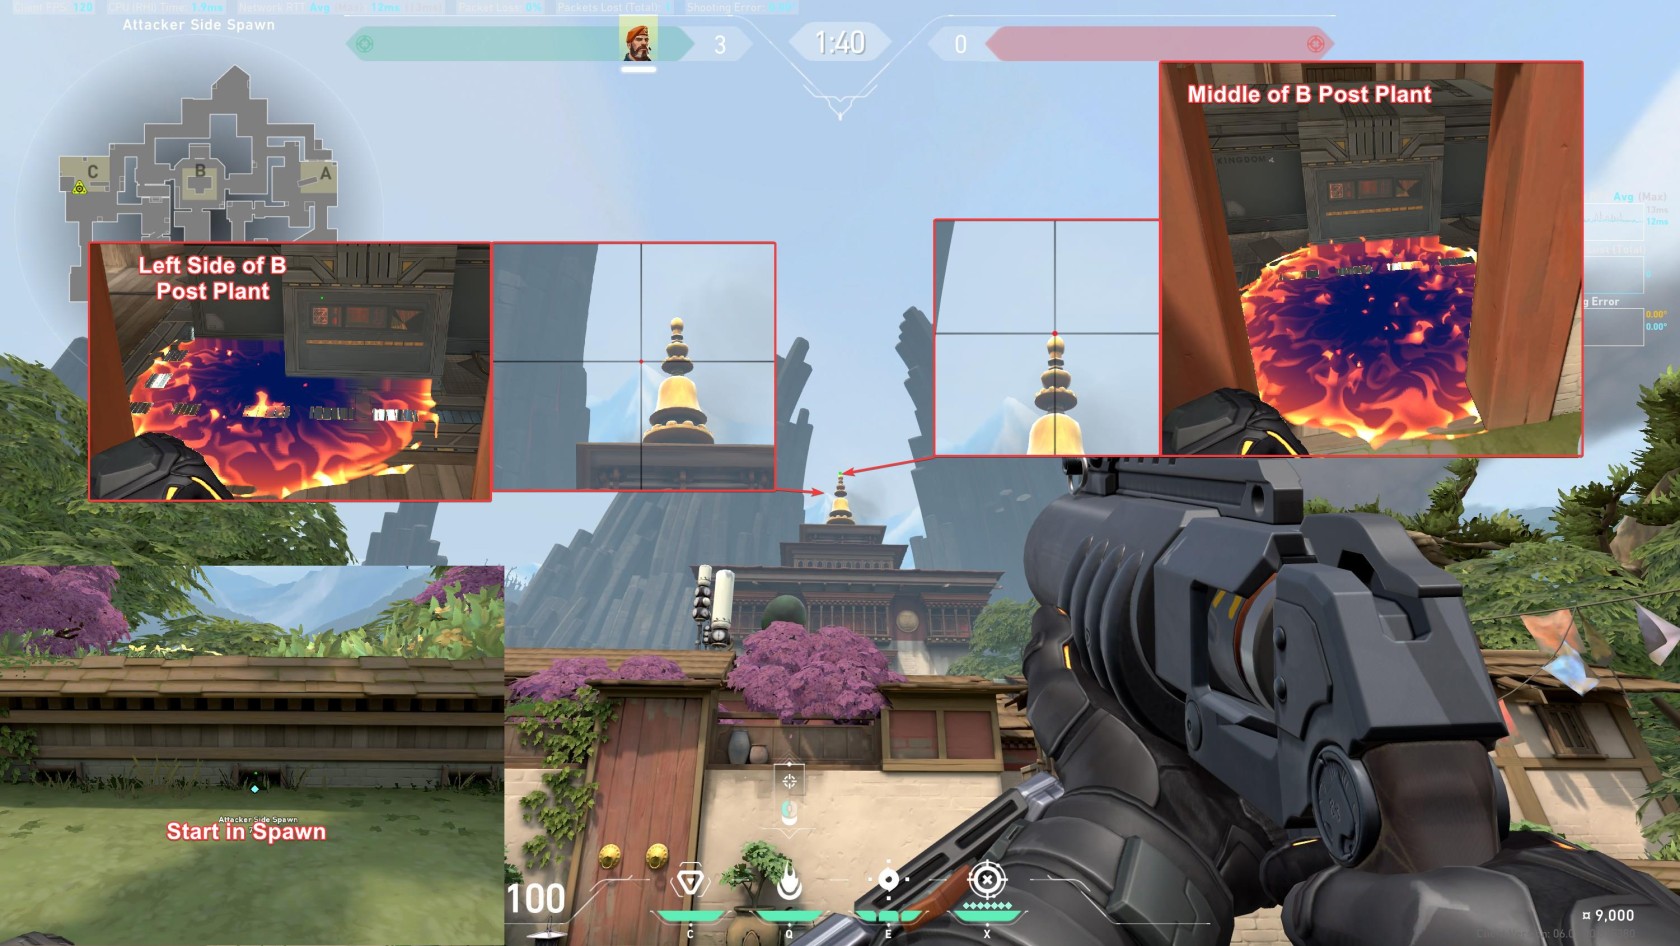
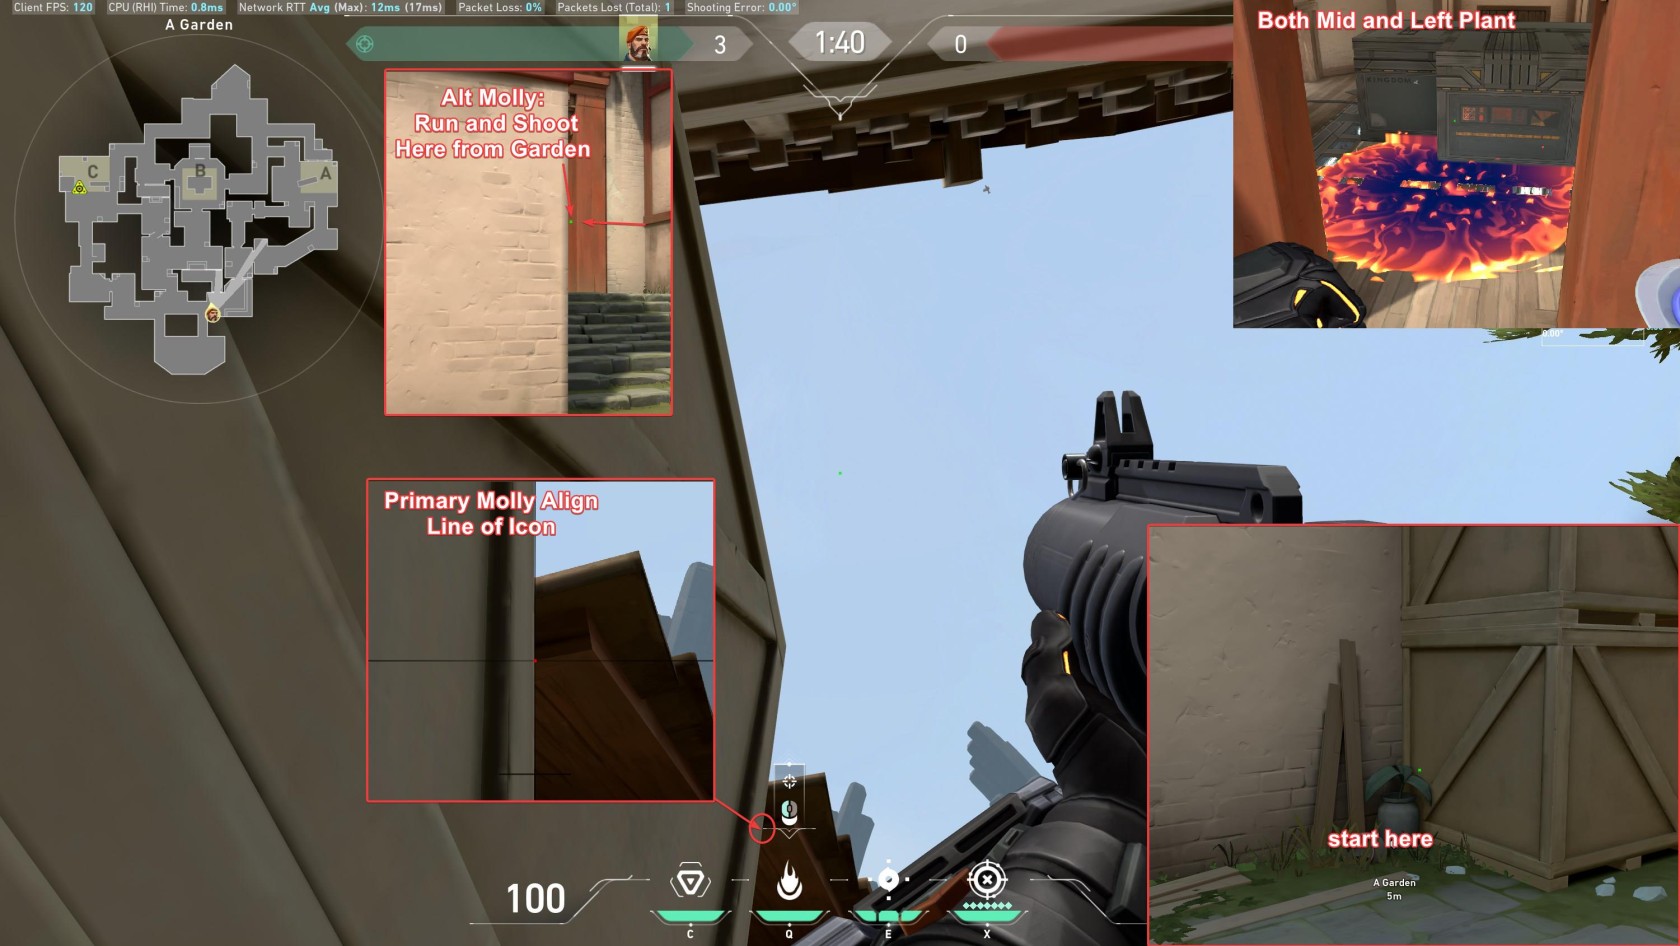
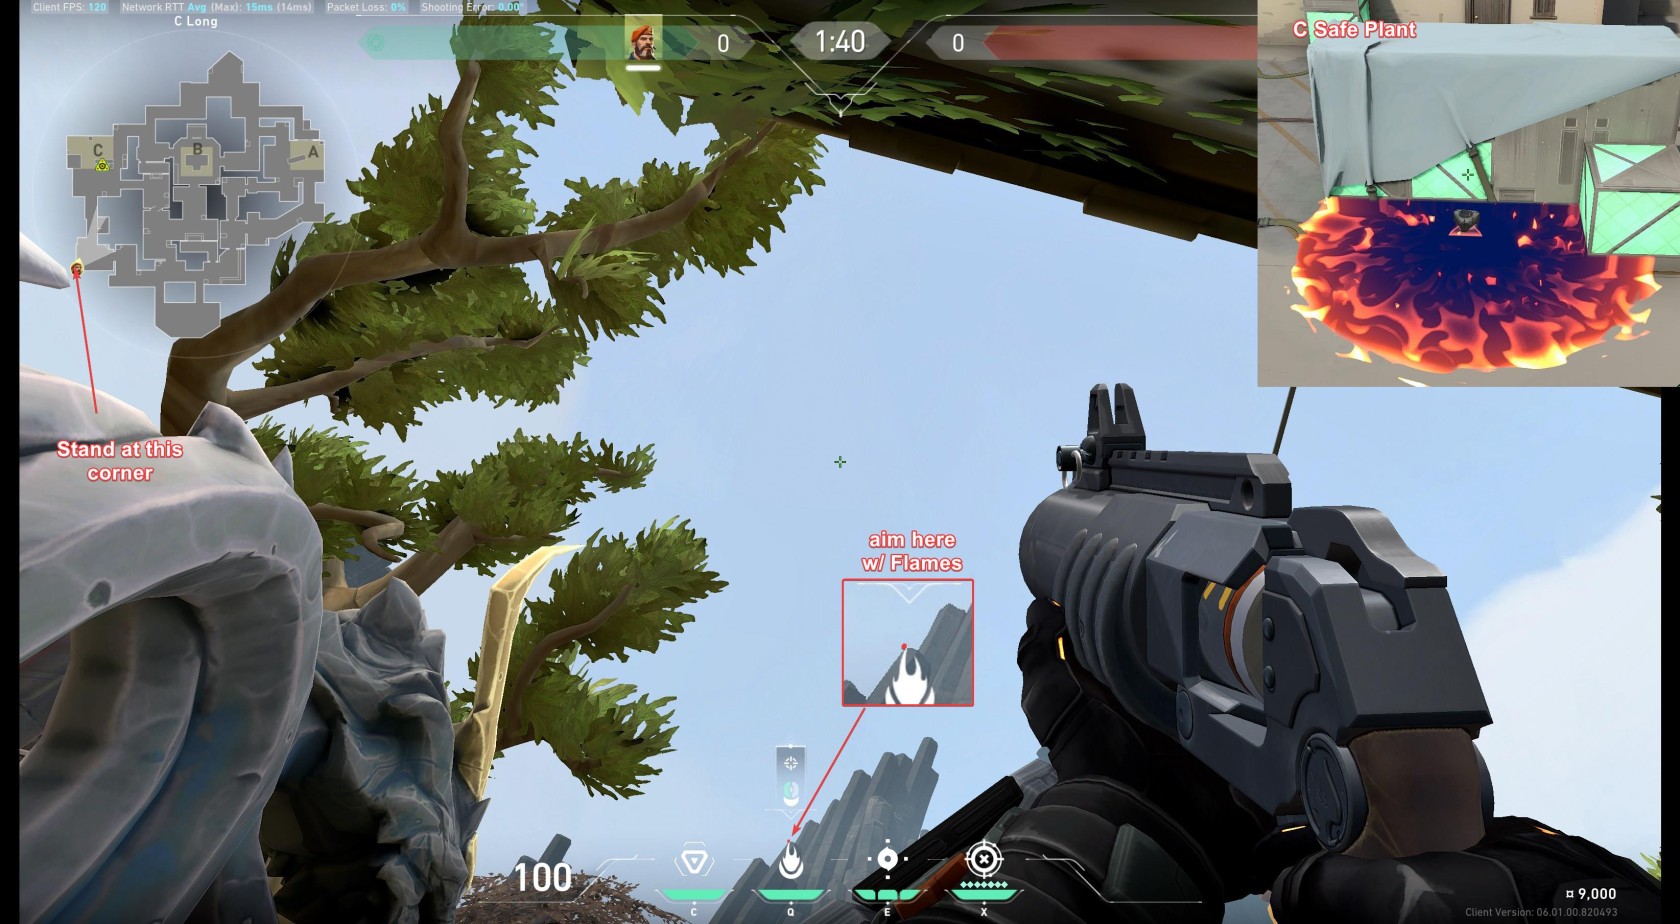
# Brimstone / KJ Ascent
[](https://wiki.stoplagging.com/uploads/images/gallery/2023-01/image-1674967115986.png)
[](https://wiki.stoplagging.com/uploads/images/gallery/2023-01/image-1674967033433.png)
[](https://wiki.stoplagging.com/uploads/images/gallery/2023-01/image-1674967332588.png)
[](https://wiki.stoplagging.com/uploads/images/gallery/2023-03/image-1678076976698.jpg)
[](https://wiki.stoplagging.com/uploads/images/gallery/2023-06/azlzg9uozd.png)
[](https://wiki.stoplagging.com/uploads/images/gallery/2023-06/3ct39w4gv2.png)
# Brimstone Fracture Lineups
##### Molly B Default From B Long near T Spawn
[](https://wiki.stoplagging.com/uploads/images/gallery/2023-01/image-1674637349666.png)
##### Molly B Default From Arcade
[](https://wiki.stoplagging.com/uploads/images/gallery/2023-01/image-1674637351232.png)
##### Molly B Default From Arcade (Further Back)
[](https://wiki.stoplagging.com/uploads/images/gallery/2023-01/image-1674637775098.png)
##### Molly A From A Main
[](https://wiki.stoplagging.com/uploads/images/gallery/2023-01/image-1674638170917.png)
##### Molly A From Sands
[](https://wiki.stoplagging.com/uploads/images/gallery/2023-01/image-1674638460949.png)
##### Molly A From T Spawn
[](https://wiki.stoplagging.com/uploads/images/gallery/2023-01/image-1674638970866.png)
##### Molly A From Drop
[](https://wiki.stoplagging.com/uploads/images/gallery/2023-02/image-1675839004104.png)
# Viper Lineups Pearl
##### Snake Bite B Orange Box
[](https://wiki.stoplagging.com/uploads/images/gallery/2023-01/image-1674443692573.png)
Time to Land: ~5.37s
##### Snake Bite B Default
[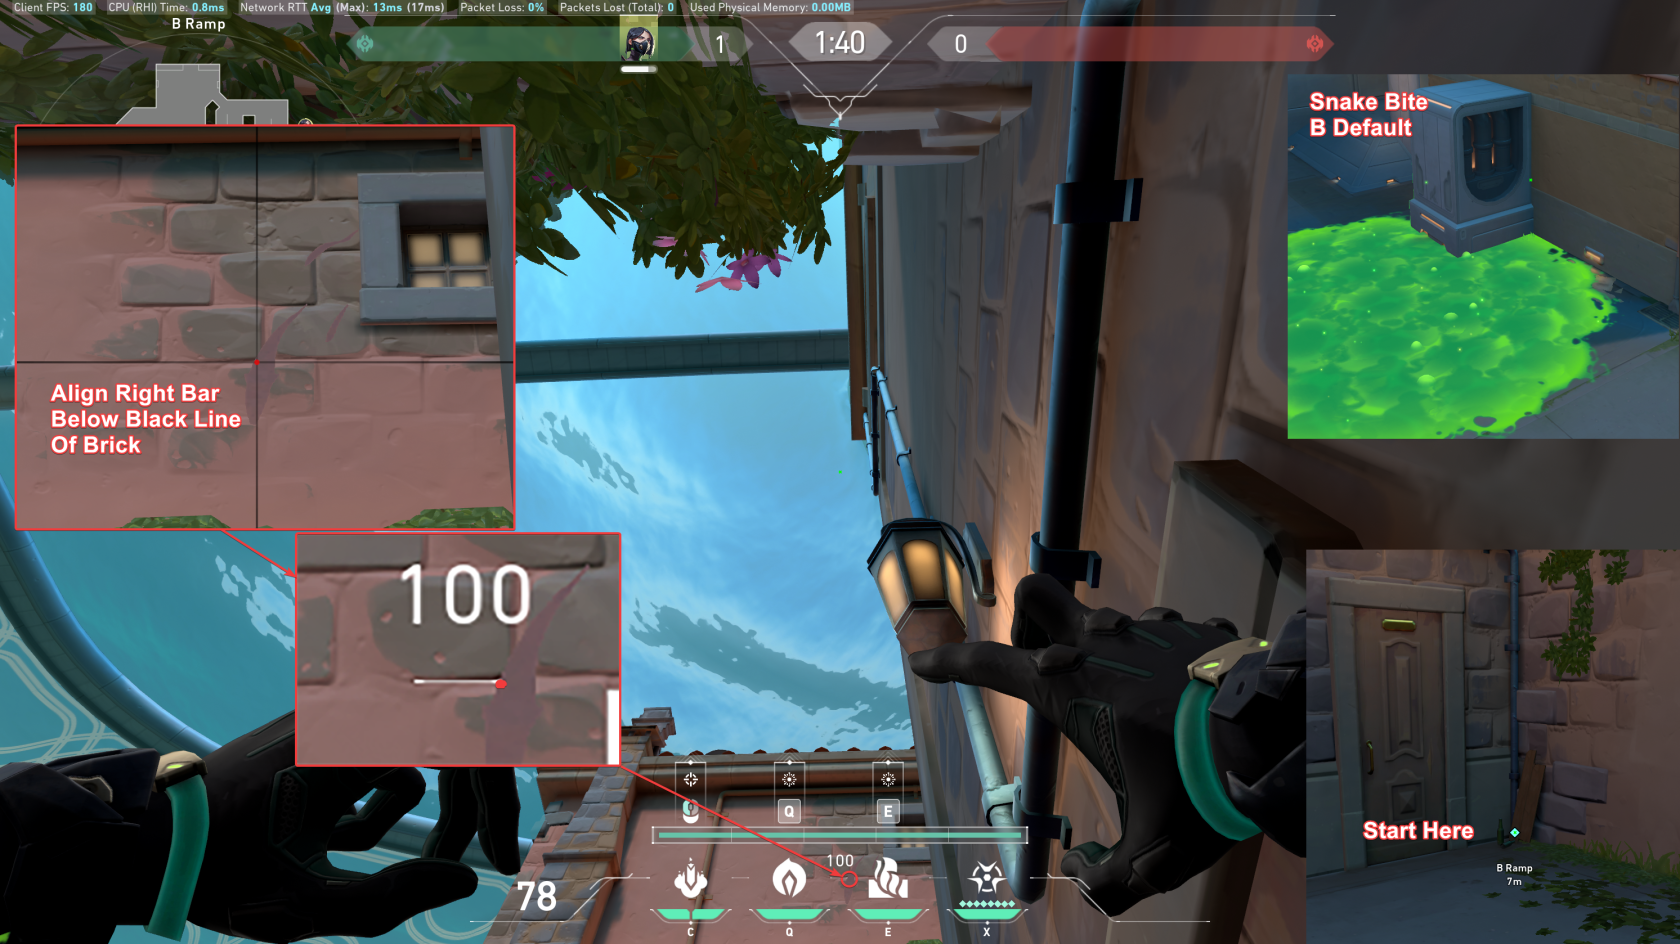](https://wiki.stoplagging.com/uploads/images/gallery/2023-01/image-1674442940355.png)
Time to Land: ~5.31s
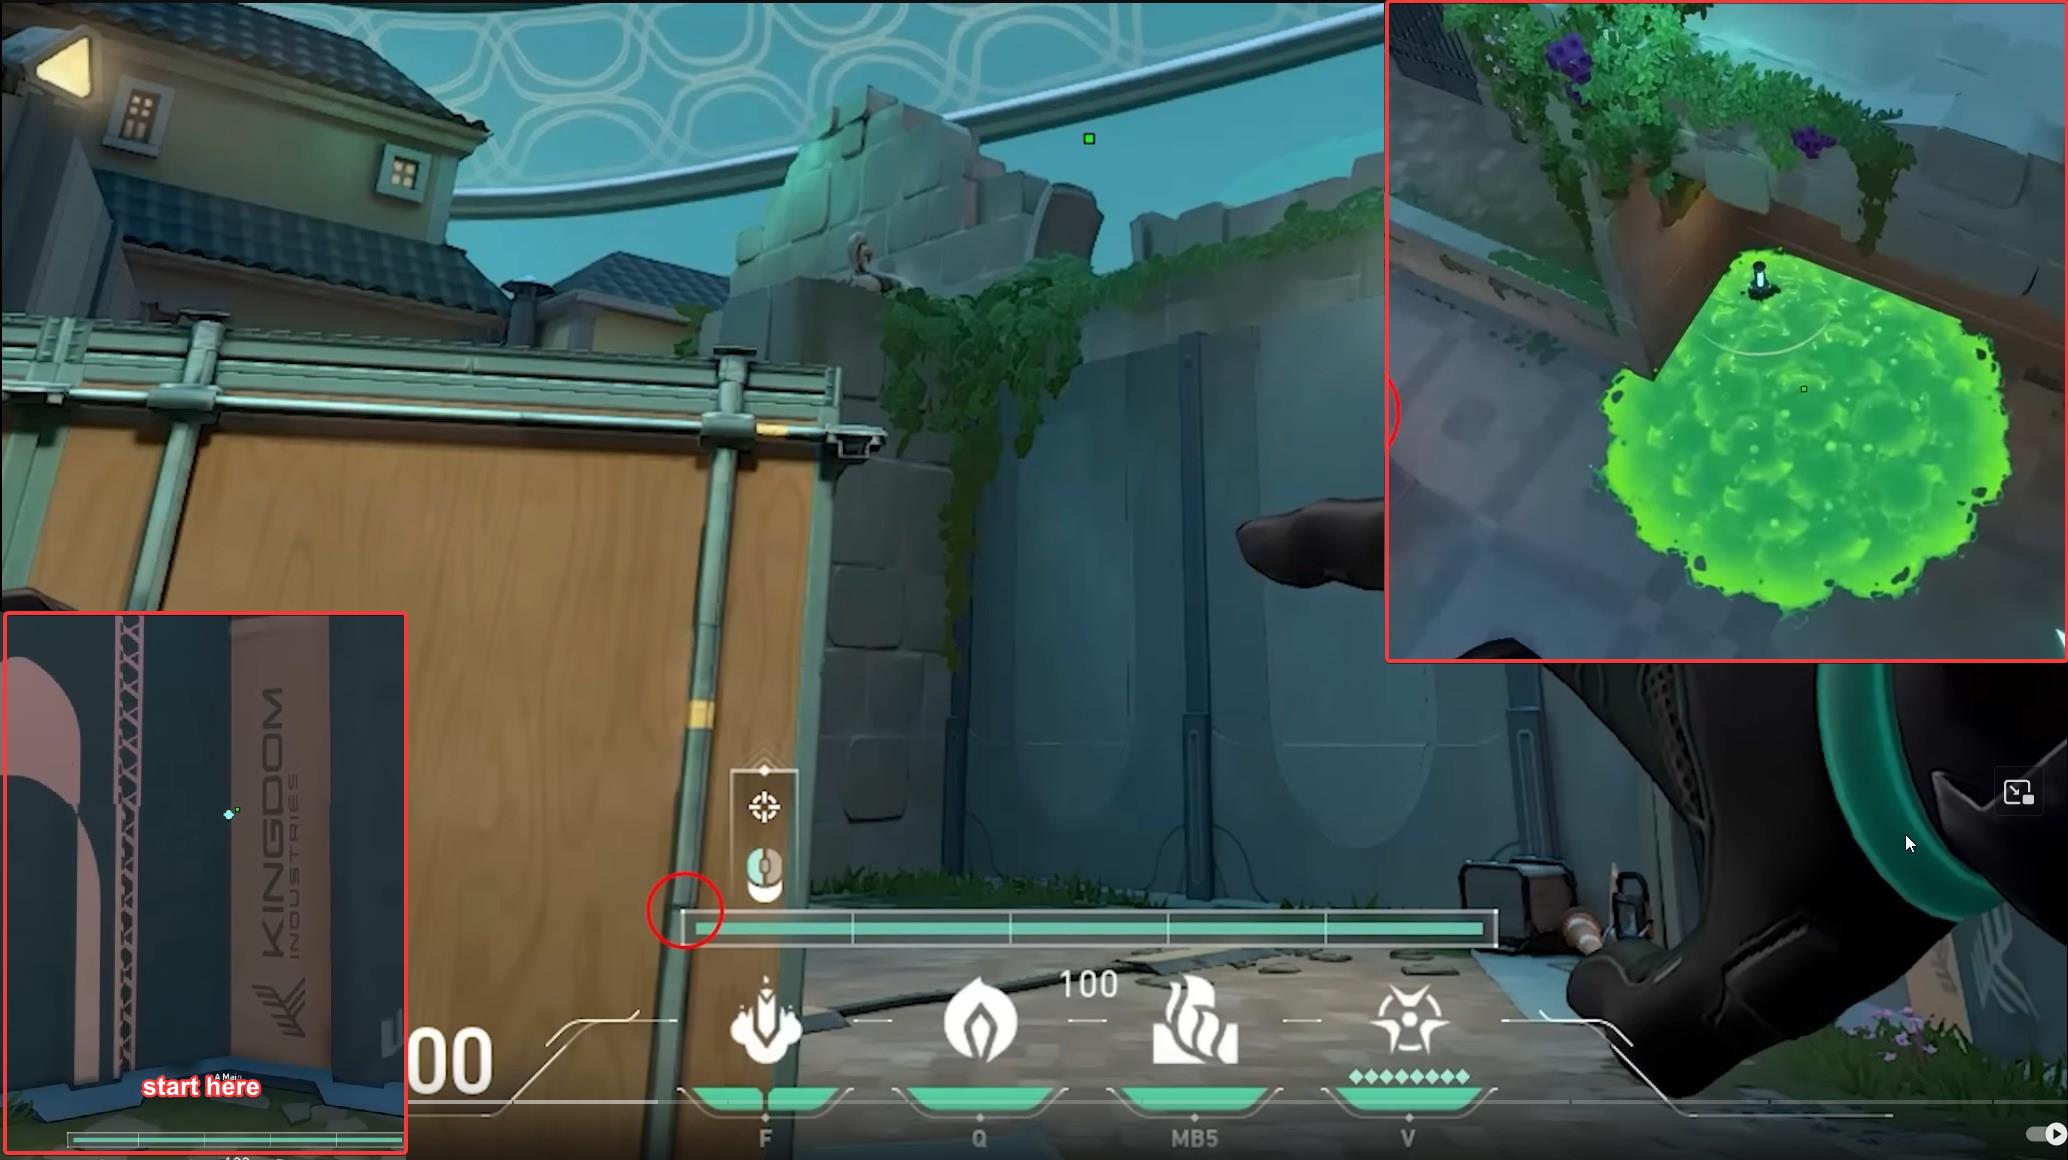
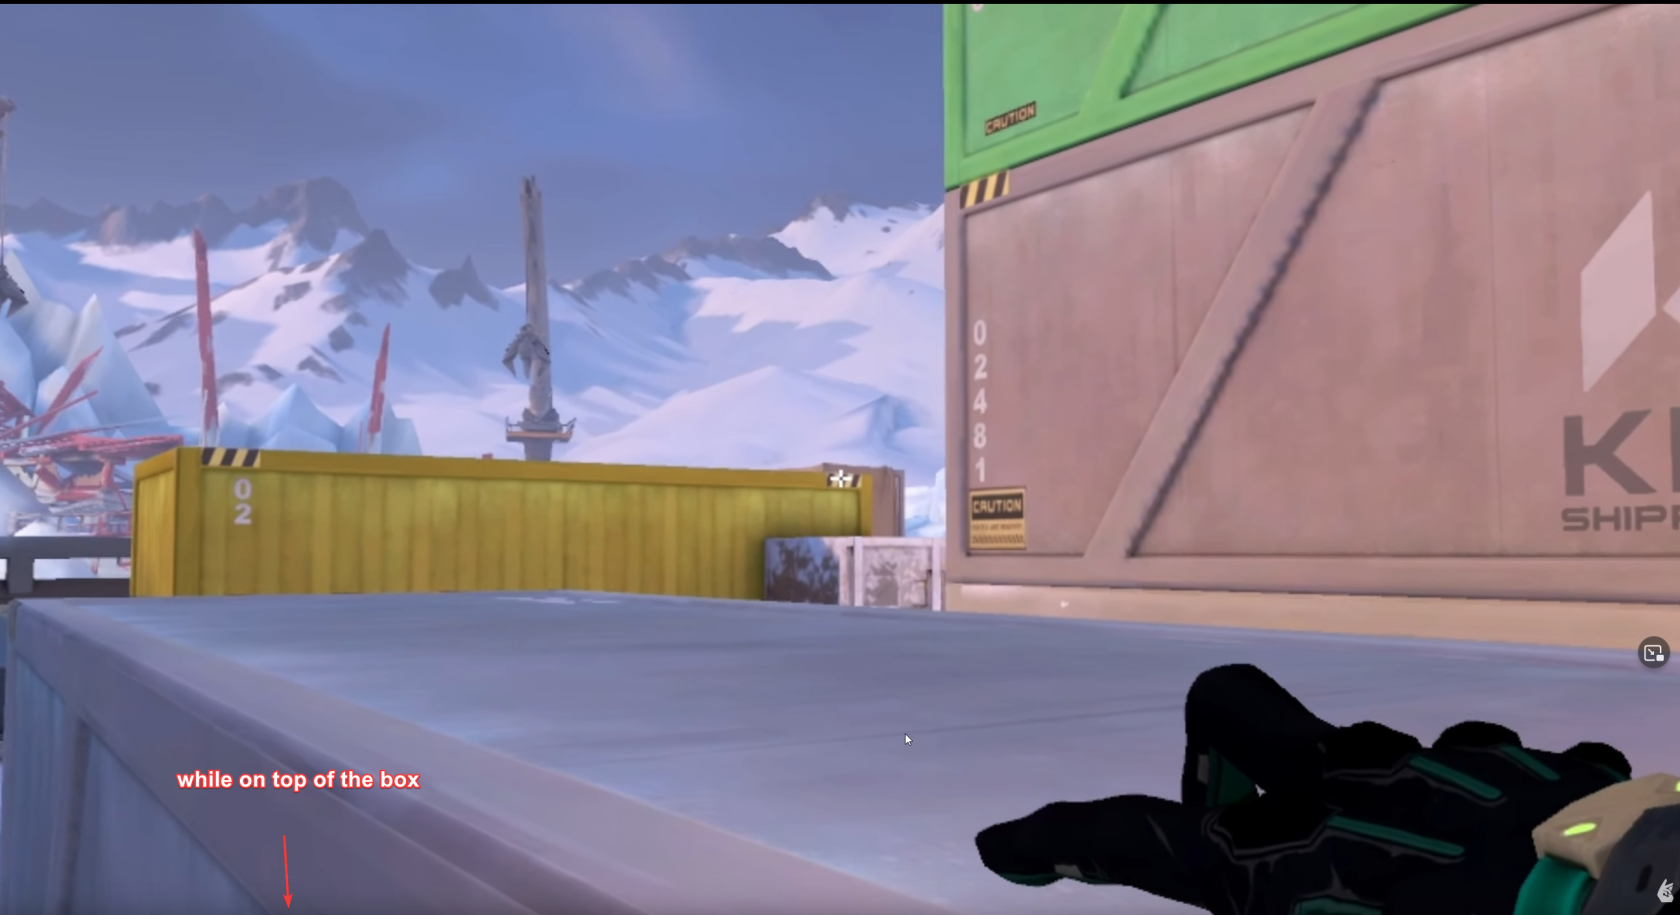
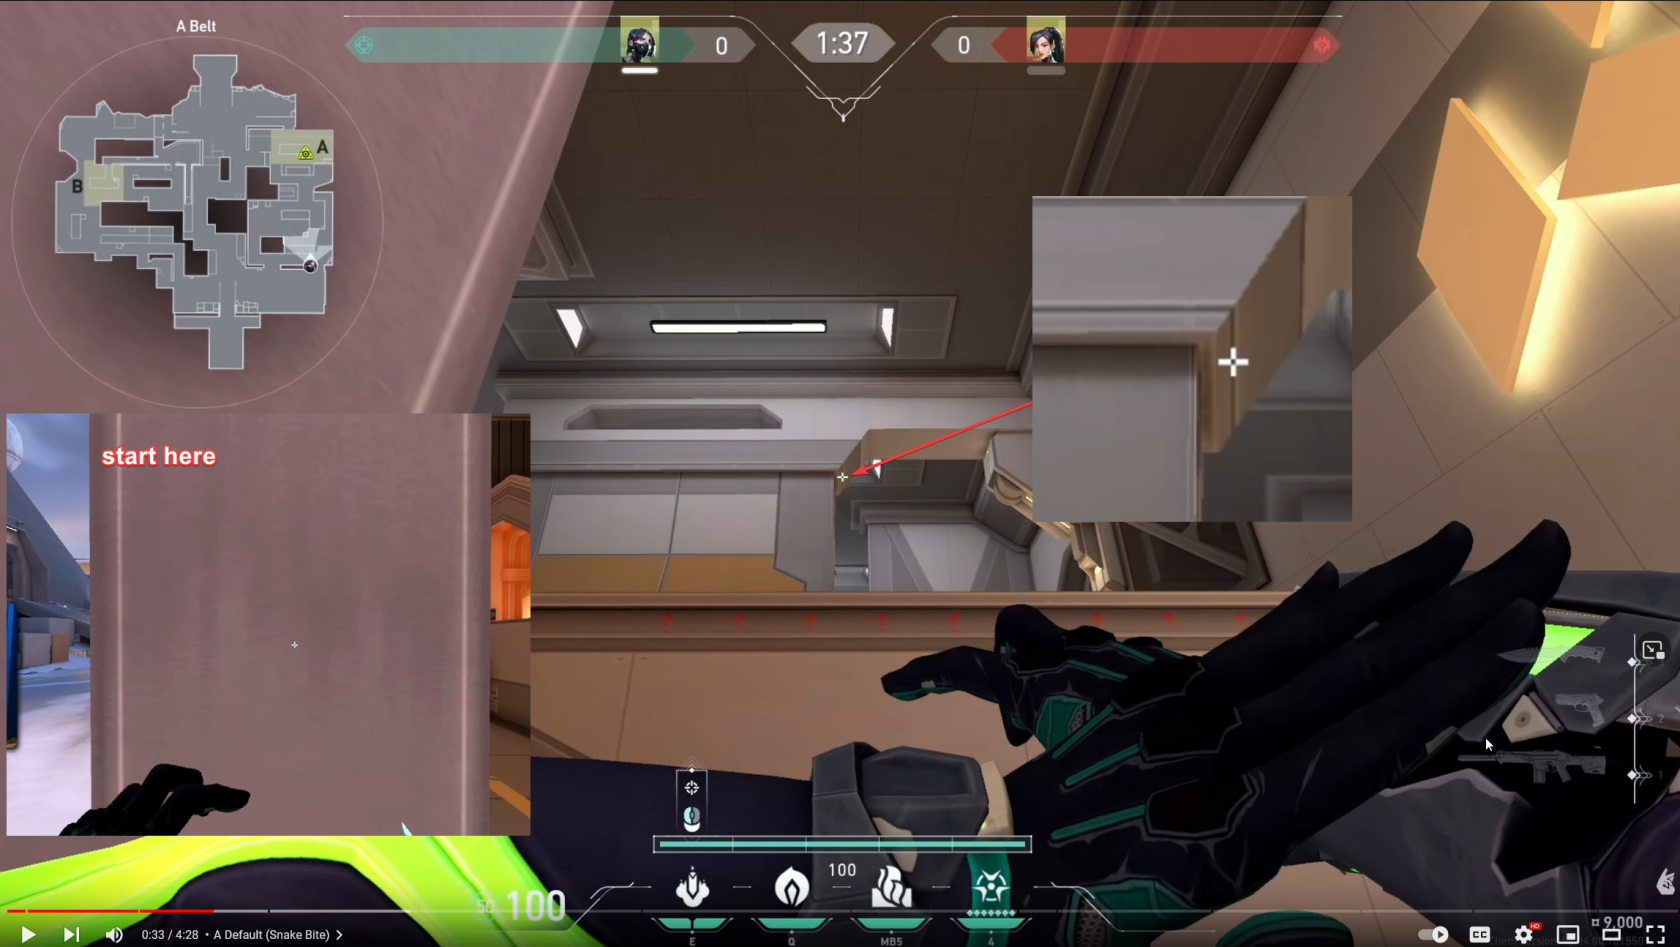
##### Snake Bite A Default
[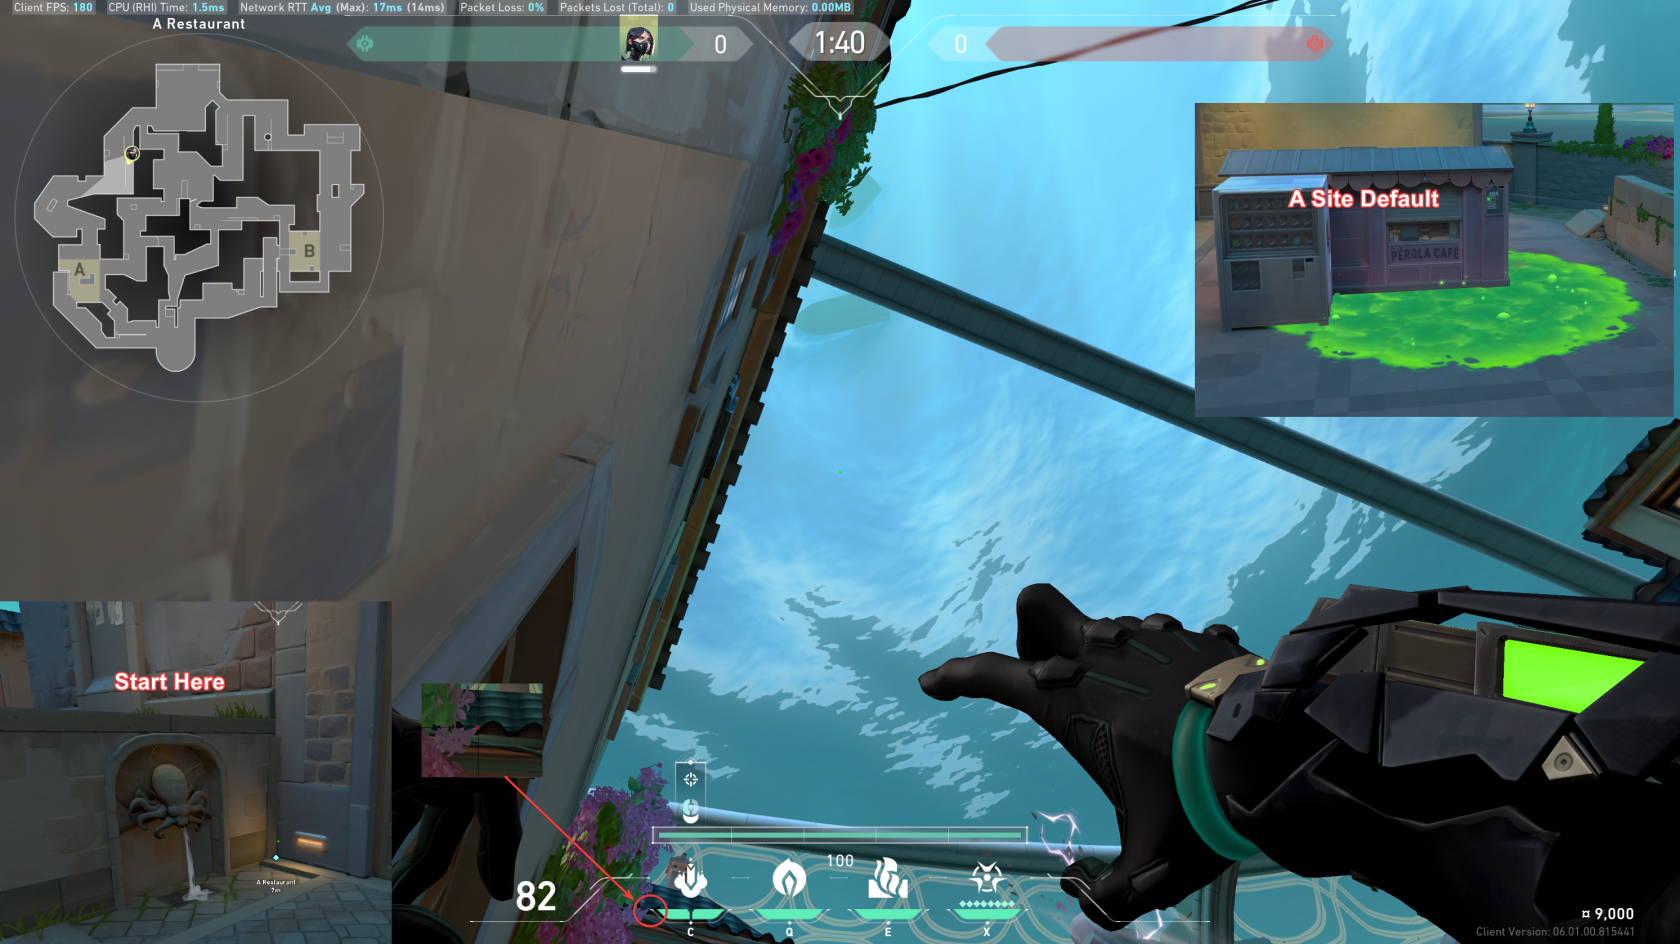](https://wiki.stoplagging.com/uploads/images/gallery/2023-01/image-1674439385886.png)
Time to Land: ~5.25s
##### Snake Bite A Default (Version 2)
[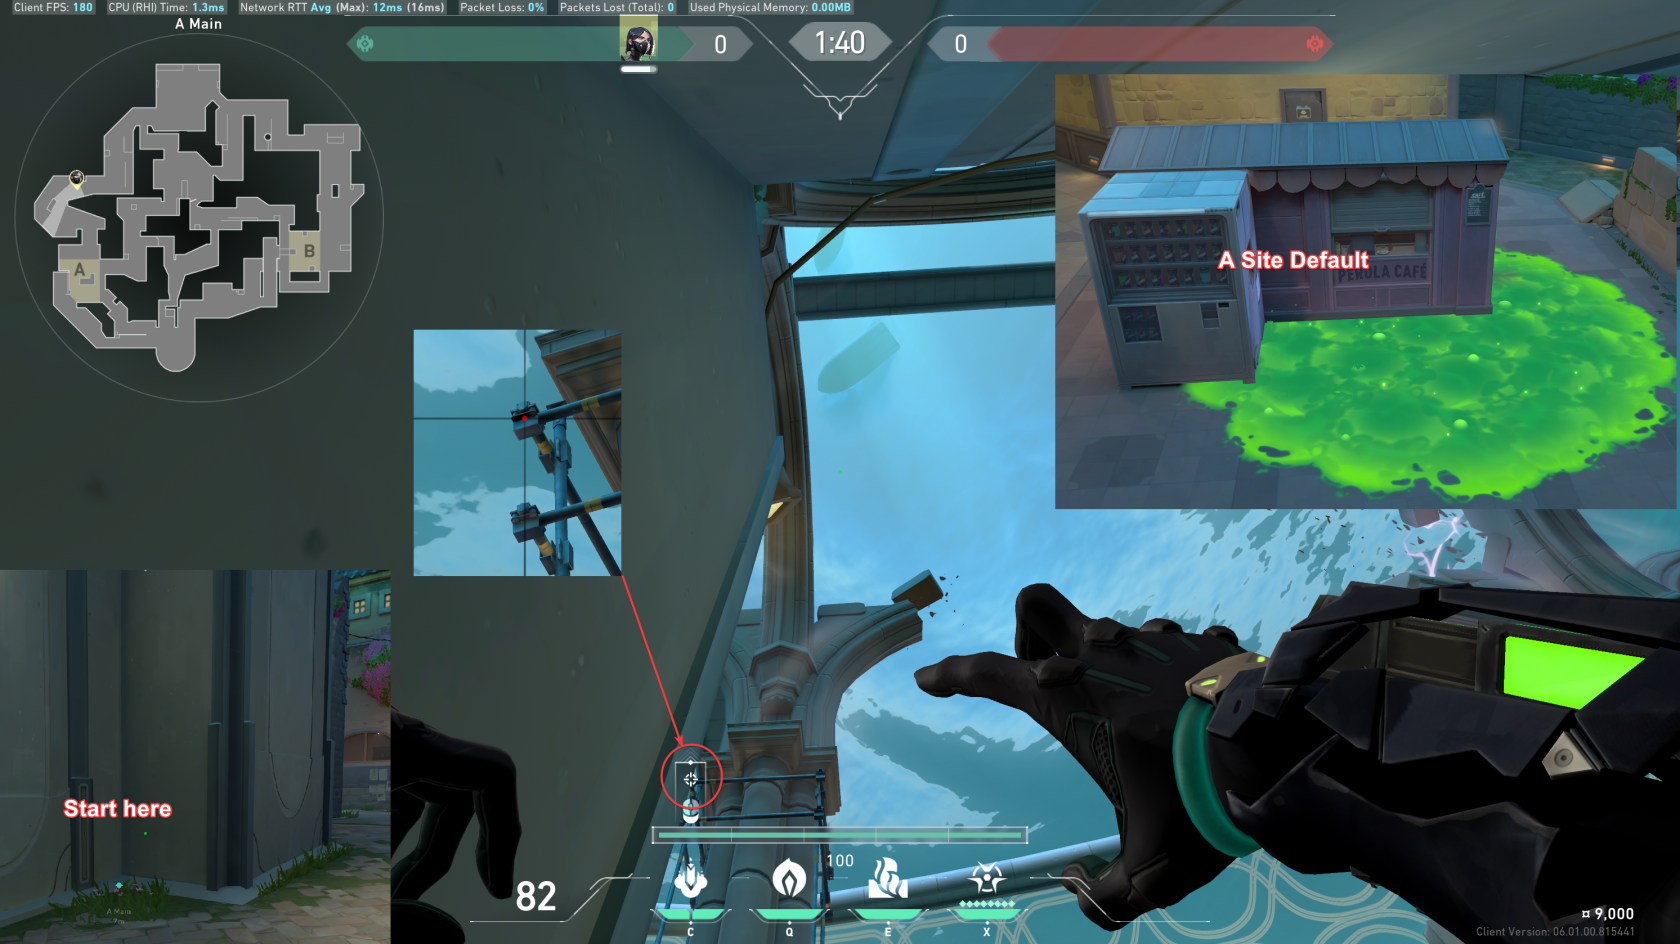](https://wiki.stoplagging.com/uploads/images/gallery/2023-01/image-1674439729032.png)
Time to Land: 5.20s
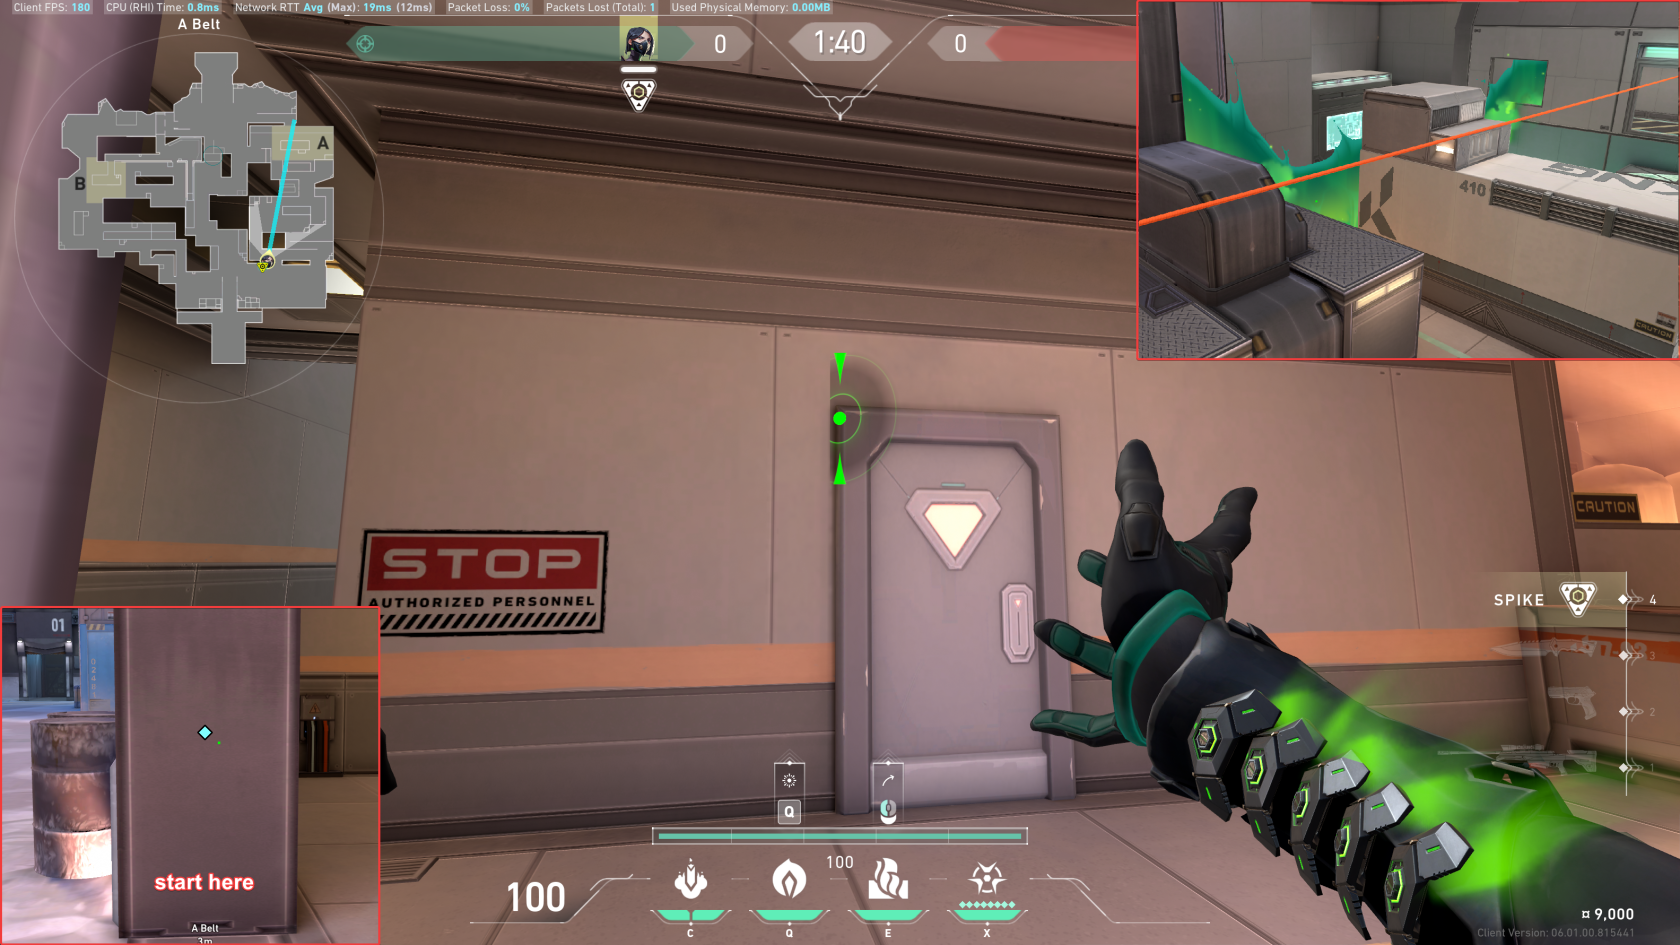
##### Snake Bite A Cubby 5s
[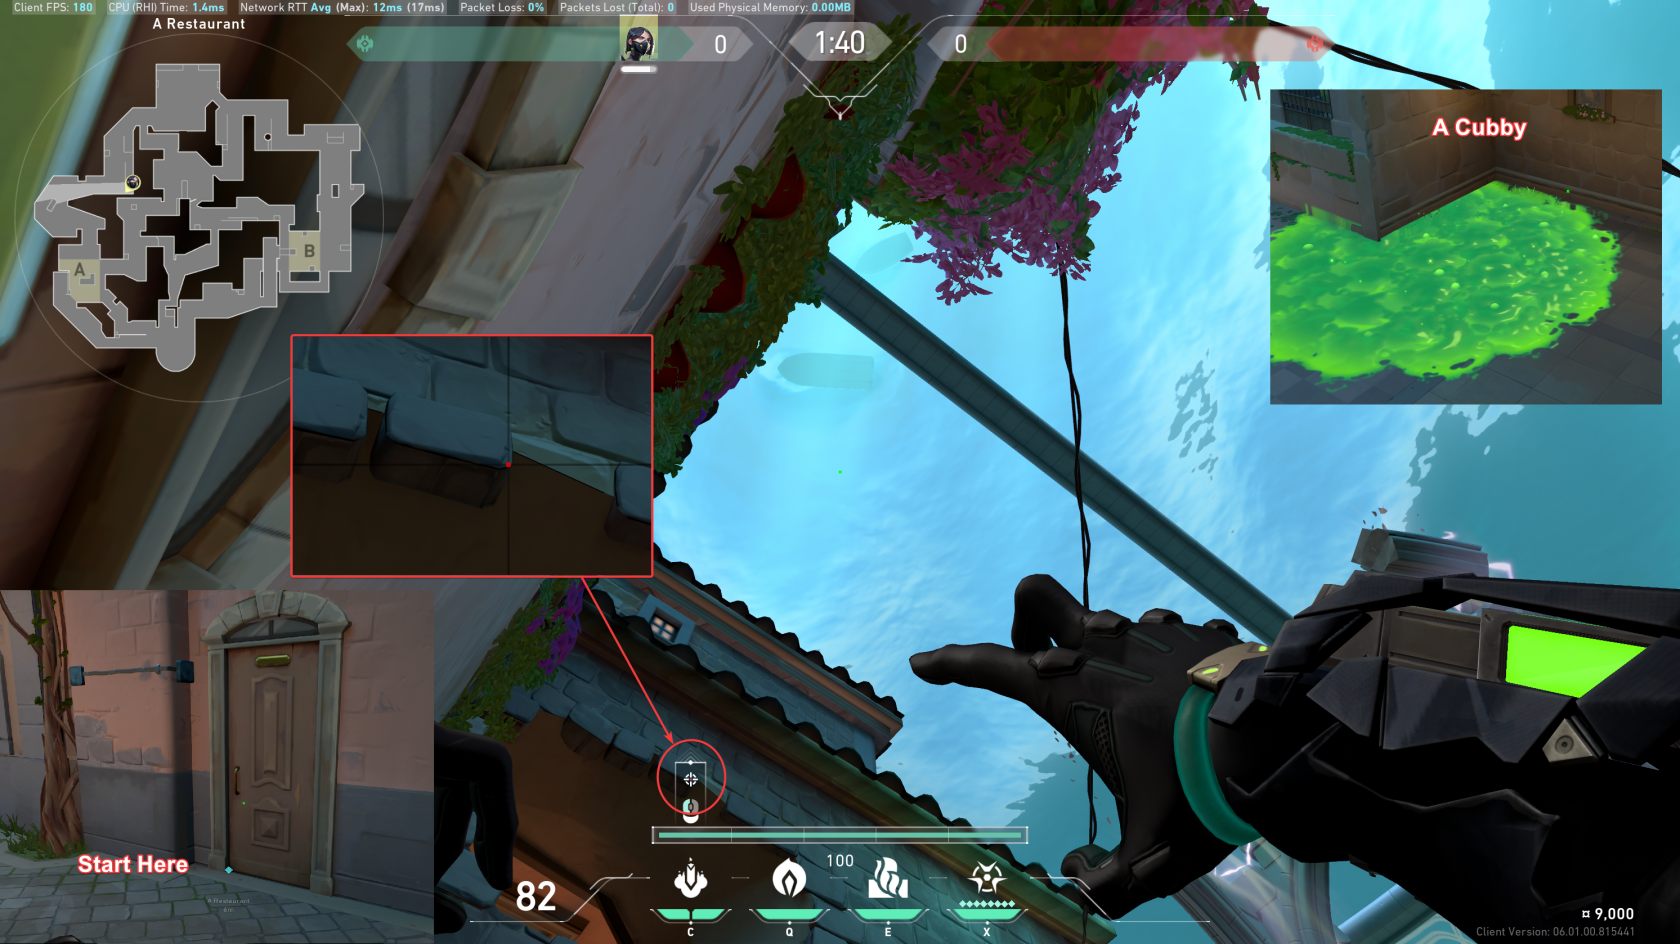](https://wiki.stoplagging.com/uploads/images/gallery/2023-01/image-1674440132388.png)
Time to Land: 05.12s
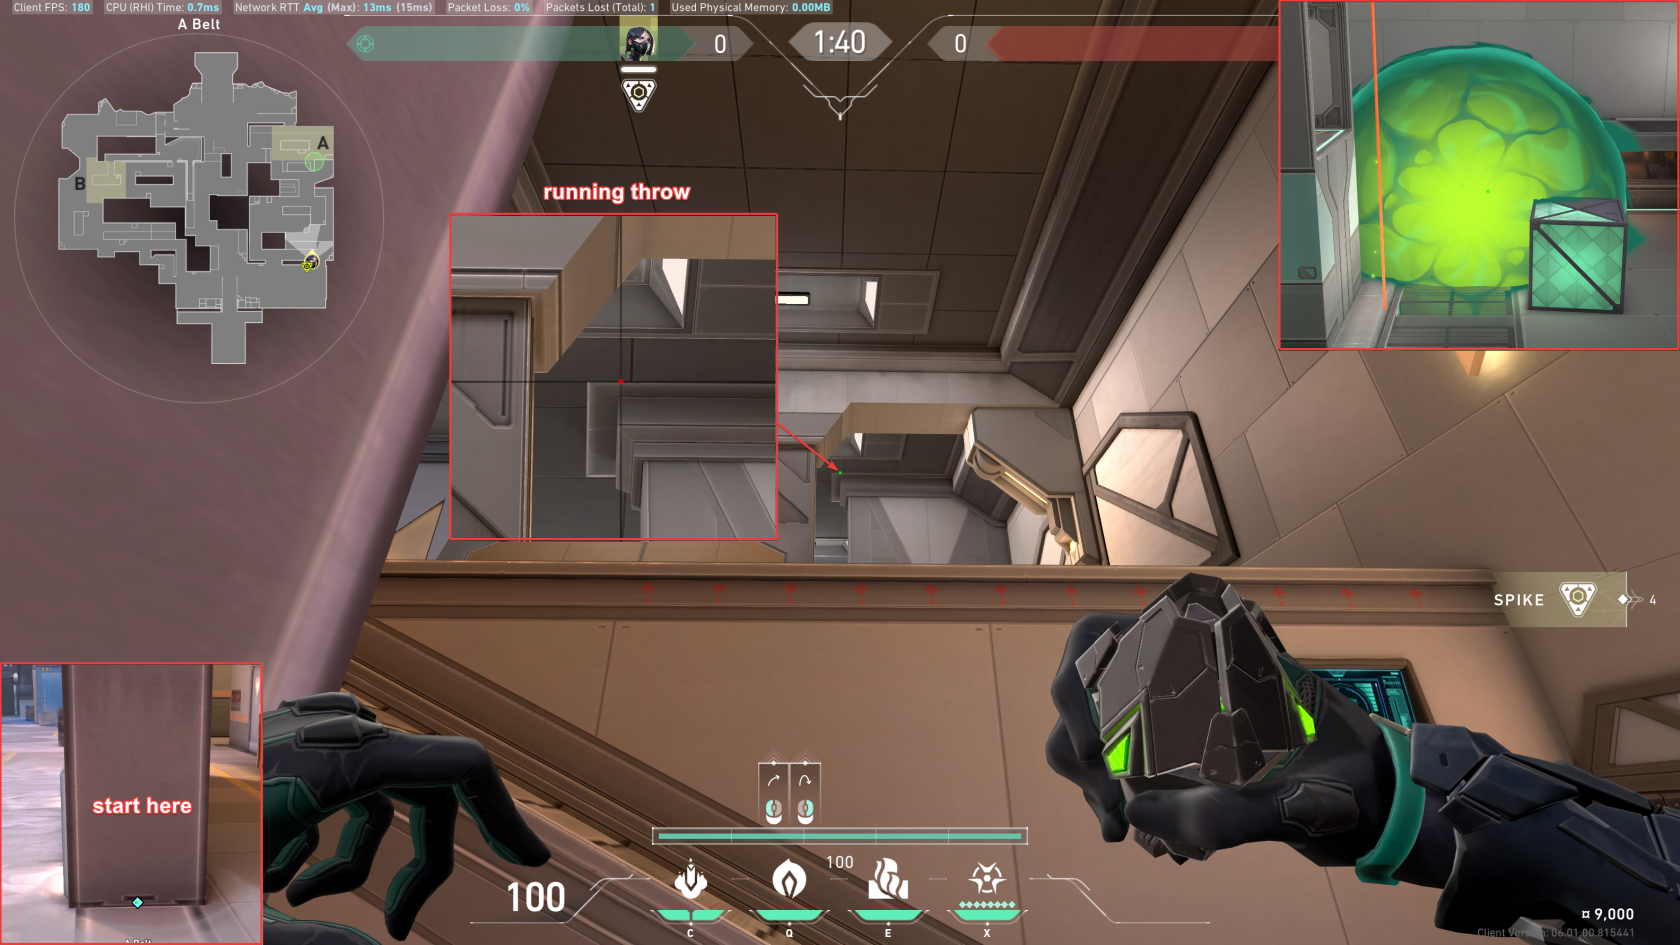
##### Snake Bite A Cubby Fast 2s
[](https://wiki.stoplagging.com/uploads/images/gallery/2023-05/viperfastcubby2smolly.jpg)
#### A Attack Setup
[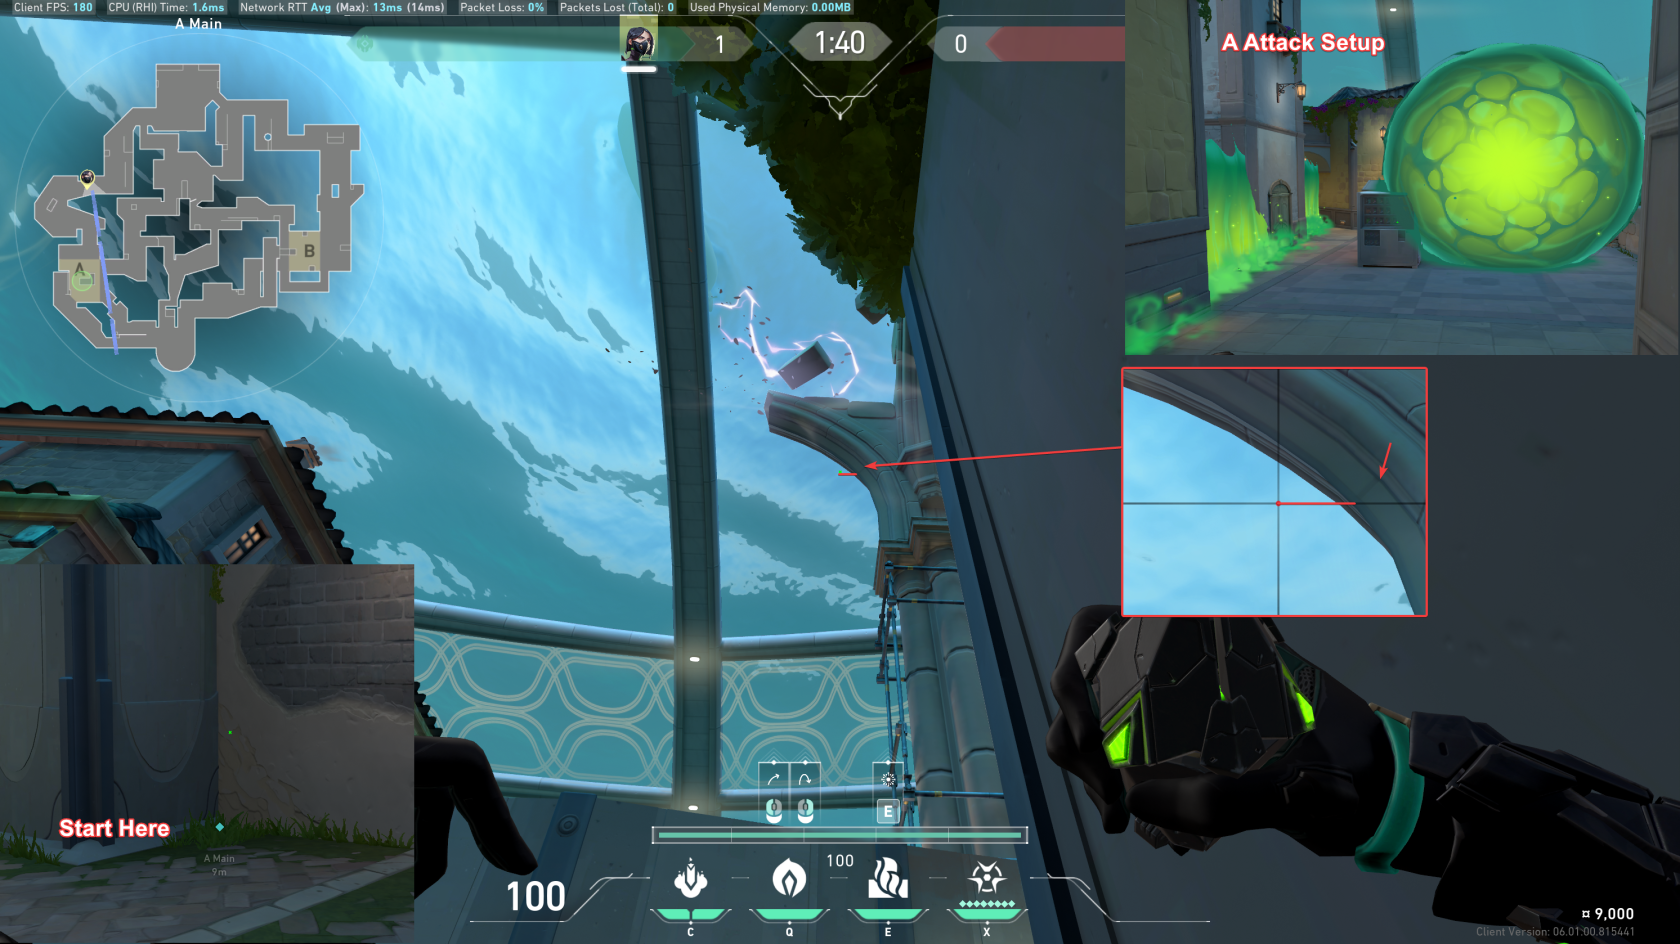](https://wiki.stoplagging.com/uploads/images/gallery/2023-01/image-1674440908449.png)
##### Art One Way Smoke Defense
[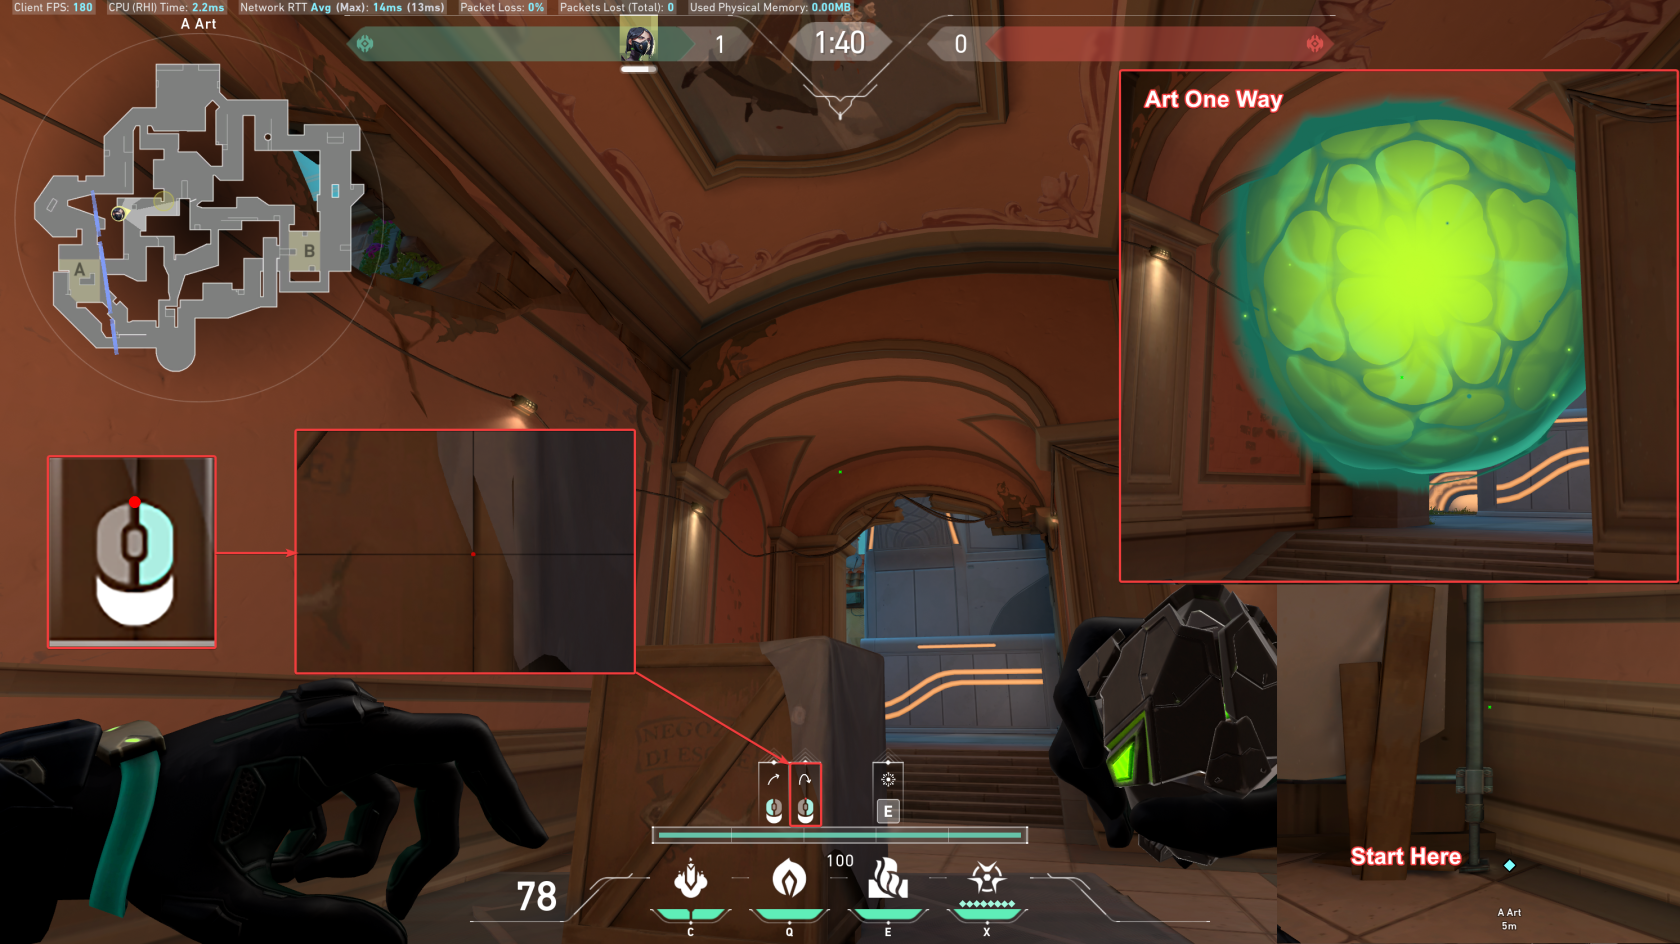](https://wiki.stoplagging.com/uploads/images/gallery/2023-01/image-1674442138217.png)
# Viper Lineups Split
#### A Default Mollys
[](https://wiki.stoplagging.com/uploads/images/gallery/2023-02/image-1675487511853.png)
[](https://wiki.stoplagging.com/uploads/images/gallery/2023-02/image-1675487484309.png)
#### Post A Plant Variations
[](https://wiki.stoplagging.com/uploads/images/gallery/2023-01/image-1674963953037.png)
[](https://wiki.stoplagging.com/uploads/images/gallery/2023-01/image-1674963984113.png)
# Viper Icebox
[https://www.reddit.com/r/VALORANT/comments/ugkxgm/viper\_mains\_and\_flexers\_mustwatch\_best\_icebox\_b/](https://www.reddit.com/r/VALORANT/comments/ugkxgm/viper_mains_and_flexers_mustwatch_best_icebox_b/)
##### B Mollys
[](https://wiki.stoplagging.com/uploads/images/gallery/2023-01/image-1674960307246.png)
[](https://wiki.stoplagging.com/uploads/images/gallery/2023-01/image-1674960299288.png)
##### A Default Molly
[](https://wiki.stoplagging.com/uploads/images/gallery/2023-01/image-1674960310698.png)
#### Attacking Wall A
[](https://wiki.stoplagging.com/uploads/images/gallery/2023-01/image-1675016723831.png)
##### Smoke Backsite A
[](https://wiki.stoplagging.com/uploads/images/gallery/2023-01/image-1675016959231.png)
##### Attacking Smoke Mid
[](https://wiki.stoplagging.com/uploads/images/gallery/2023-02/image-1676949912663.png)
##### Attacking Perfect Wall B
[](https://wiki.stoplagging.com/uploads/images/gallery/2023-01/image-1674971700820.png)
##### Defending Smoke B
[](https://wiki.stoplagging.com/uploads/images/gallery/2023-01/image-1675016048407.png)
# Killjoy Lotus
##### Sauce
Omen's also OP on lotus if someone took your KJ
[https://www.youtube.com/watch?v=cqhc4GyqK3A](https://www.youtube.com/watch?v=cqhc4GyqK3A)
## Setups
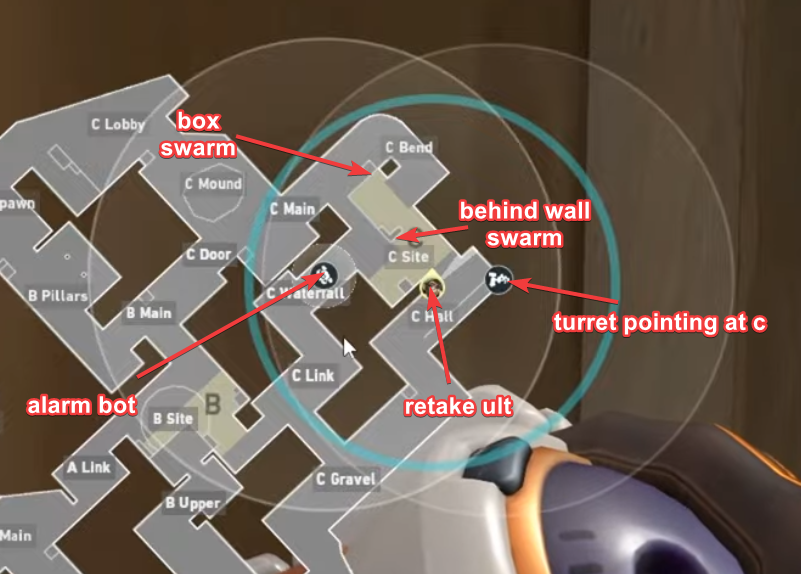
##### A Site Setups
Triangle = possible turret locations
Circle + Triangle = optimum position for when they retreat from swarm.
All Swarms are right clicks
[](https://wiki.stoplagging.com/uploads/images/gallery/2023-01/image-1674889896152.png)
[](https://wiki.stoplagging.com/uploads/images/gallery/2023-01/image-1674890658375.png)
For variation 2 play back elbow
##### A Retake Set up (Allows you to cover B)
[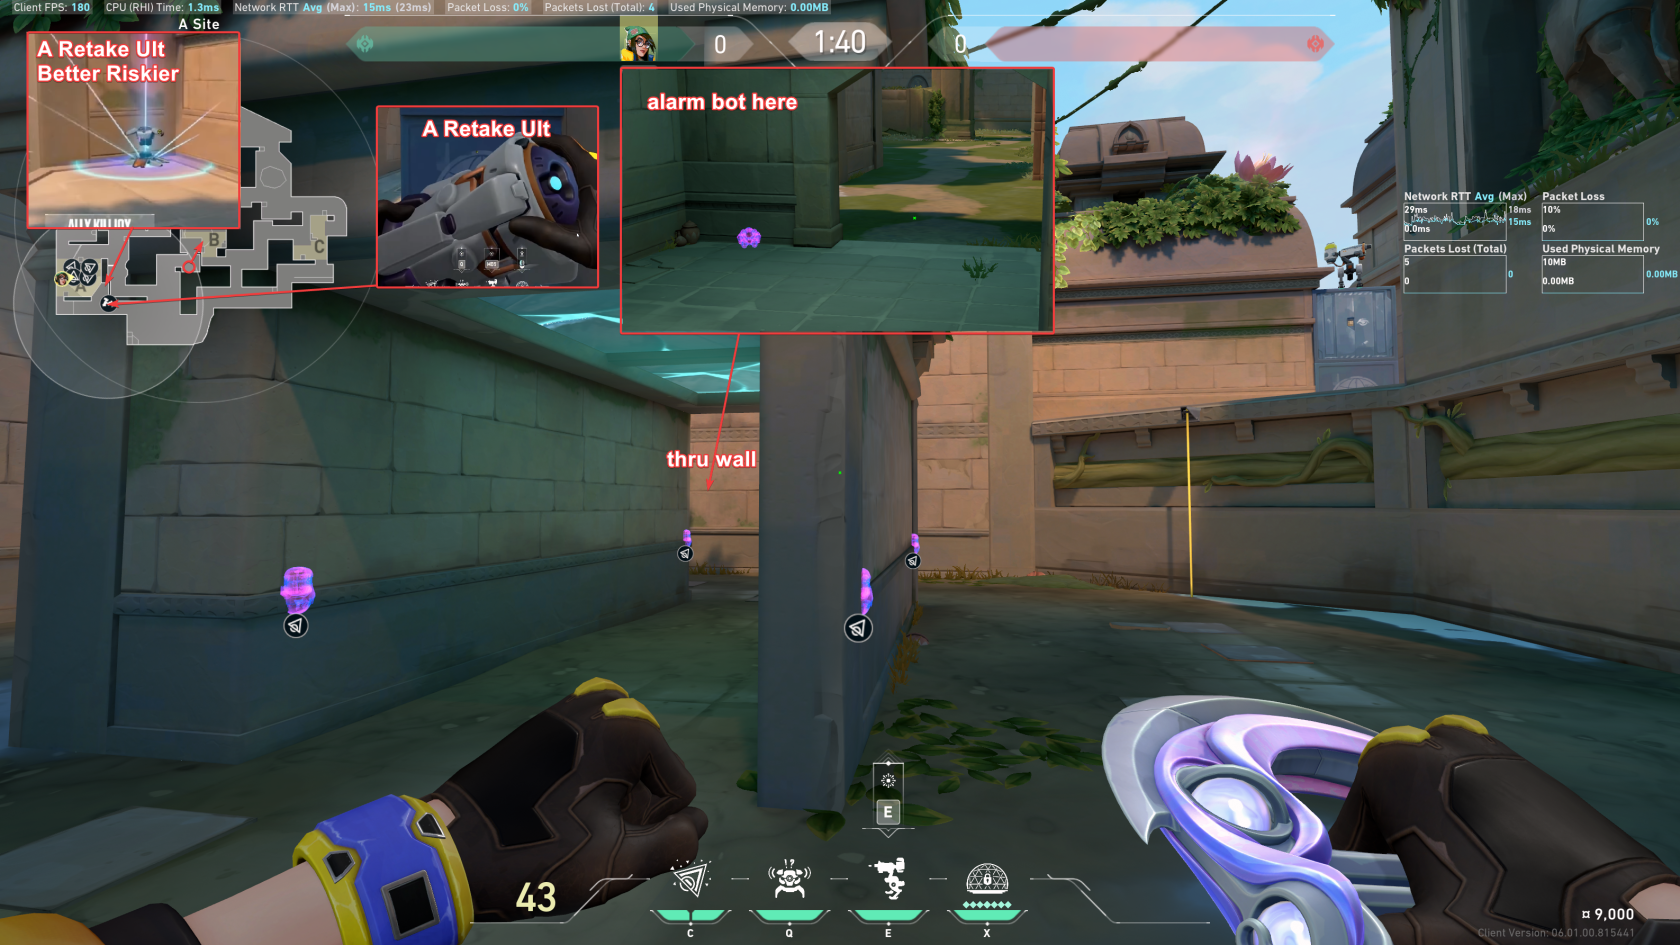](https://wiki.stoplagging.com/uploads/images/gallery/2023-01/image-1674891128720.png)
##### B Setup
[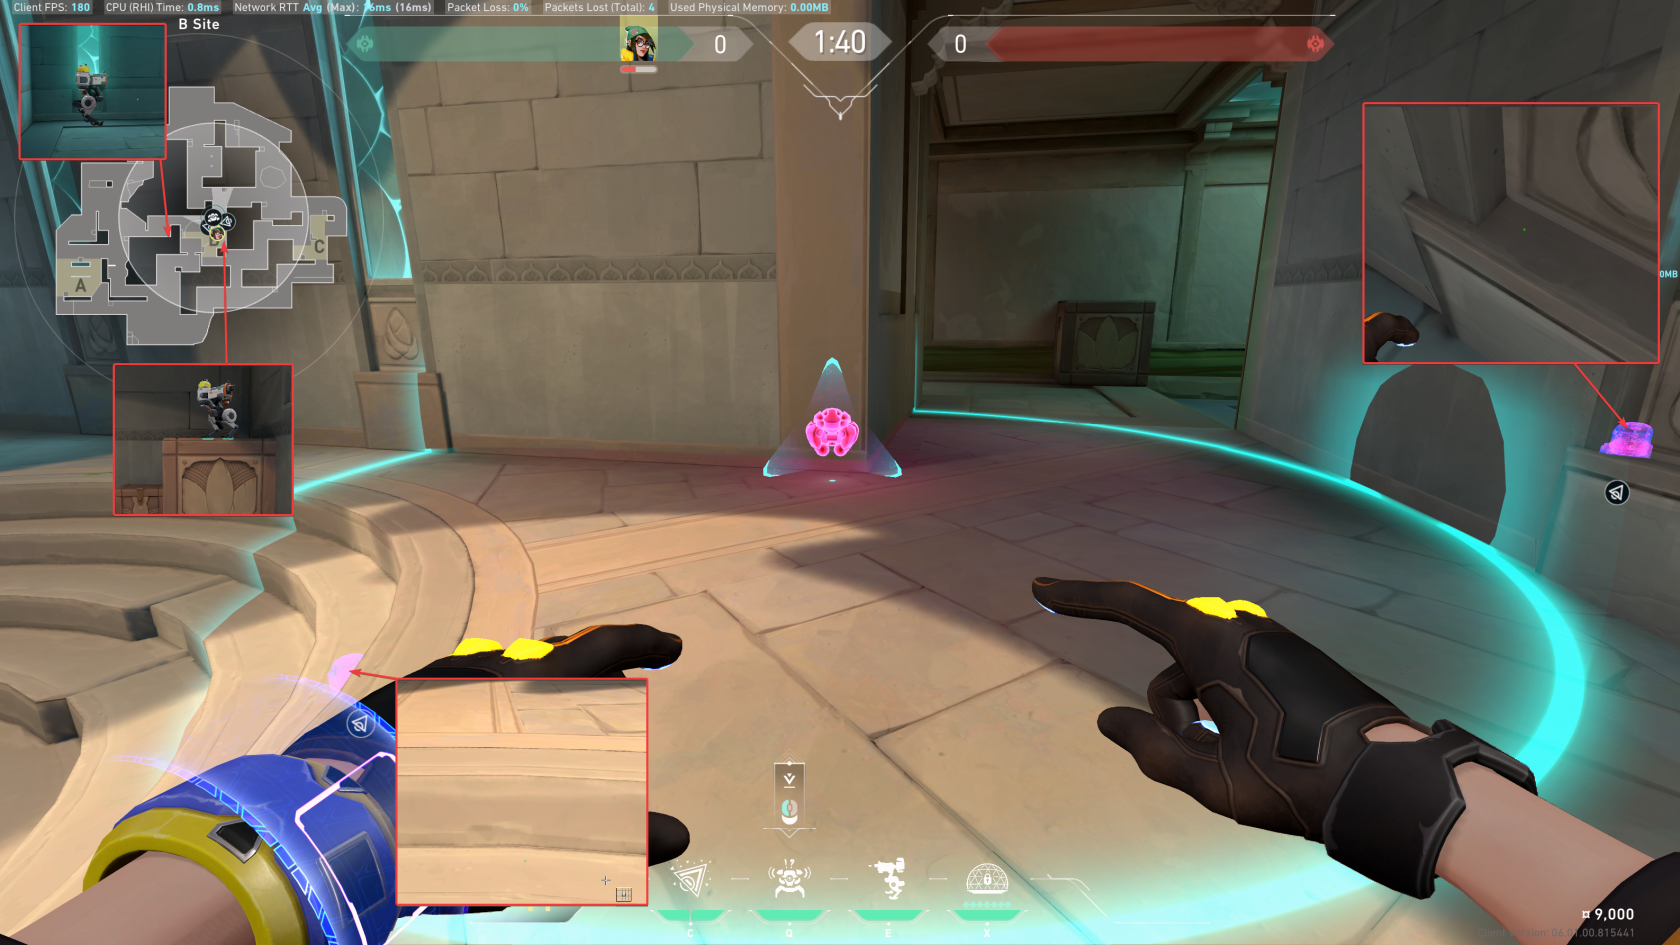](https://wiki.stoplagging.com/uploads/images/gallery/2023-01/image-1674891639848.png)
##### B Retake Setup
[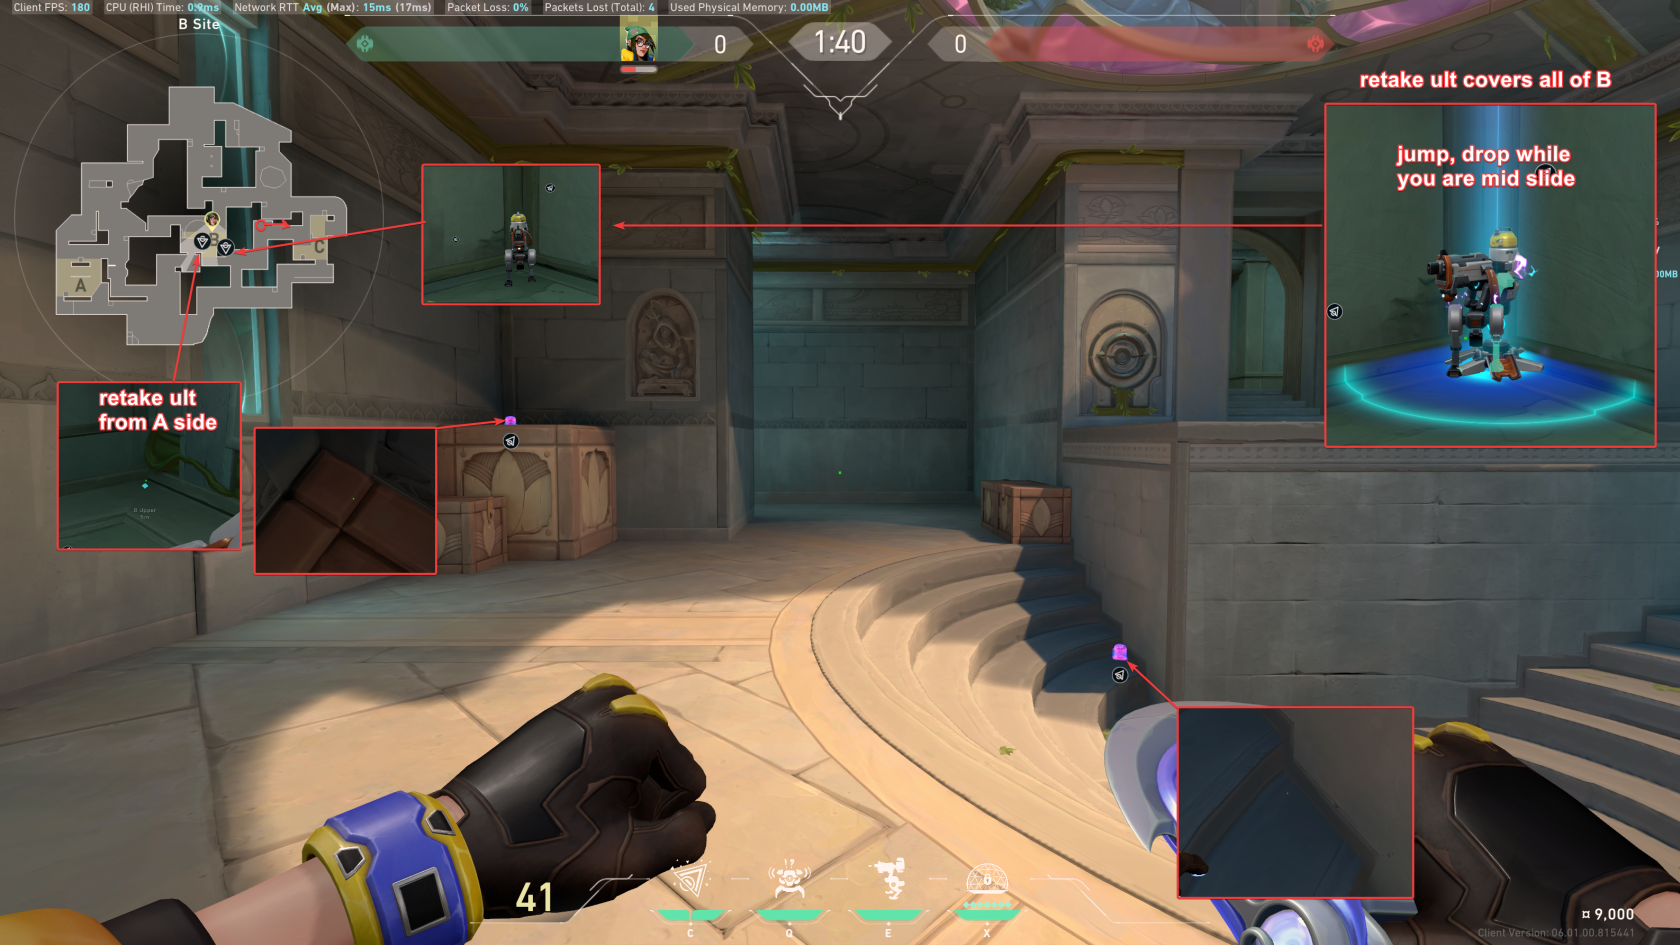](https://wiki.stoplagging.com/uploads/images/gallery/2023-01/image-1674892349391.png)
##### C Standard Setup
[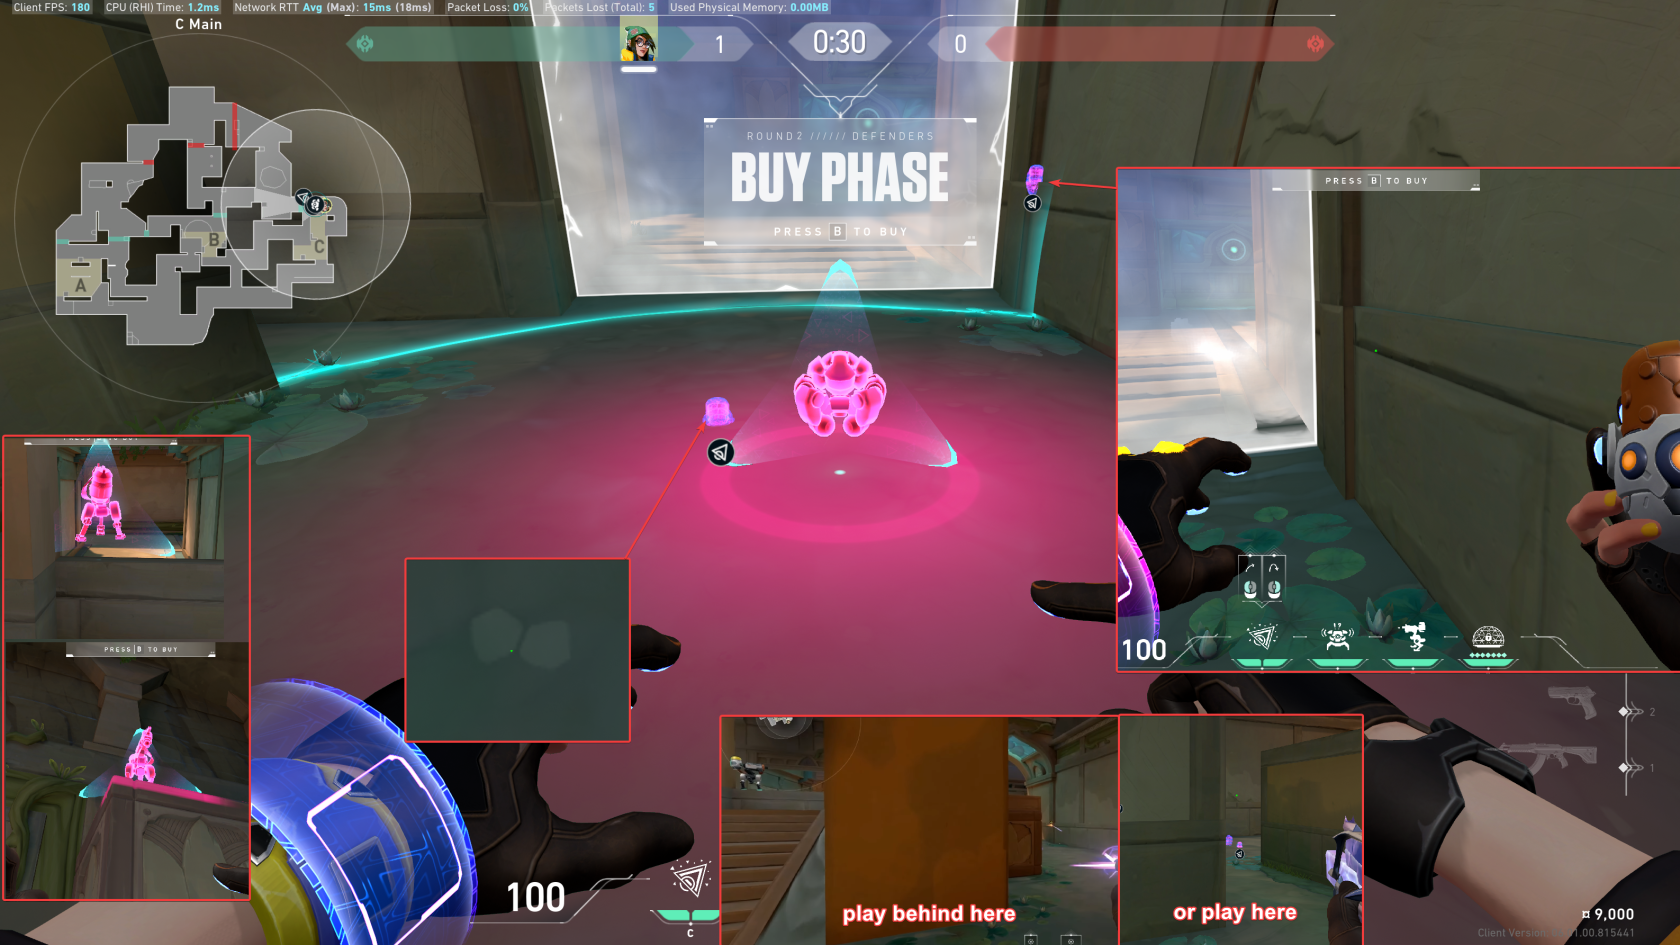](https://wiki.stoplagging.com/uploads/images/gallery/2023-01/image-1674892994179.png)
#### C Microwave Setup
[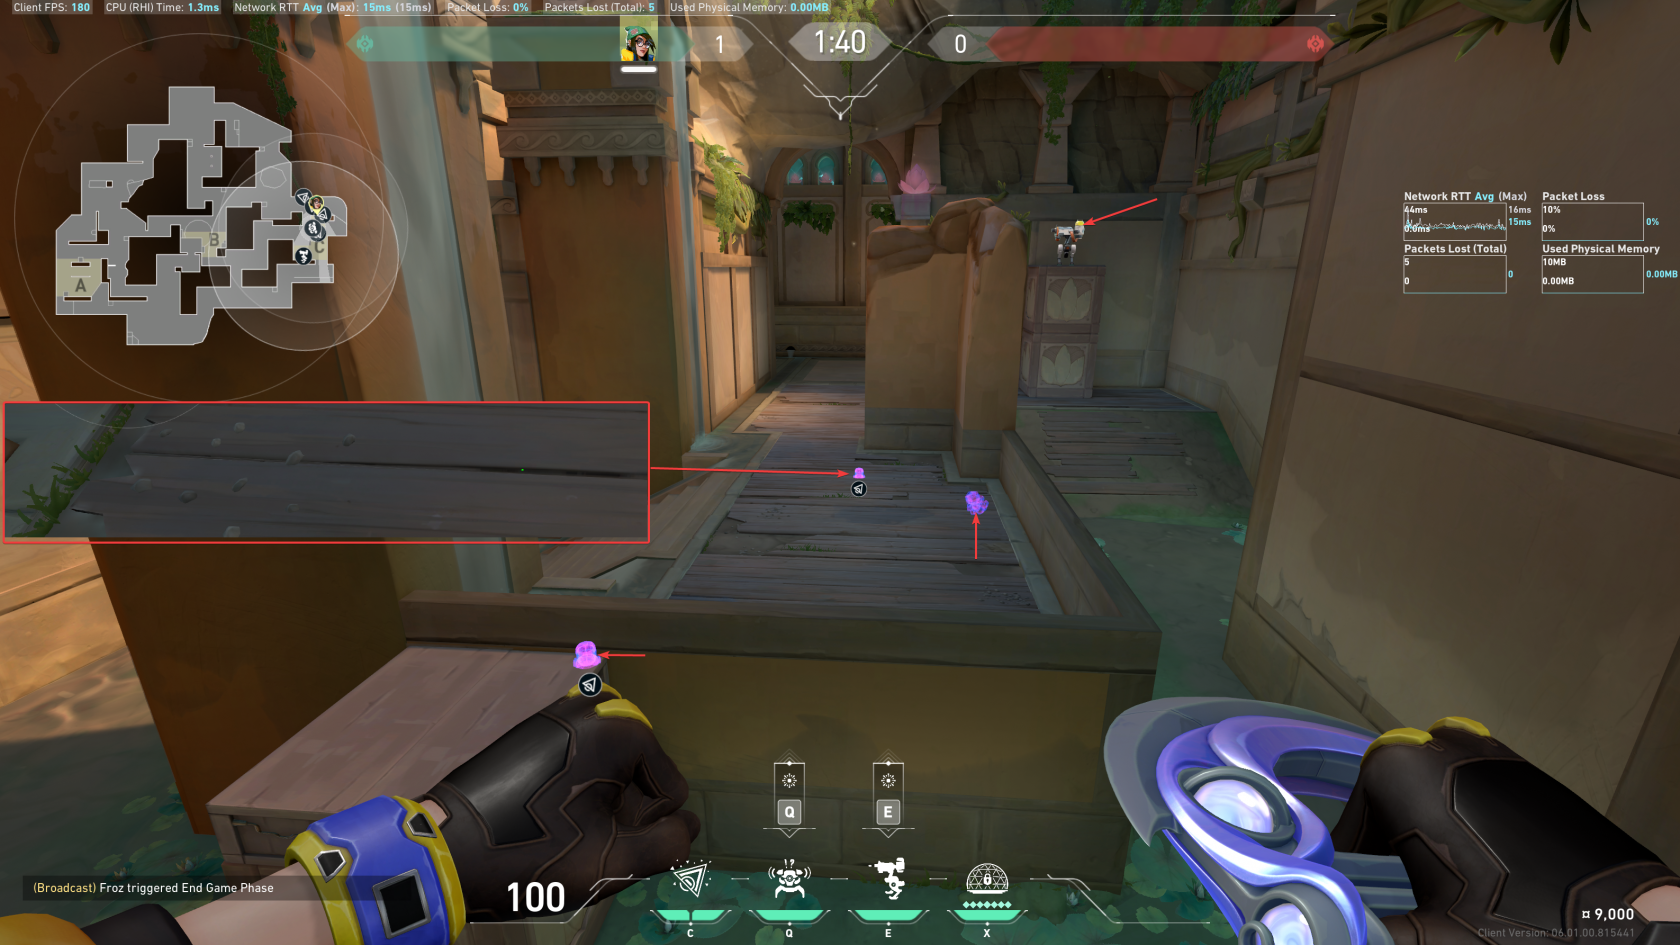](https://wiki.stoplagging.com/uploads/images/gallery/2023-01/image-1674893273193.png)
##### C Retake Setup
[](https://wiki.stoplagging.com/uploads/images/gallery/2023-01/image-1674893438707.png)
## Lineups
##### A Post Plant
[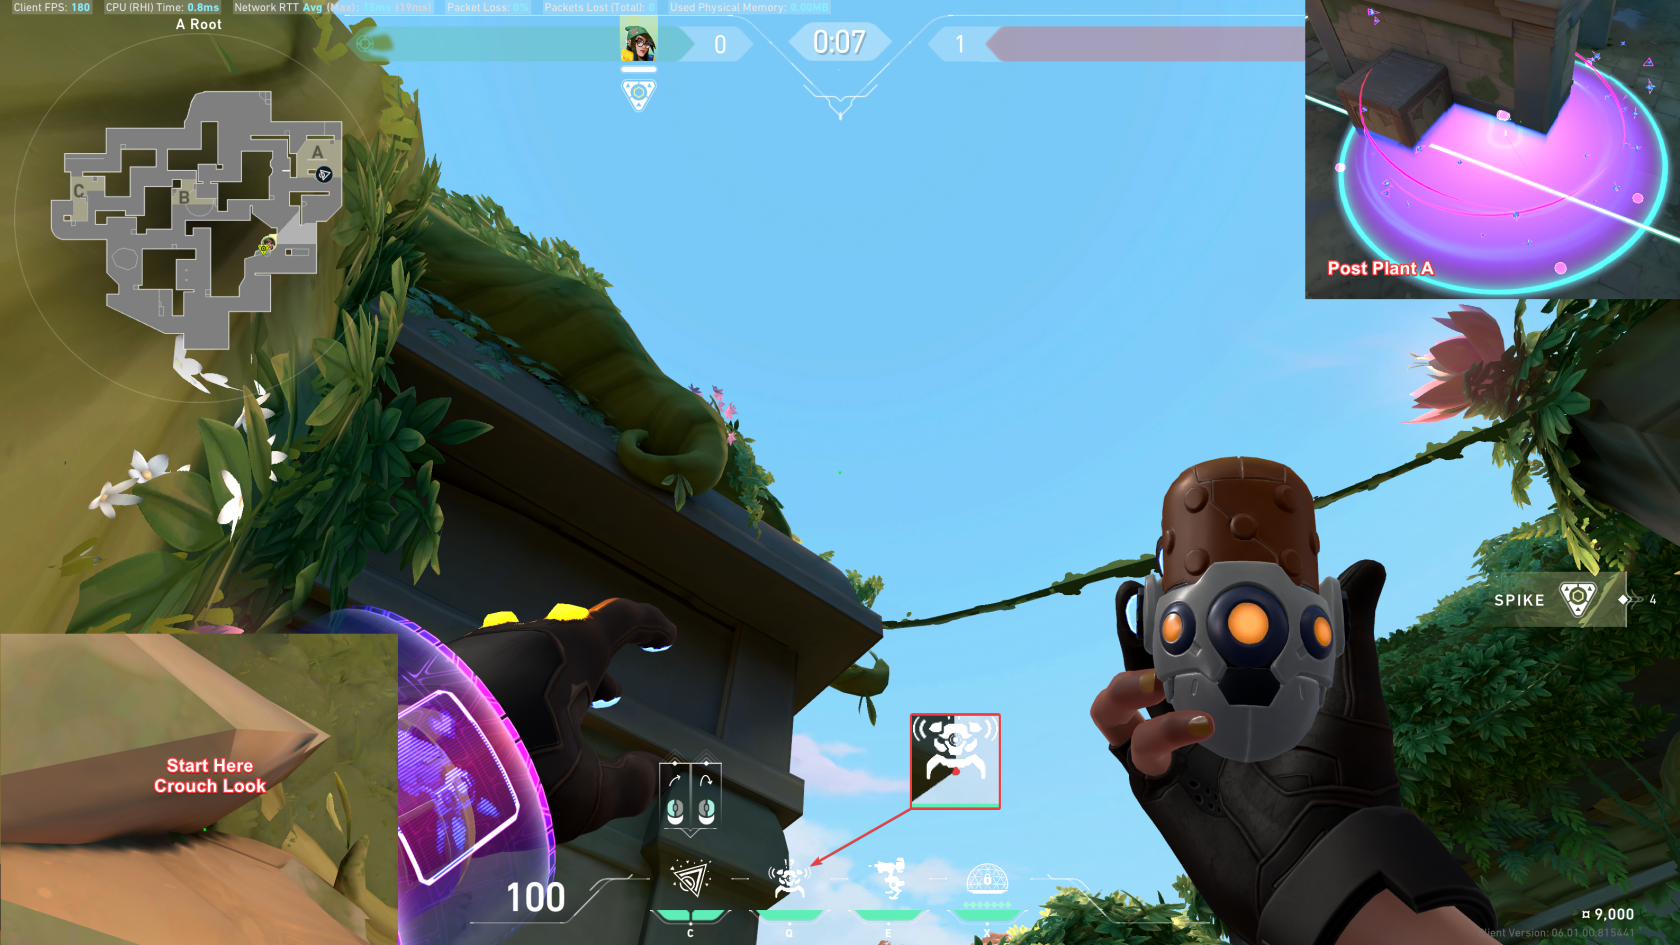](https://wiki.stoplagging.com/uploads/images/gallery/2023-01/image-1674952471219.png)
[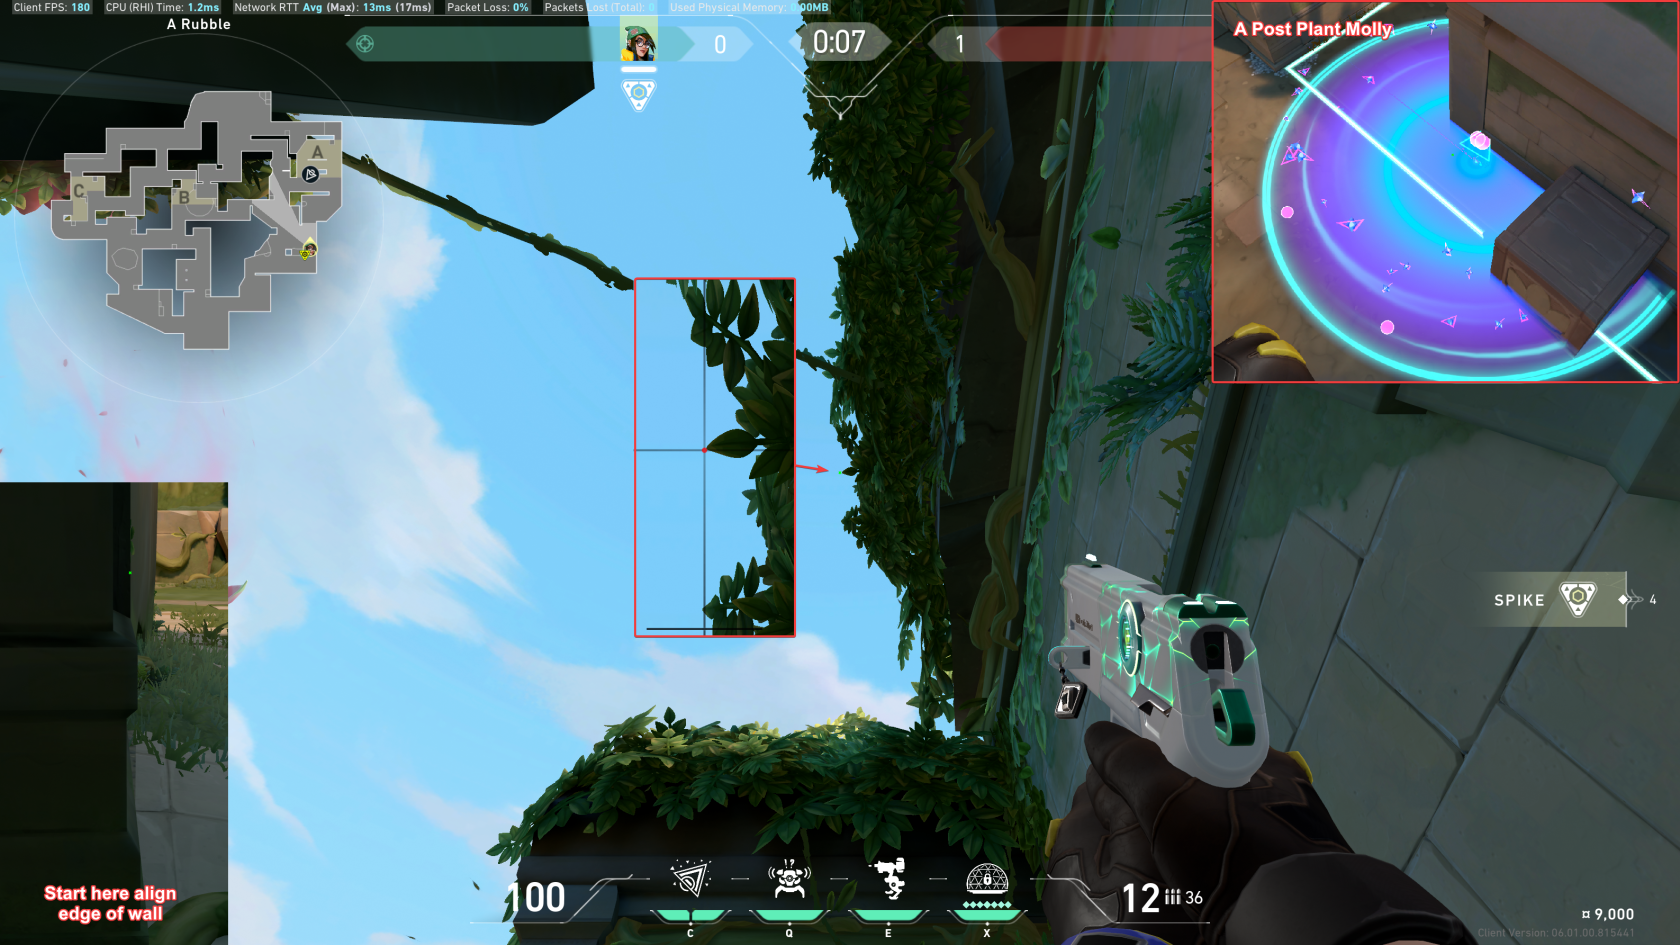](https://wiki.stoplagging.com/uploads/images/gallery/2023-01/image-1674952481451.png)
##### B Post Plant
[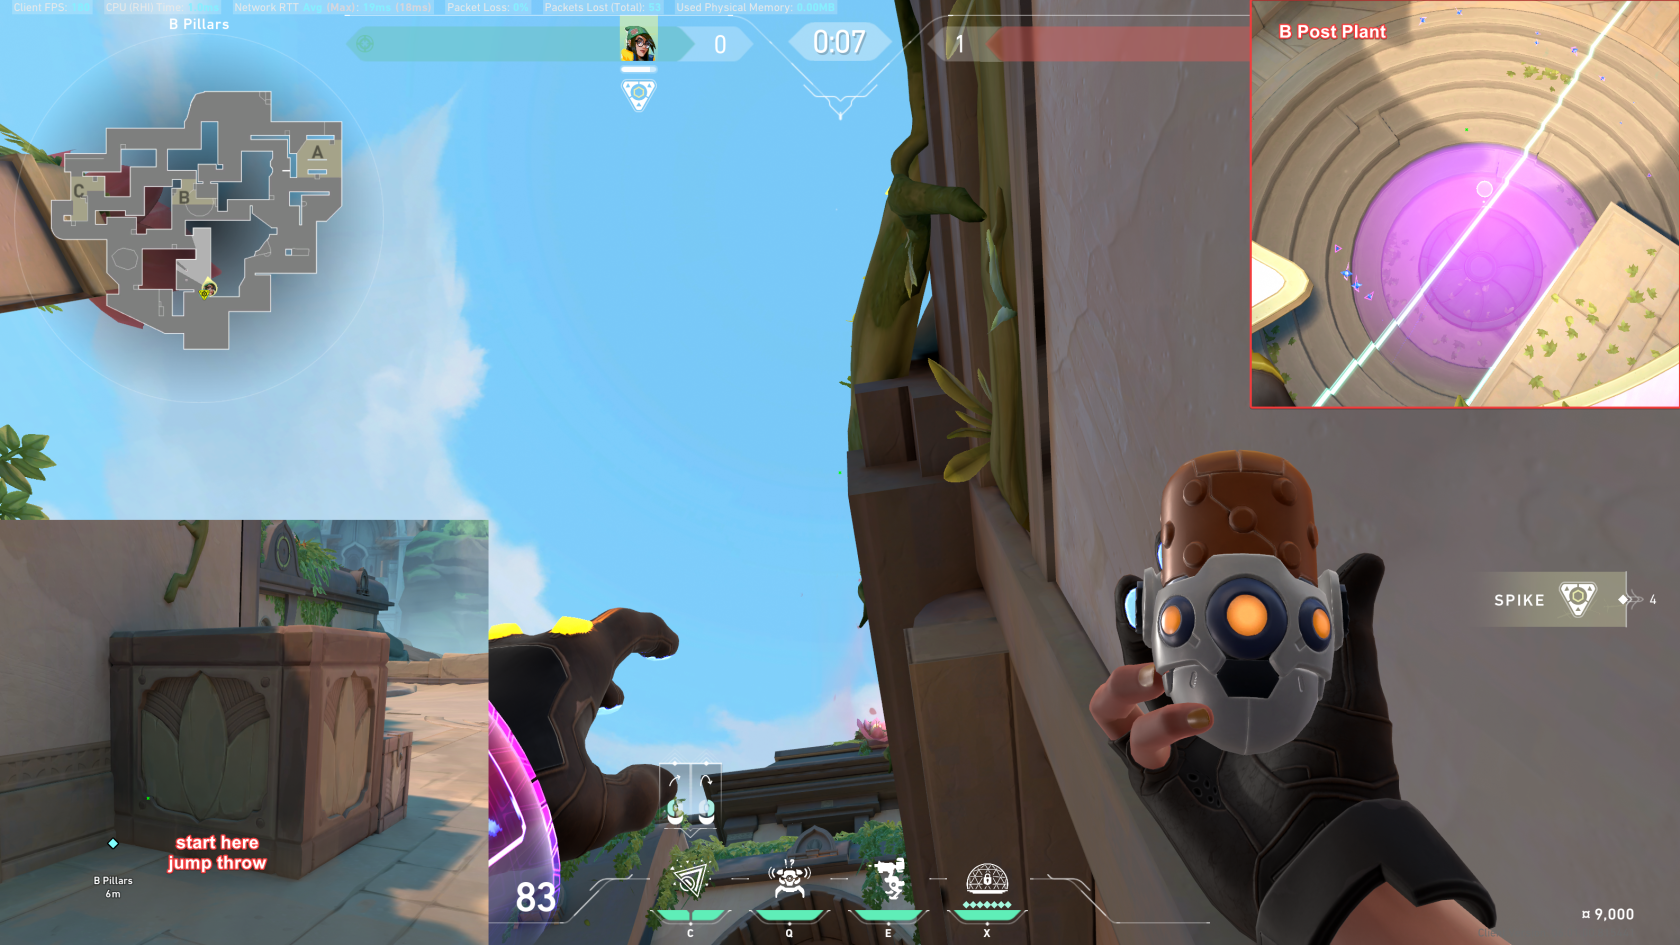](https://wiki.stoplagging.com/uploads/images/gallery/2023-01/image-1674952492899.png)
[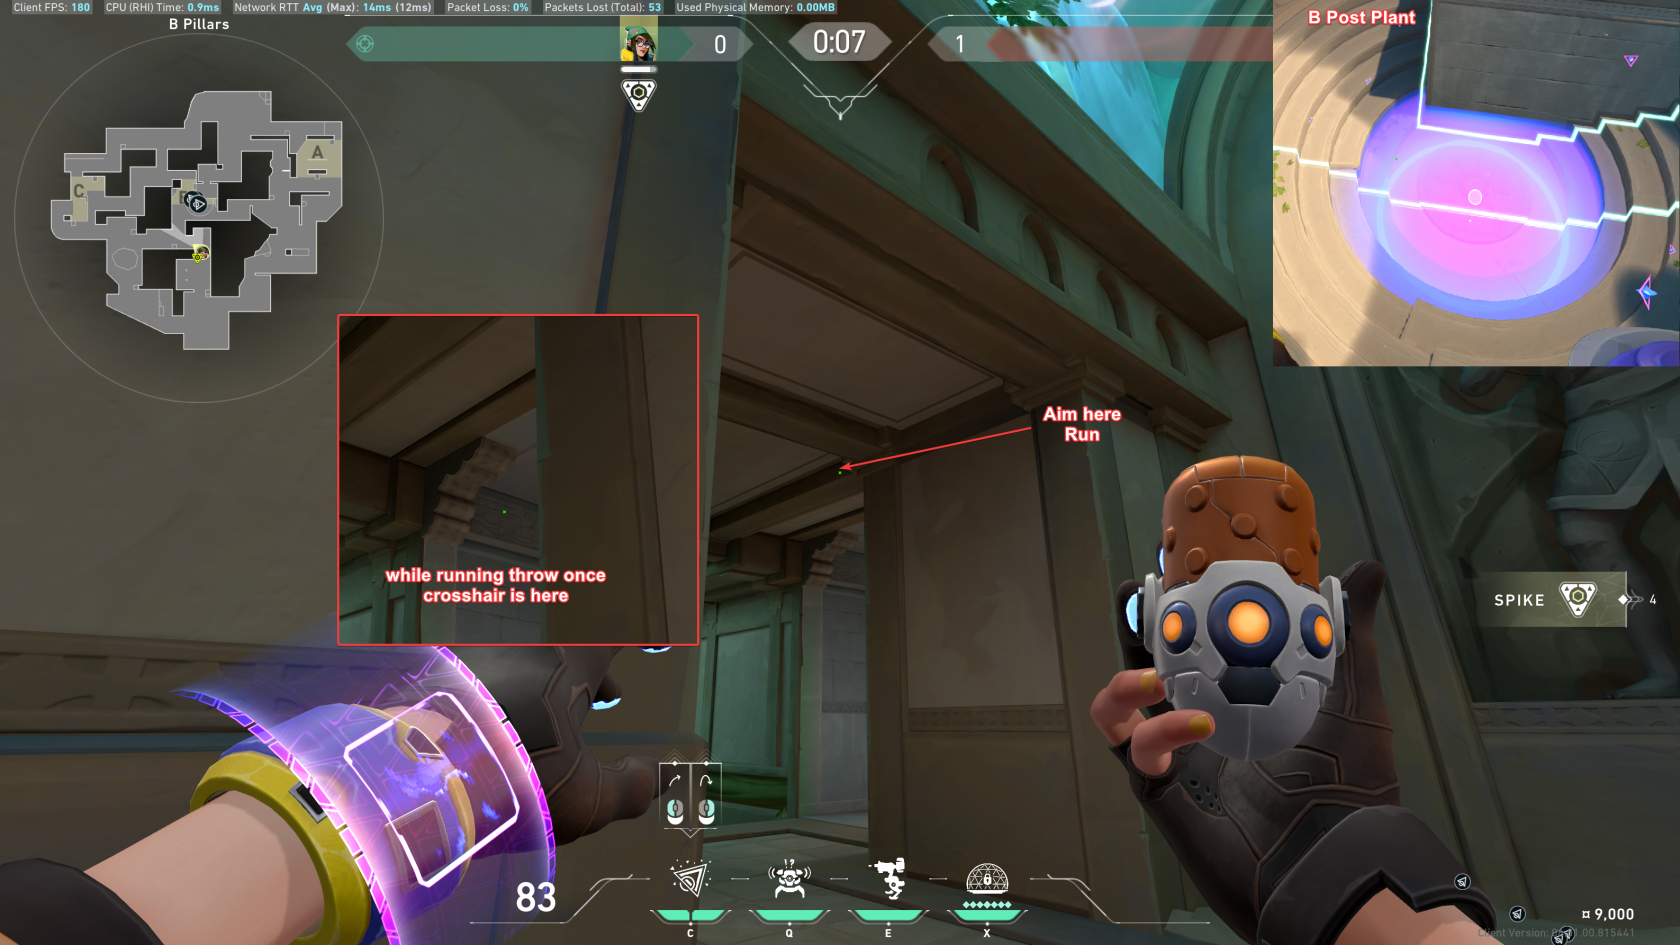](https://wiki.stoplagging.com/uploads/images/gallery/2023-01/image-1674952503547.png)
##### C Post Plant
[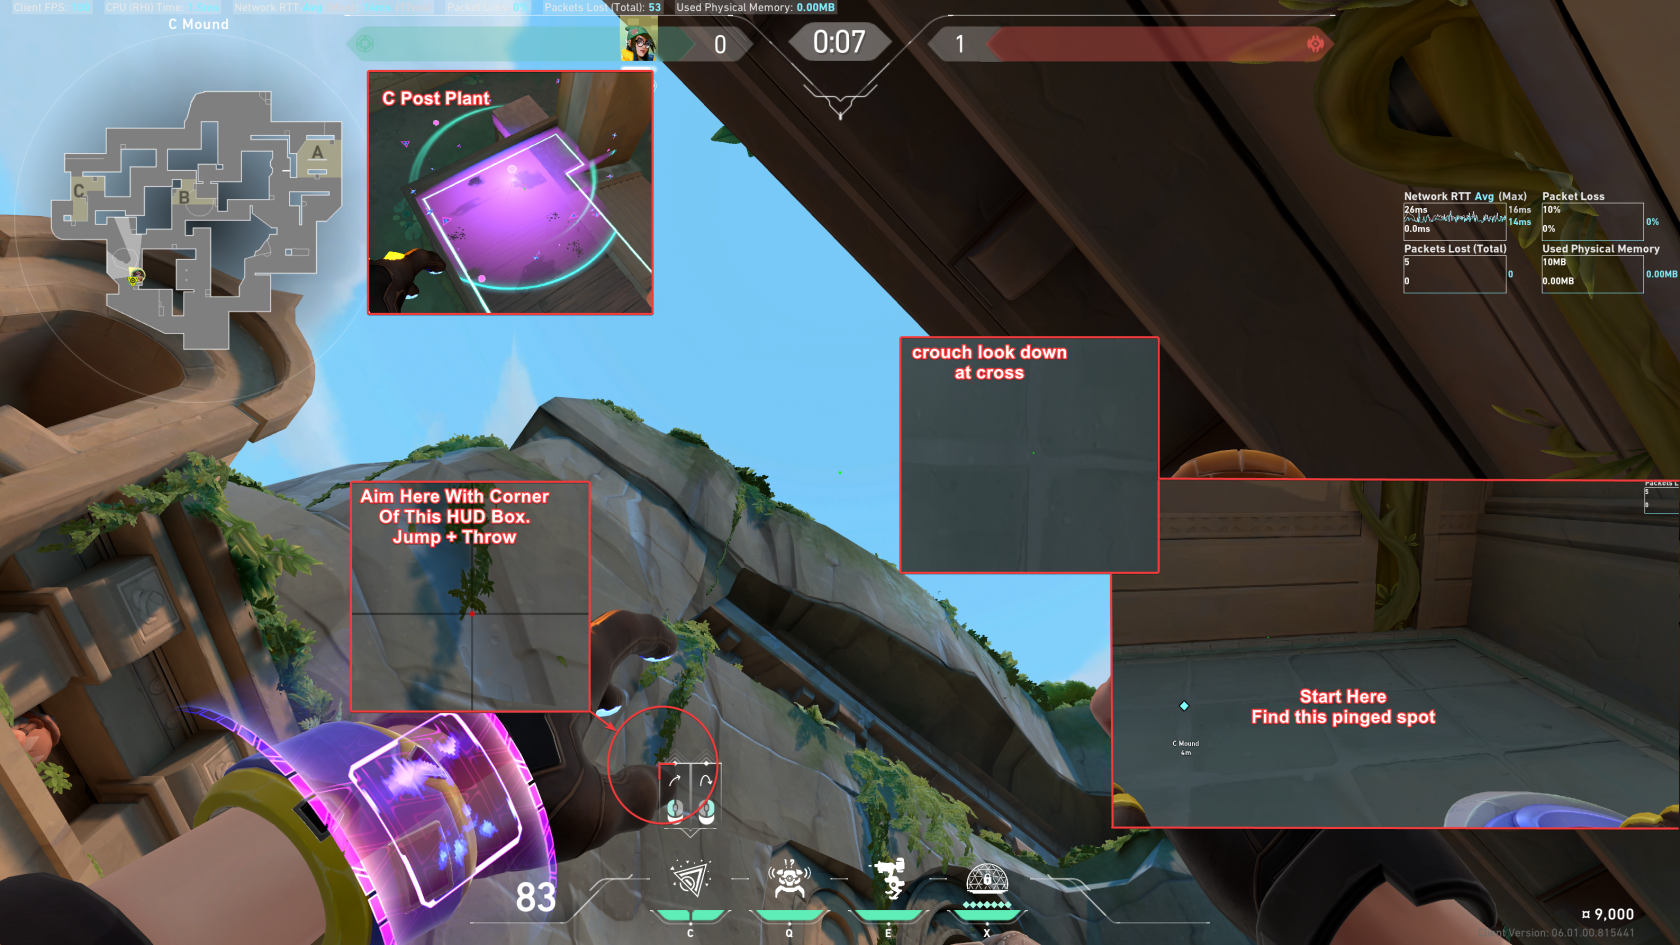](https://wiki.stoplagging.com/uploads/images/gallery/2023-01/image-1674952974933.png)
[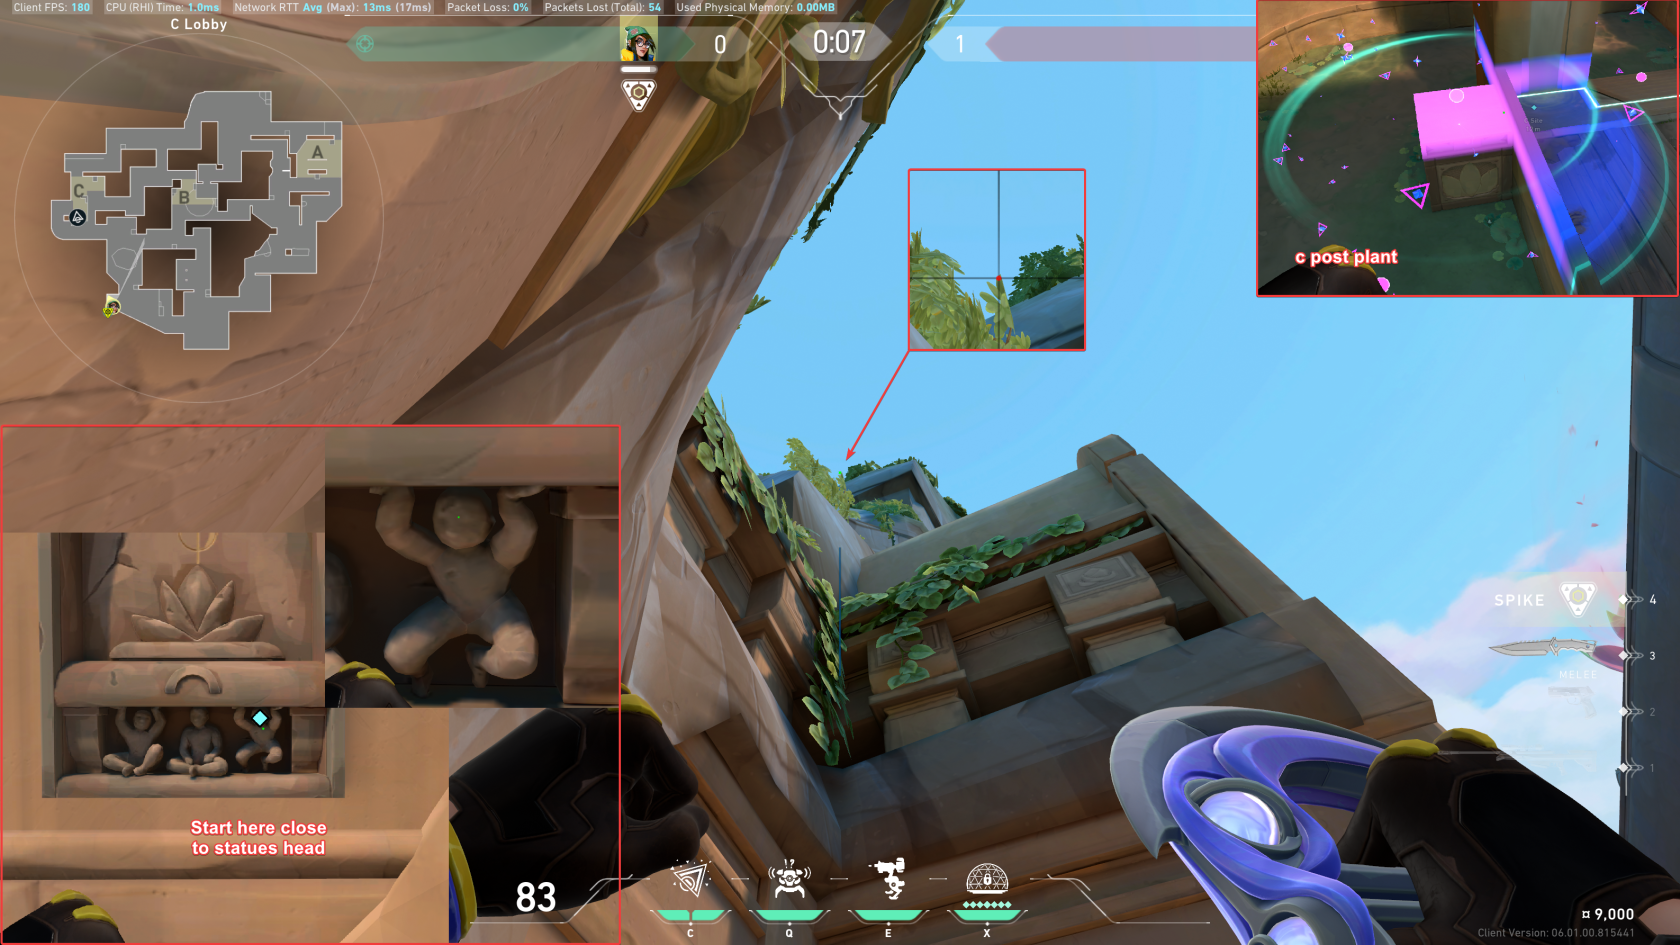](https://wiki.stoplagging.com/uploads/images/gallery/2023-01/image-1674953389779.png)
[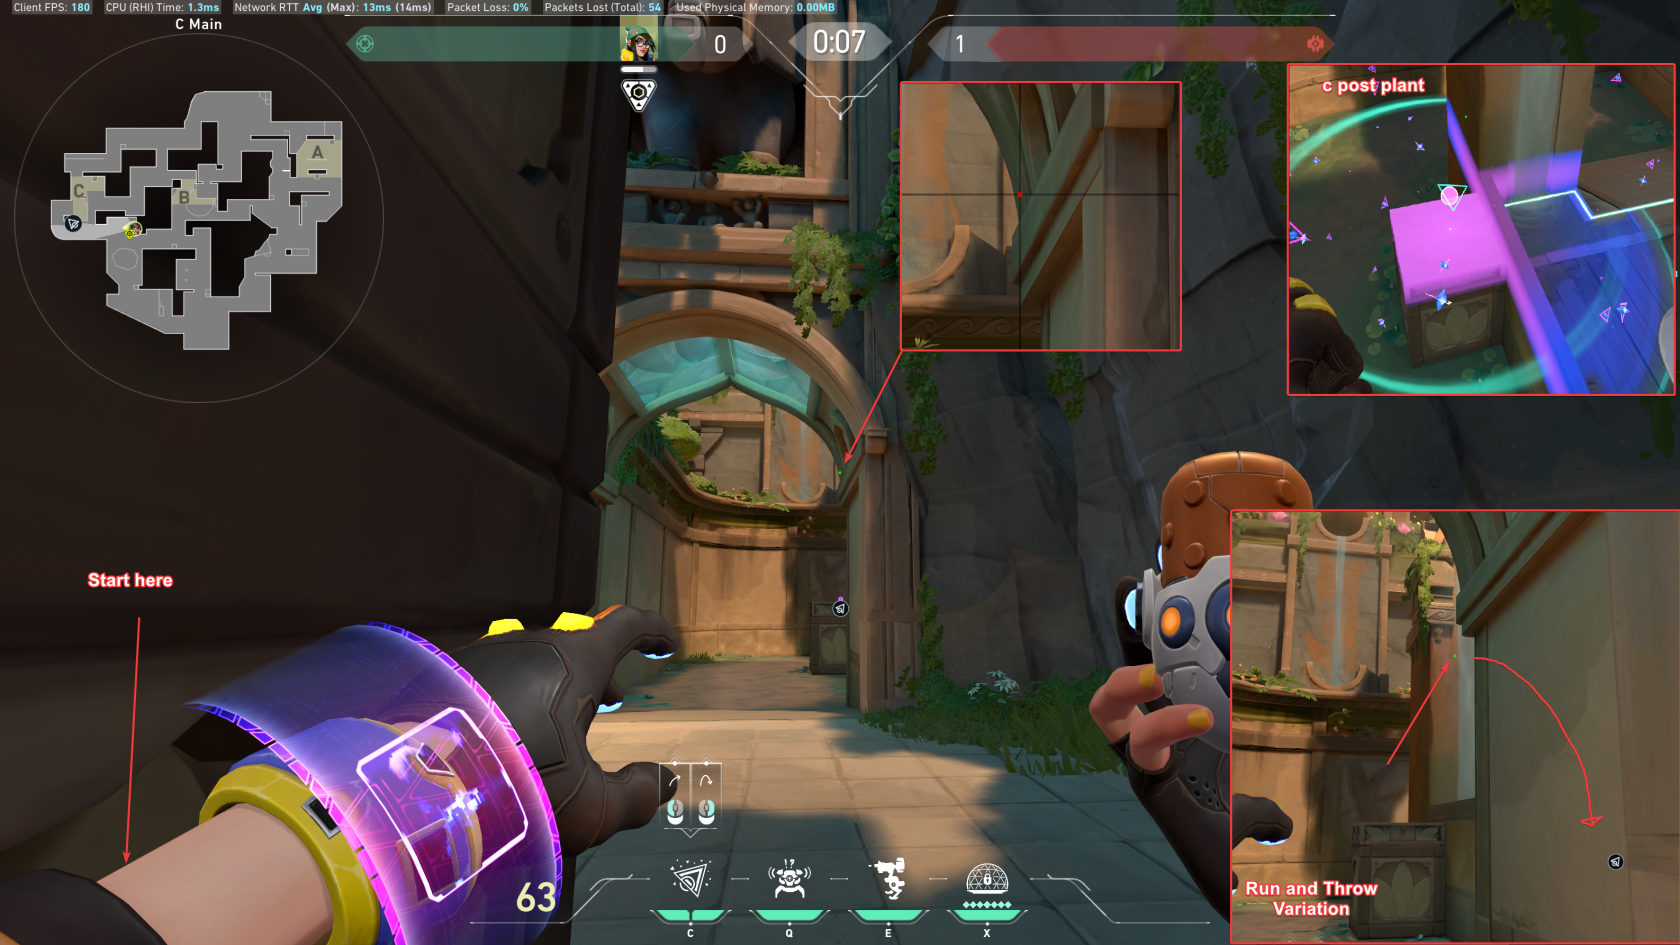](https://wiki.stoplagging.com/uploads/images/gallery/2023-01/image-1674953636562.png)
# Breach Haven
https://www.youtube.com/watch?v=TzSWYnuidGs
# Sage Walls Haven
One Ways A Site
https://www.youtube.com/watch?v=vStuKLEau0M&list=LL&index=3
# Sova Line Ups Haven
## Offense Recons
[](https://wiki.stoplagging.com/uploads/images/gallery/2022-07/image-1656879233925.png)
To A Long
[](https://wiki.stoplagging.com/uploads/images/gallery/2022-07/image-1656879423885.png)
To C Variation 1
[](https://wiki.stoplagging.com/uploads/images/gallery/2022-07/image-1656879527747.png)
To C Easy Variation 2
#####
[](https://wiki.stoplagging.com/uploads/images/gallery/2022-07/image-1656883503733.png)
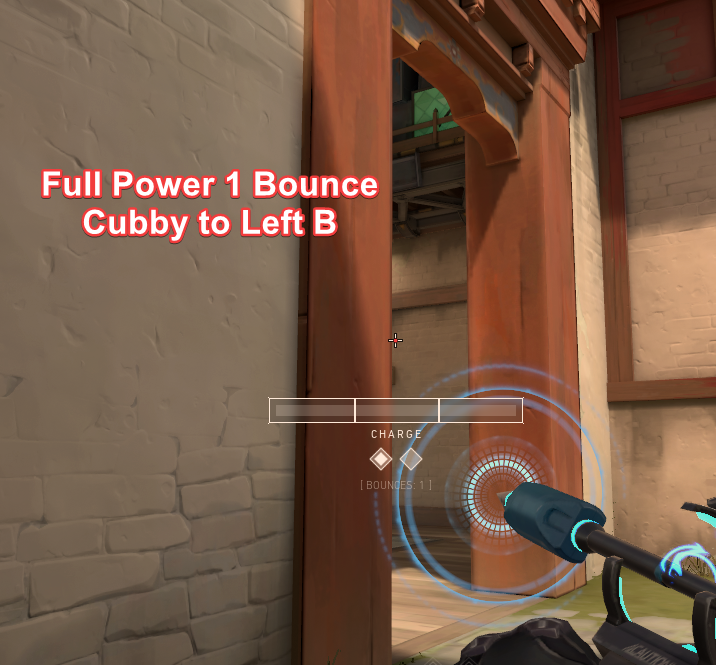
Mid Cubby To Left B
[](https://wiki.stoplagging.com/uploads/images/gallery/2022-07/image-1656883598916.png)
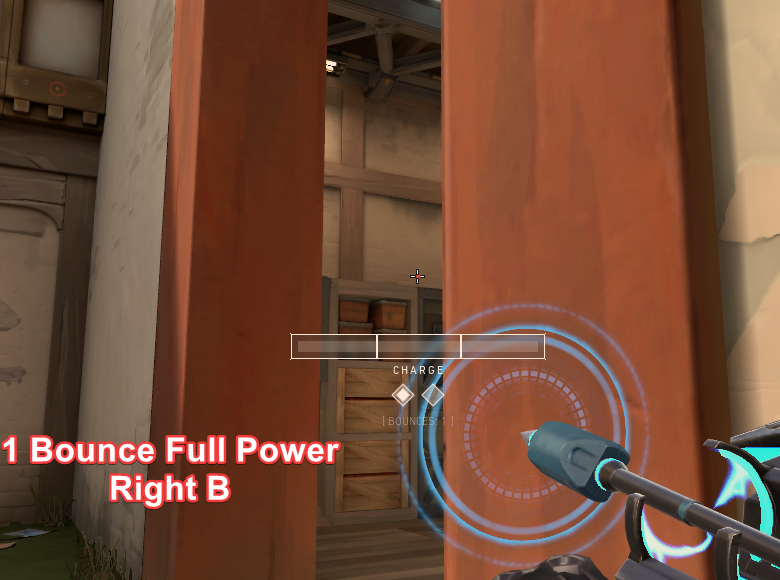
Mid To Right B
[](https://wiki.stoplagging.com/uploads/images/gallery/2022-07/image-1656883848141.png)
B Double Doors
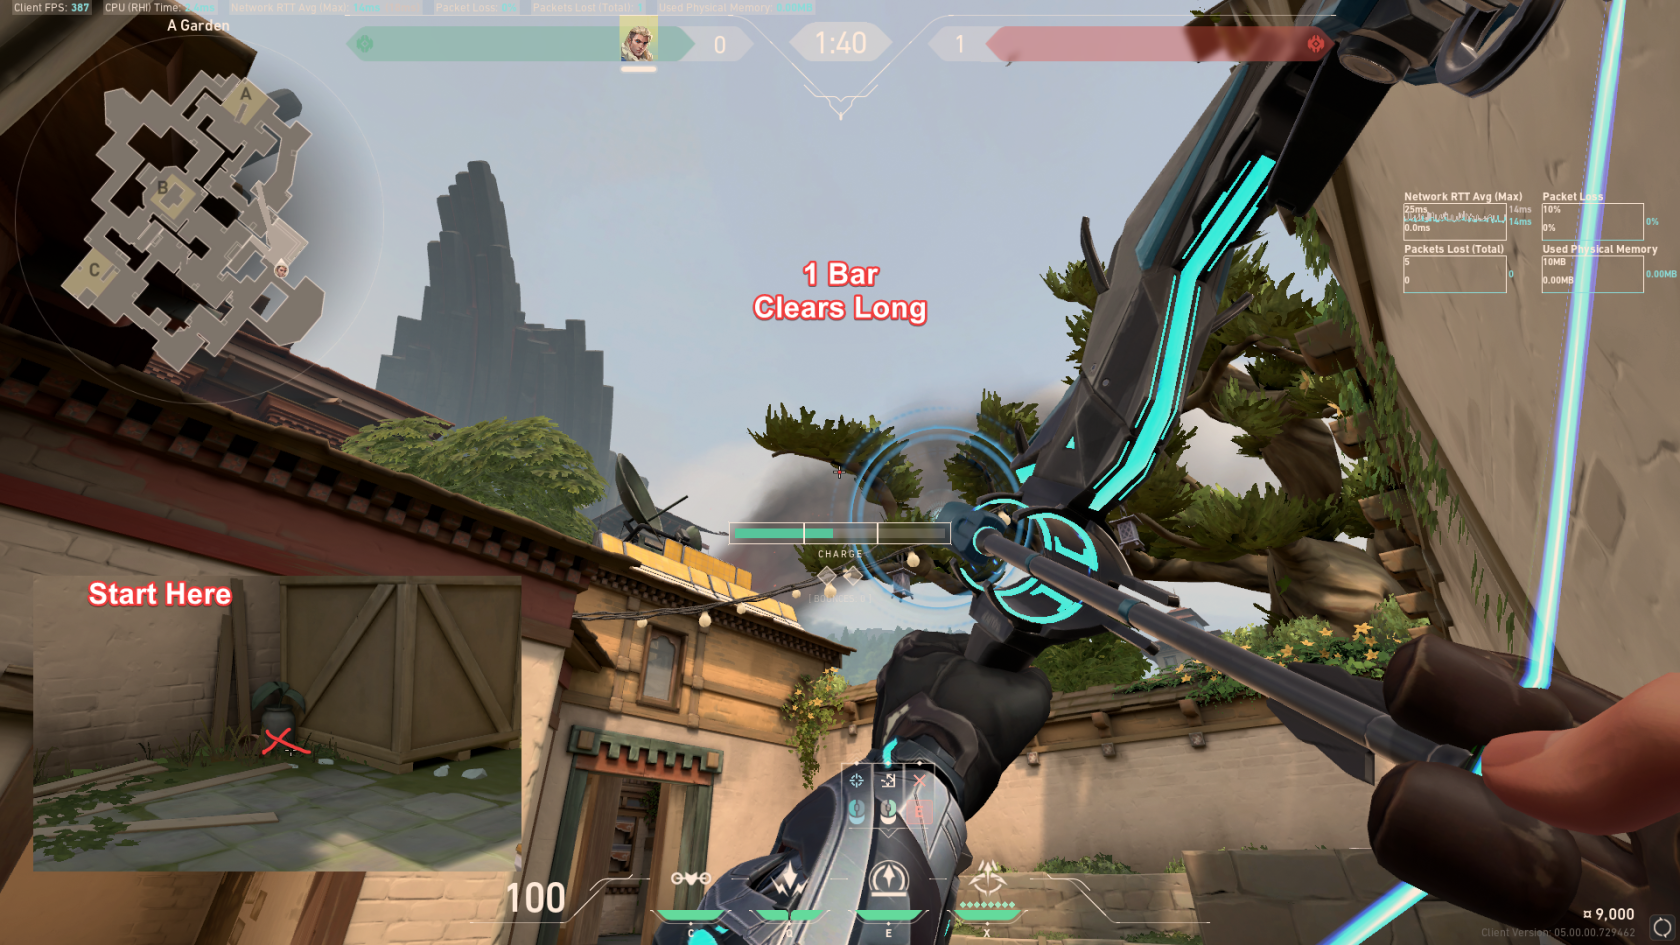
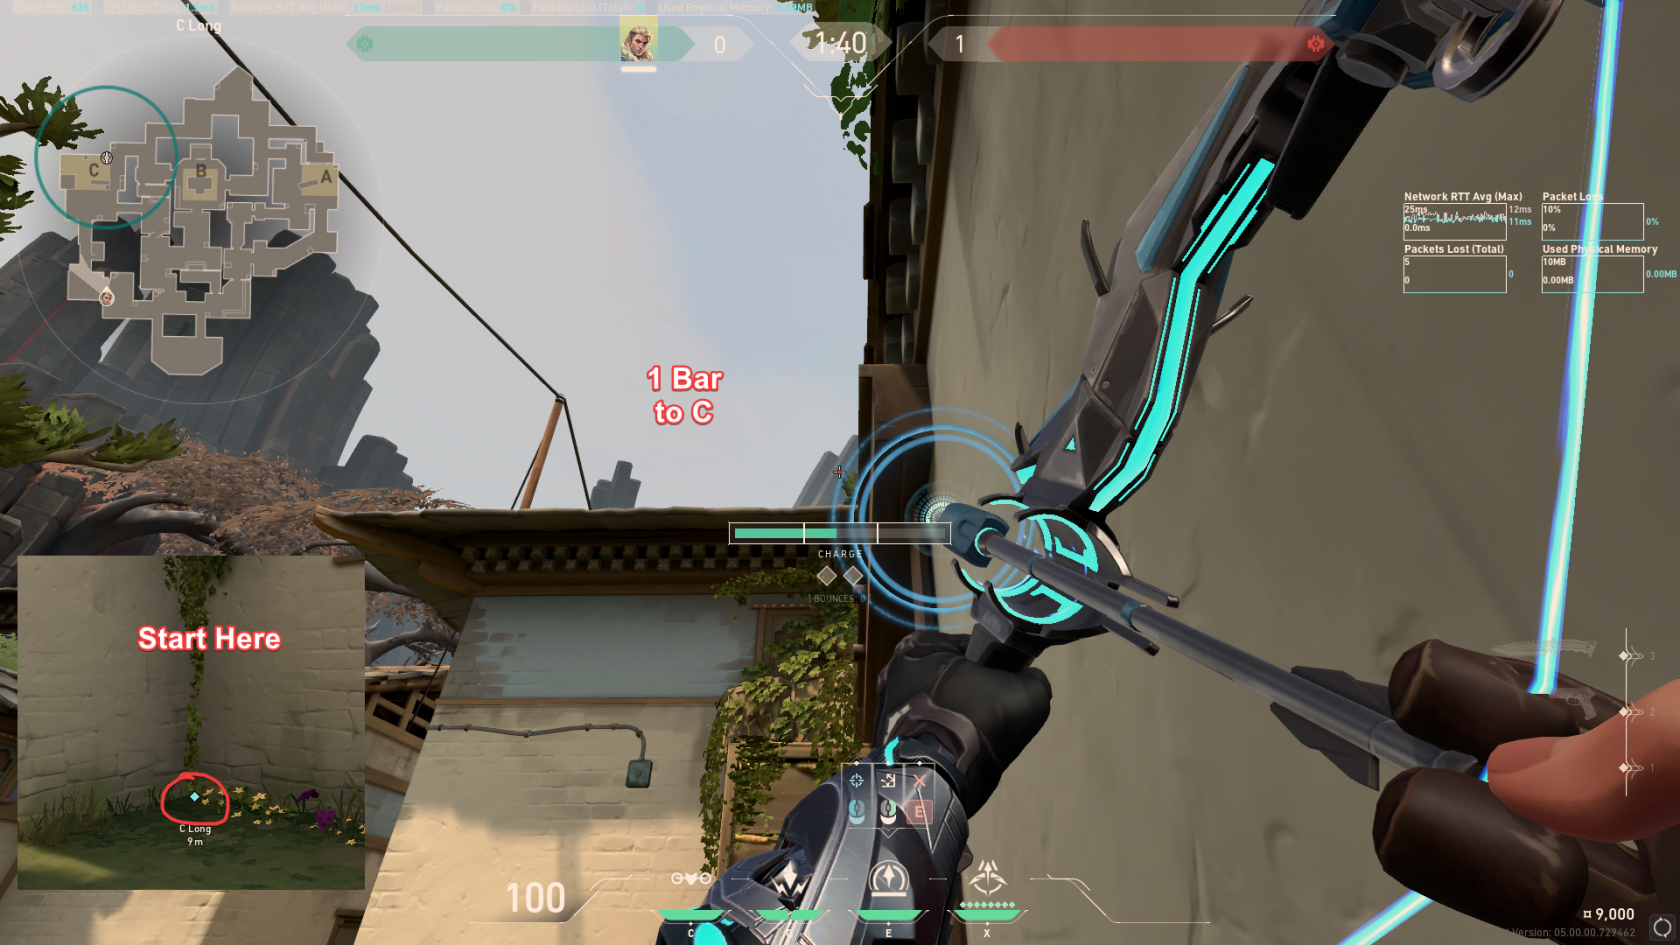
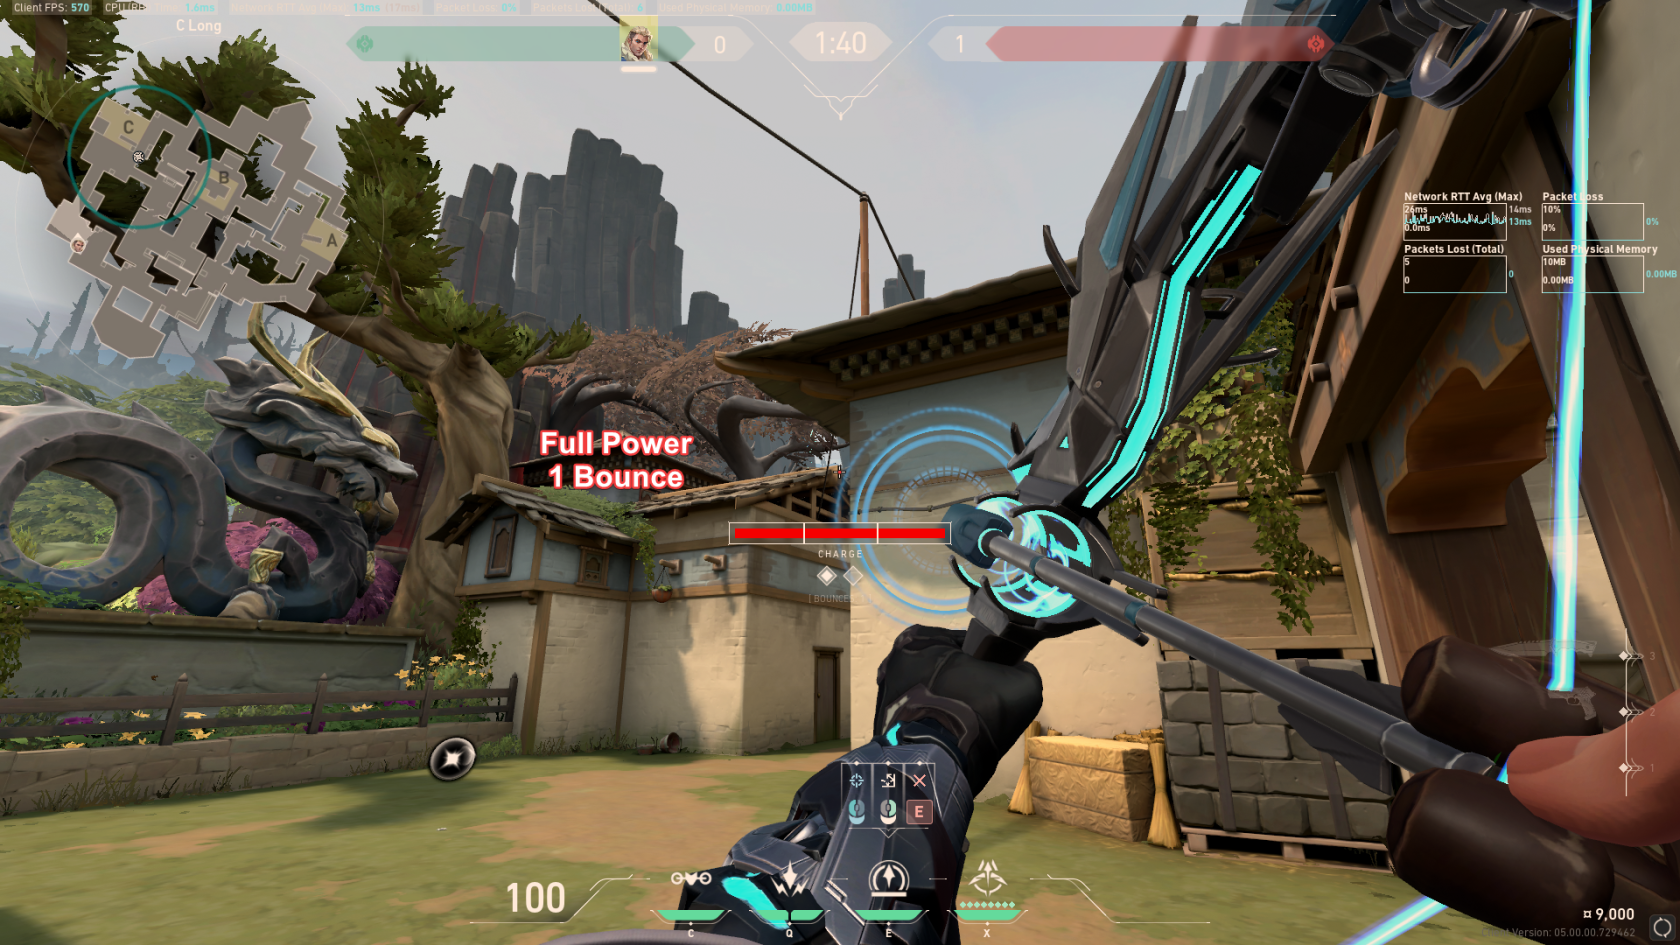
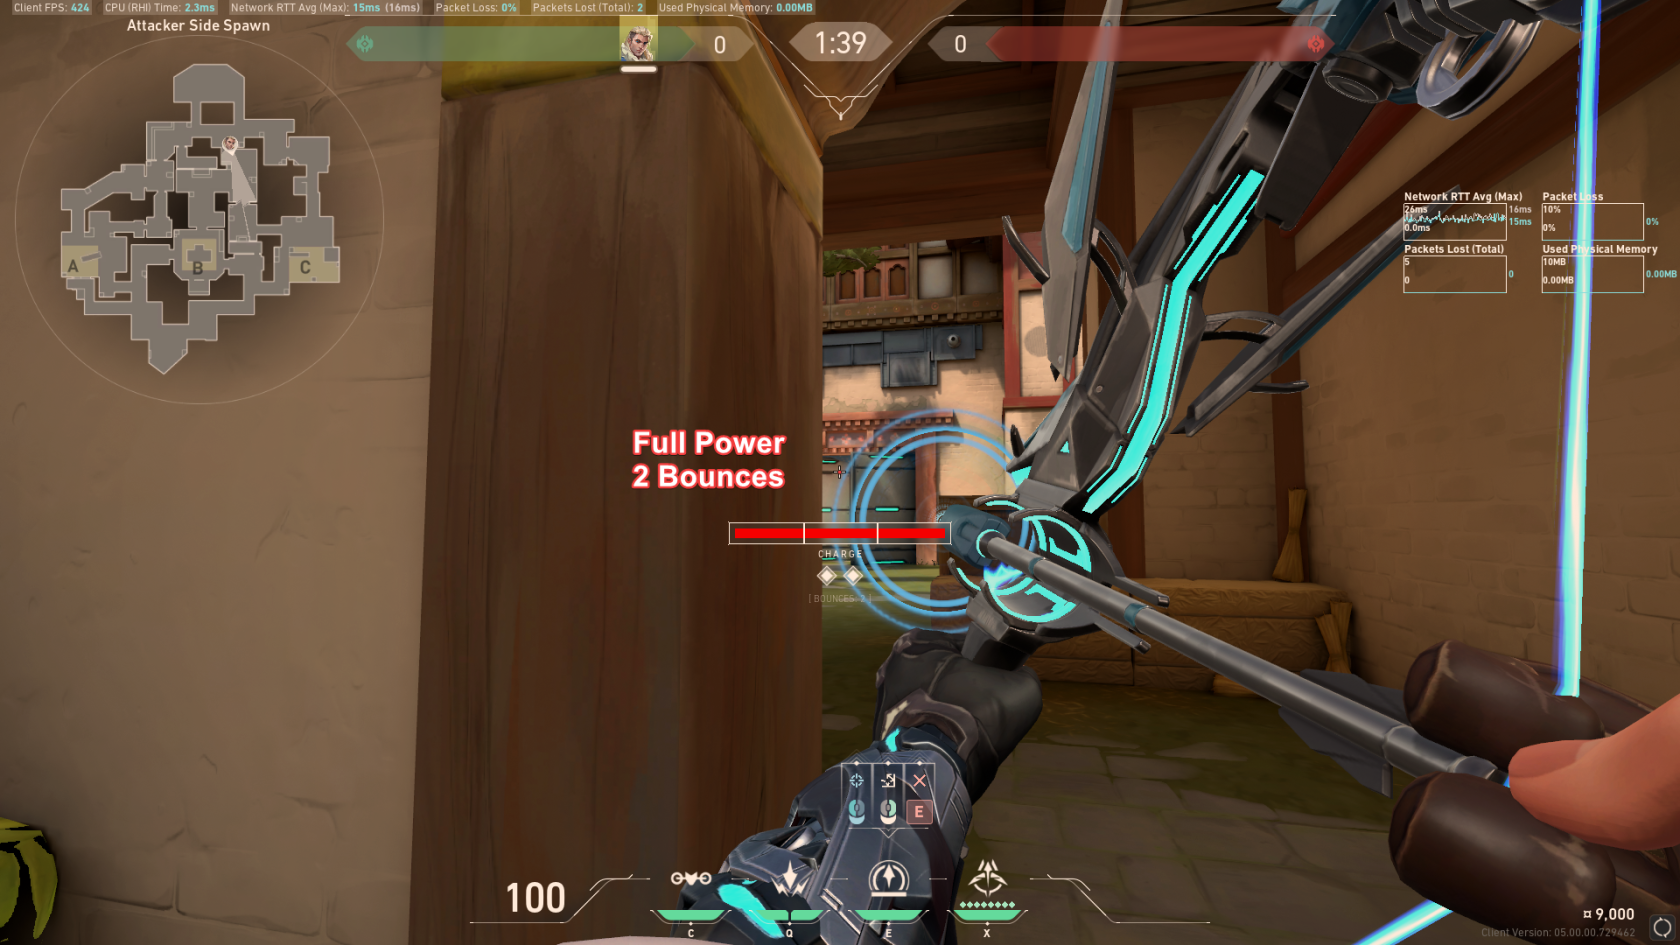
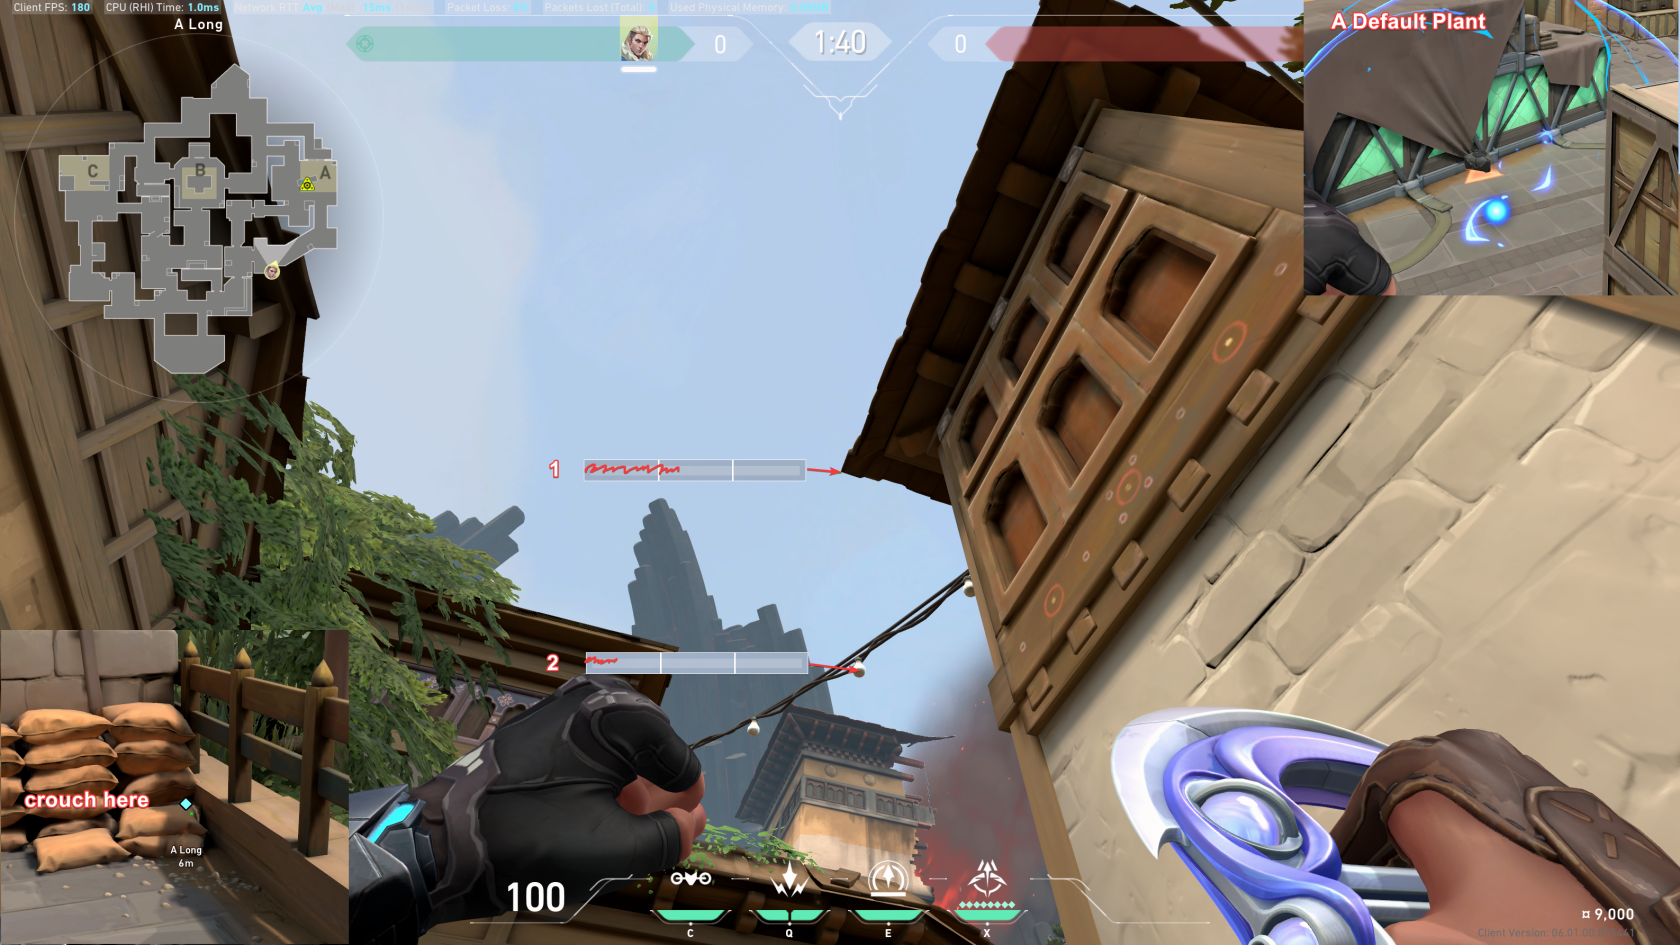
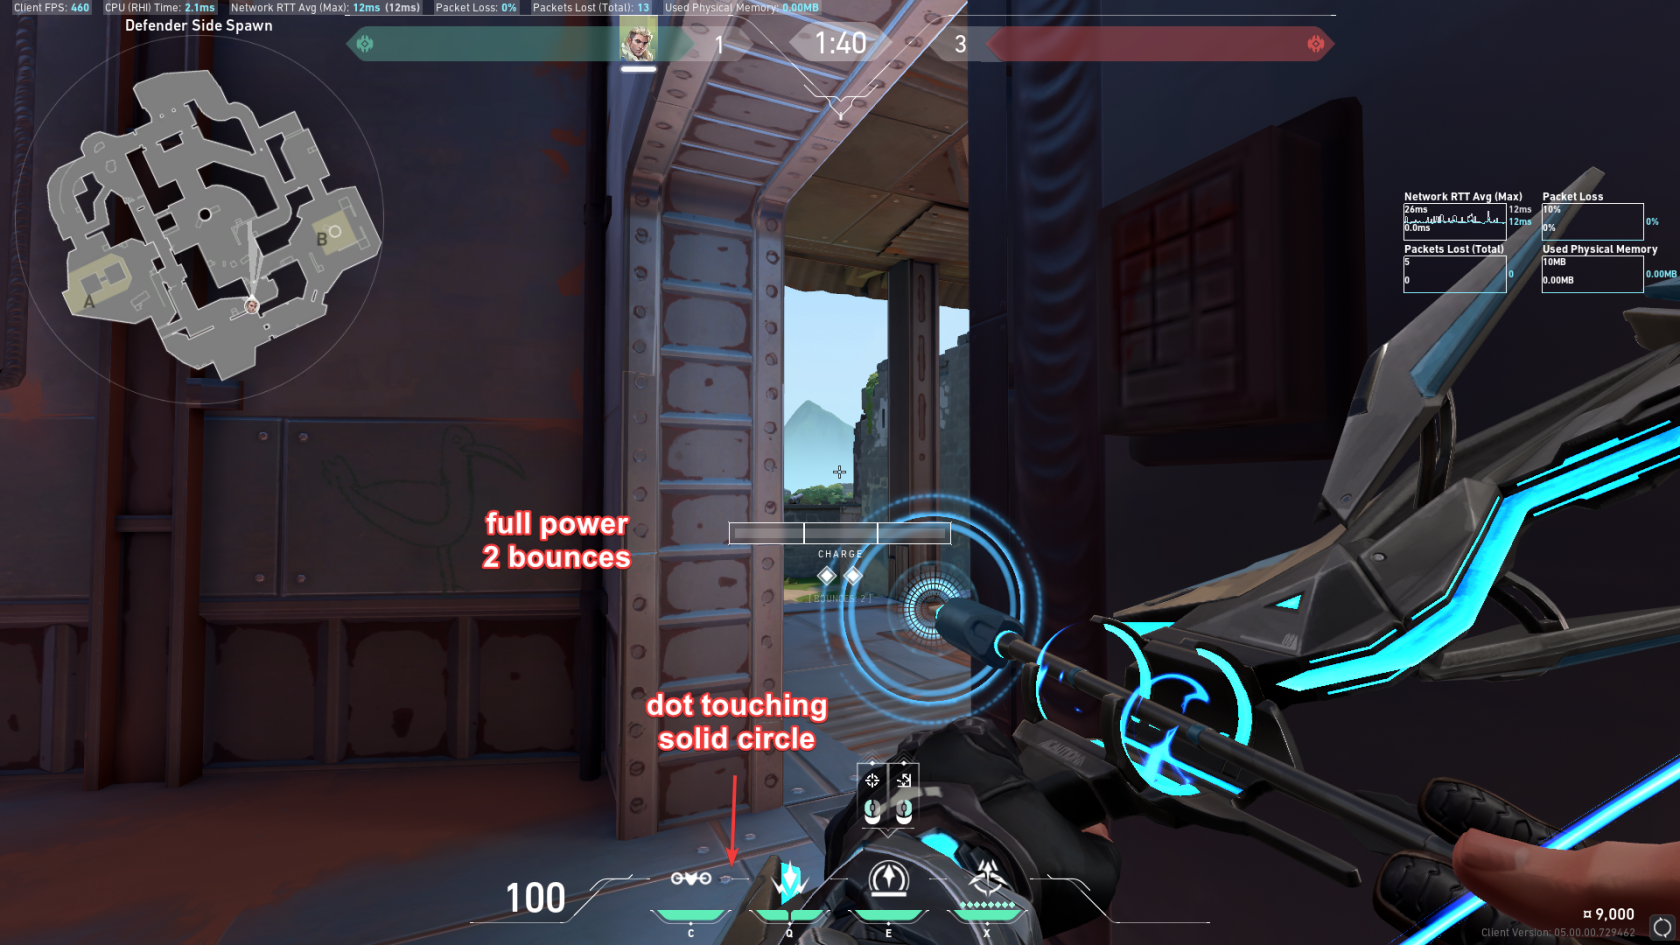
##### Long A To A Link (1 Bounce, 2 Bars)
## Defense
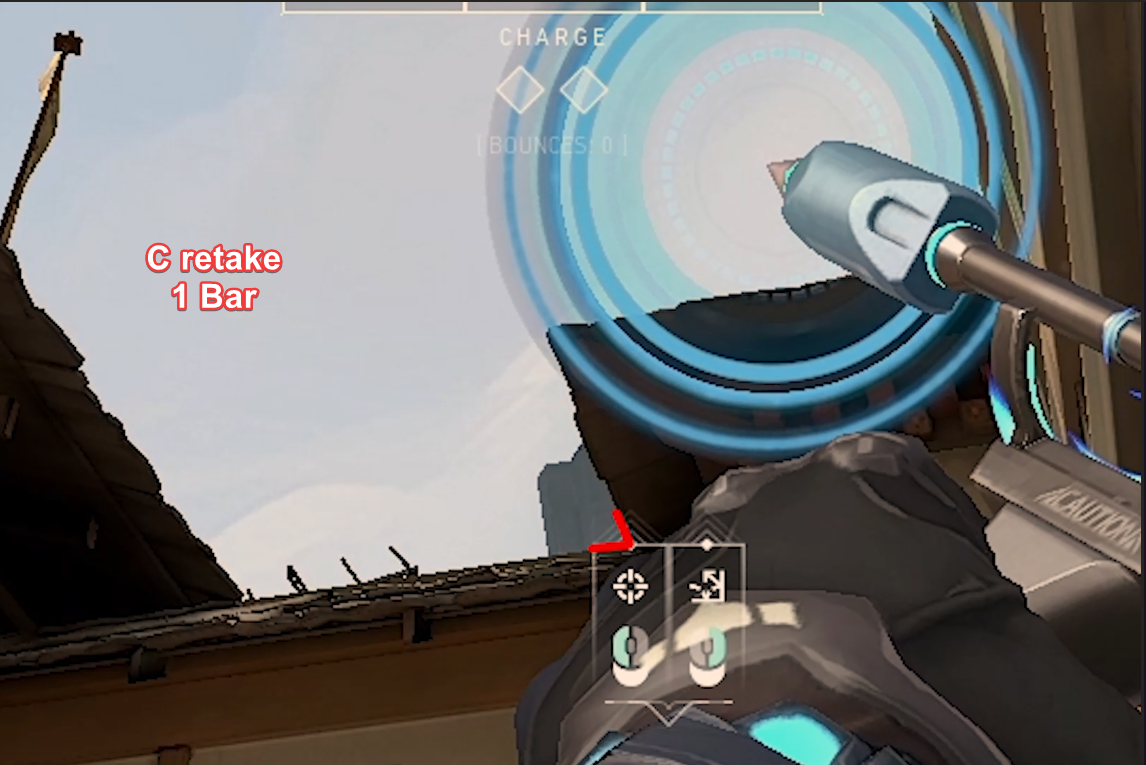
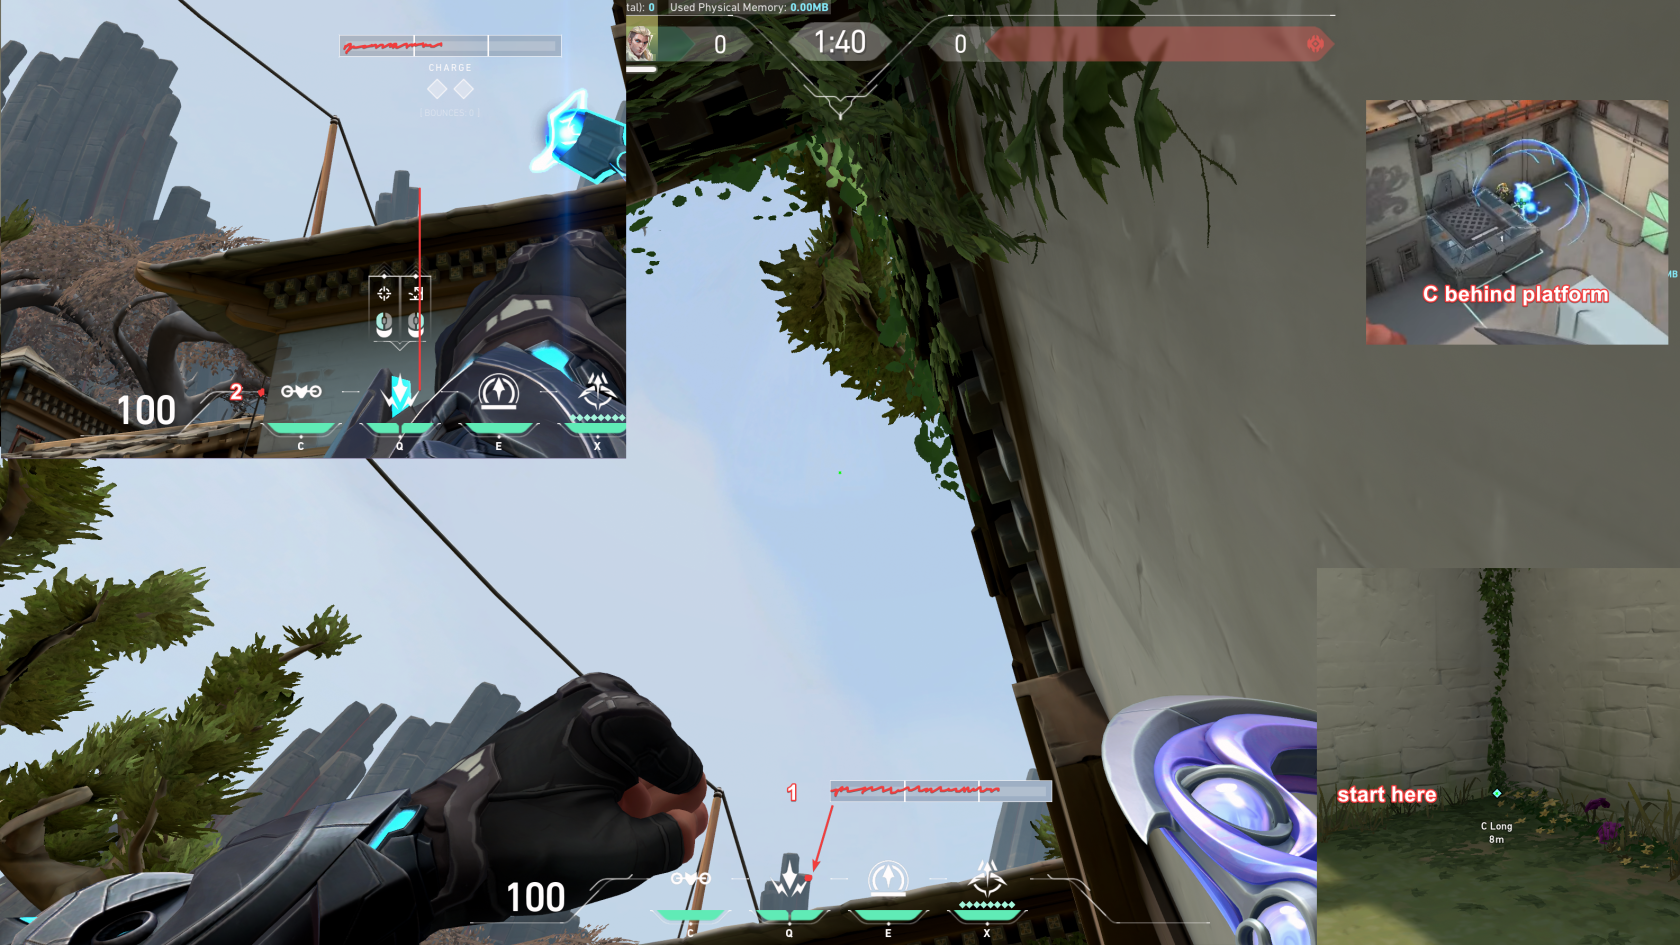
##### **God** Retake C (1 Bounce, Full Bars)
####
[](https://wiki.stoplagging.com/uploads/images/gallery/2022-07/image-1656882718724.png)
C Retake Easy
[](https://wiki.stoplagging.com/uploads/images/gallery/2022-07/image-1656889536086.png)
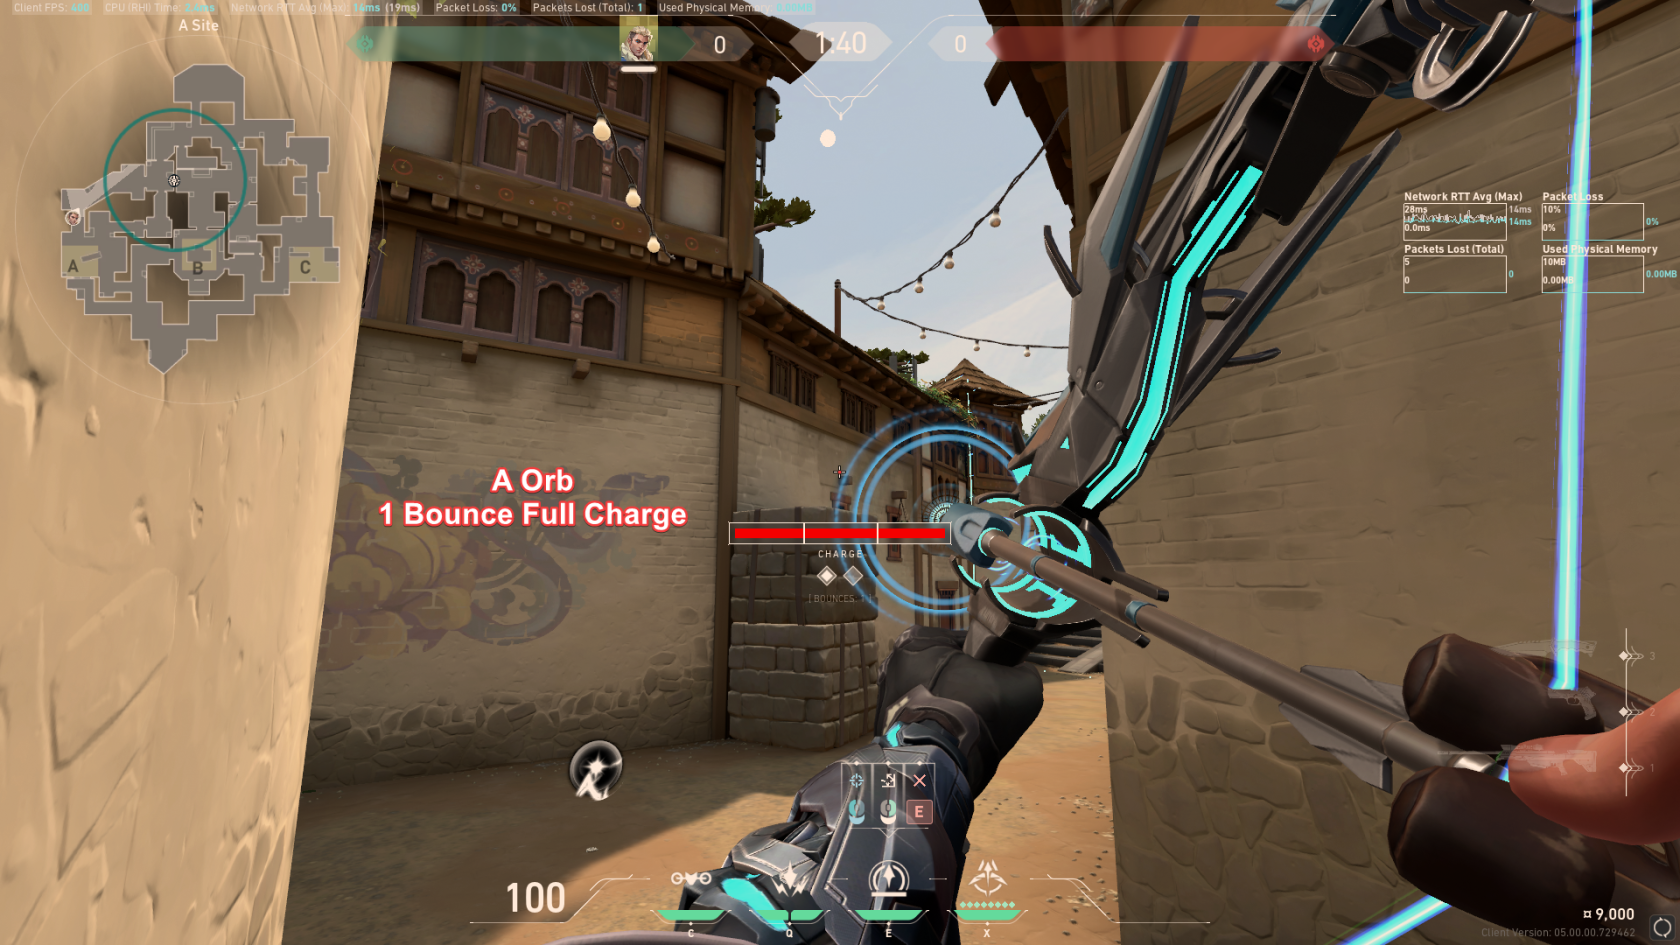
Early Orb A
[](https://wiki.stoplagging.com/uploads/images/gallery/2022-07/image-1656884947178.png)
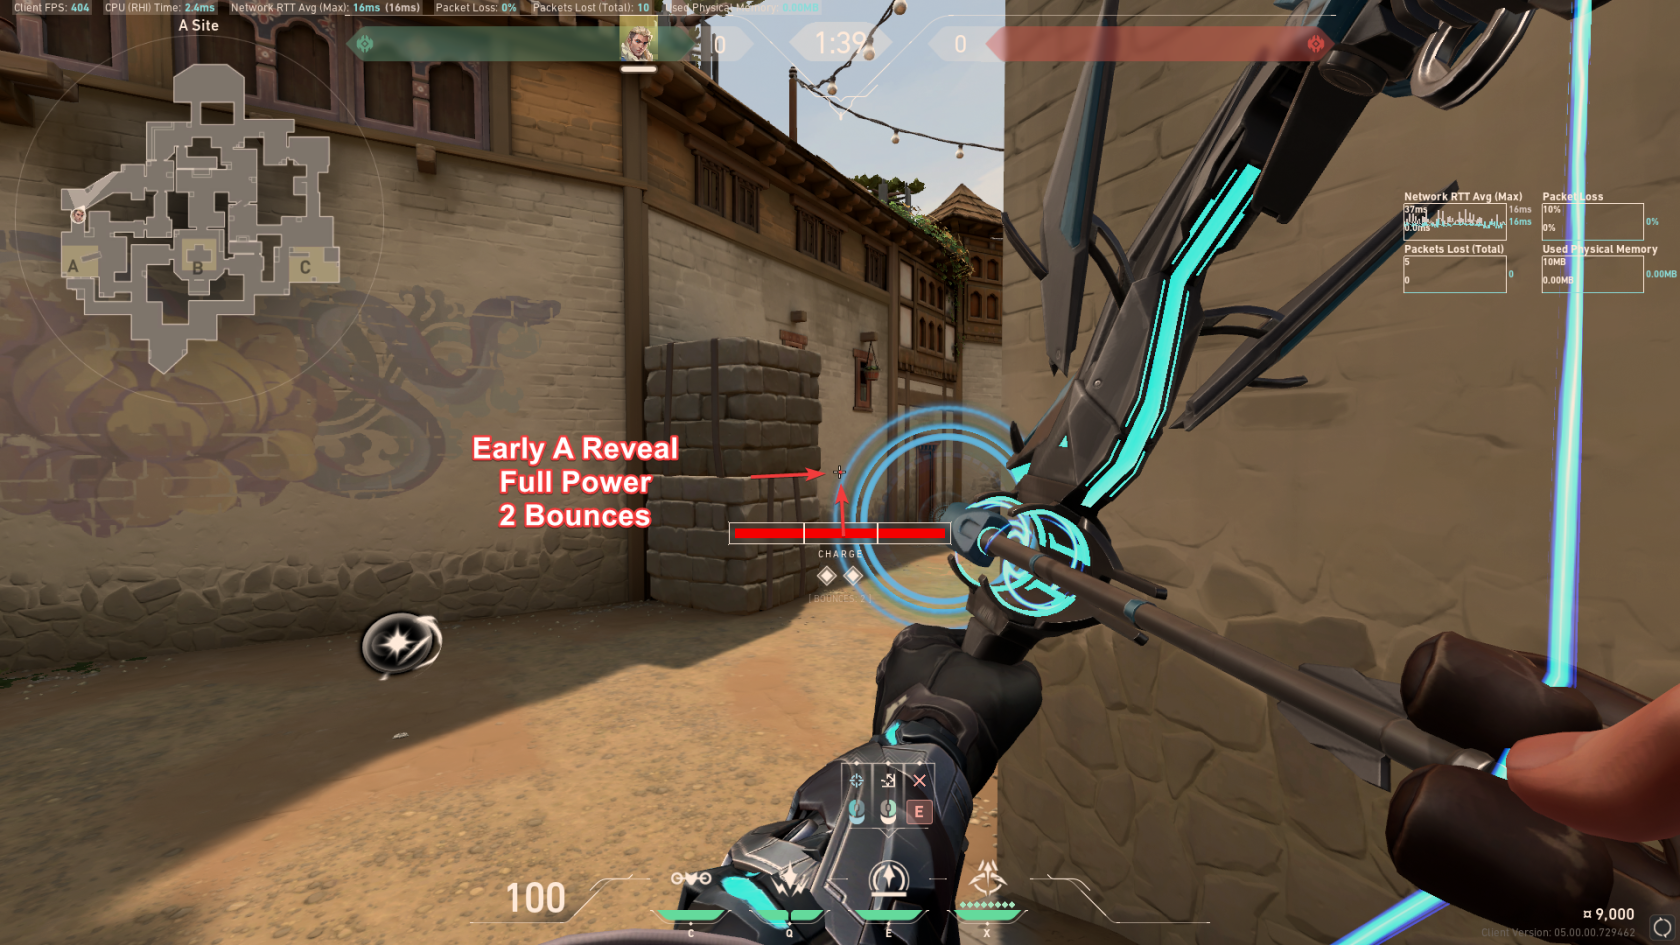
Early A Reveal 2
[](https://wiki.stoplagging.com/uploads/images/gallery/2022-07/image-1656884479018.png)
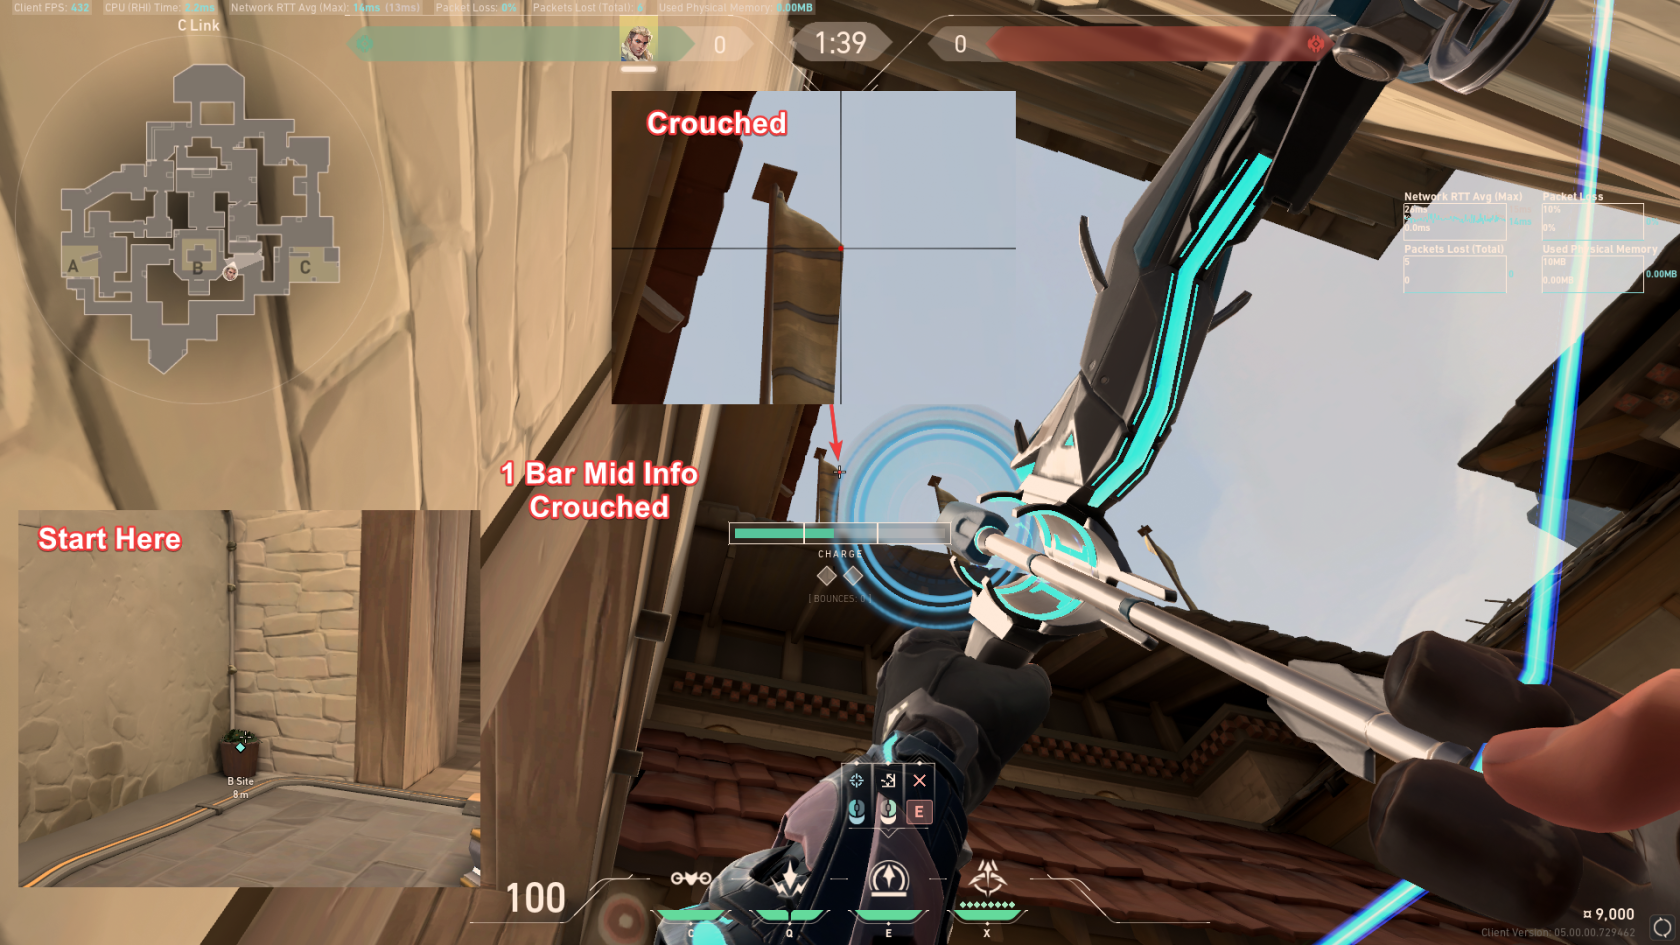
Hidden Mid Info
[](https://wiki.stoplagging.com/uploads/images/gallery/2022-07/image-1656889412283.png)
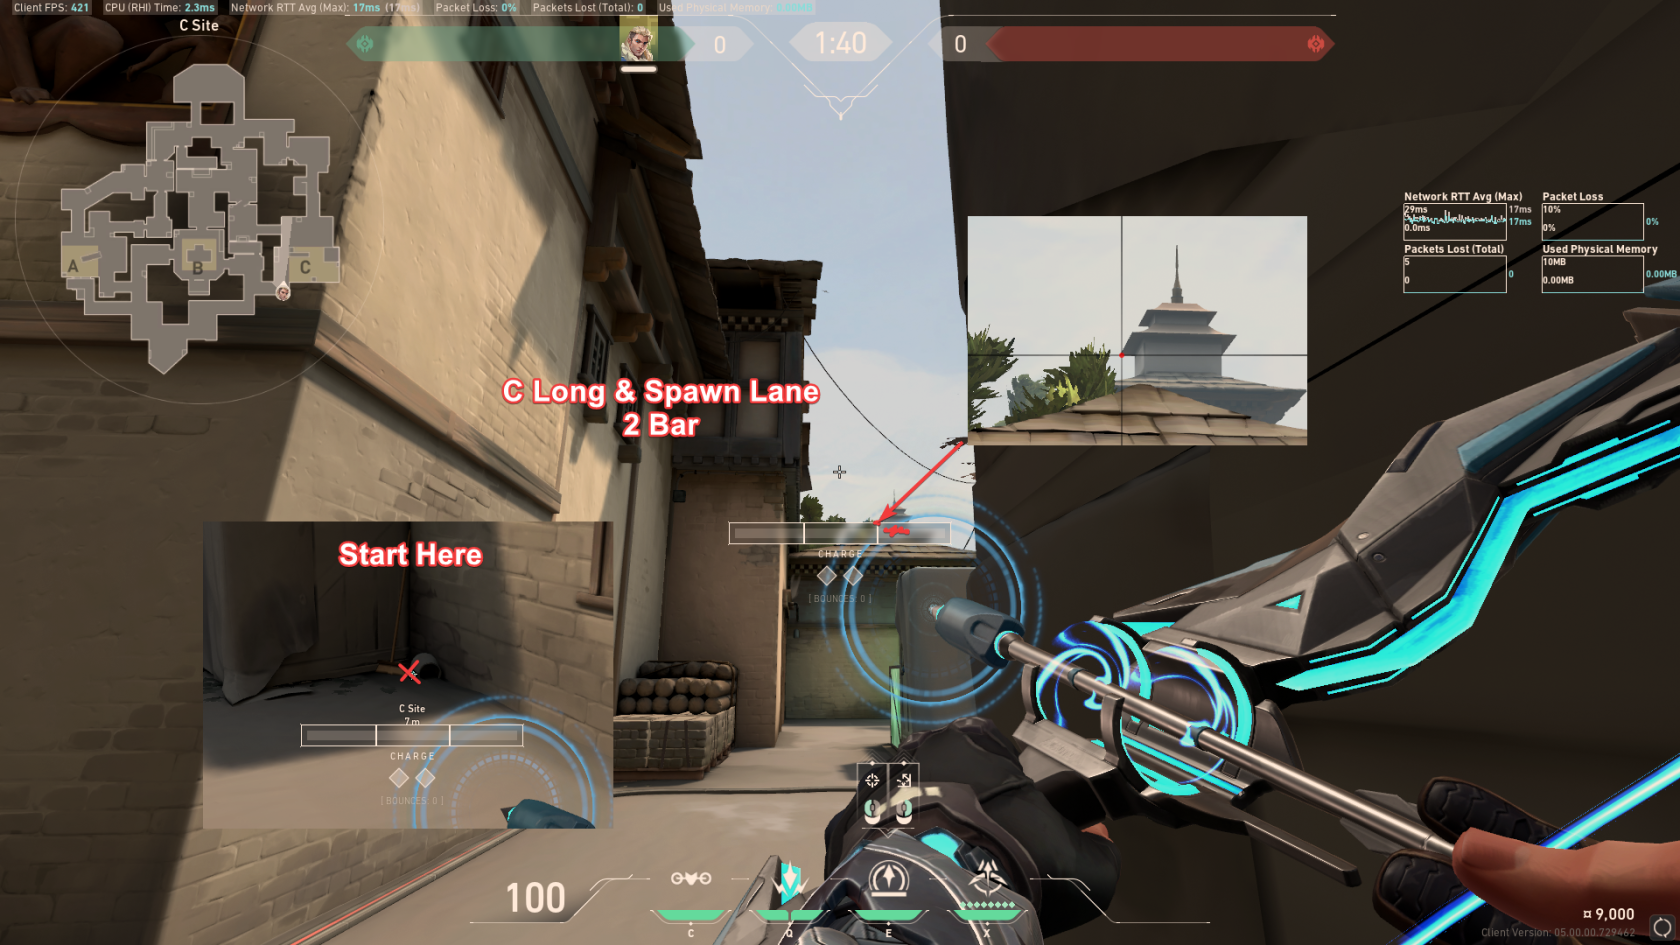
C Long + Spawn Lane
[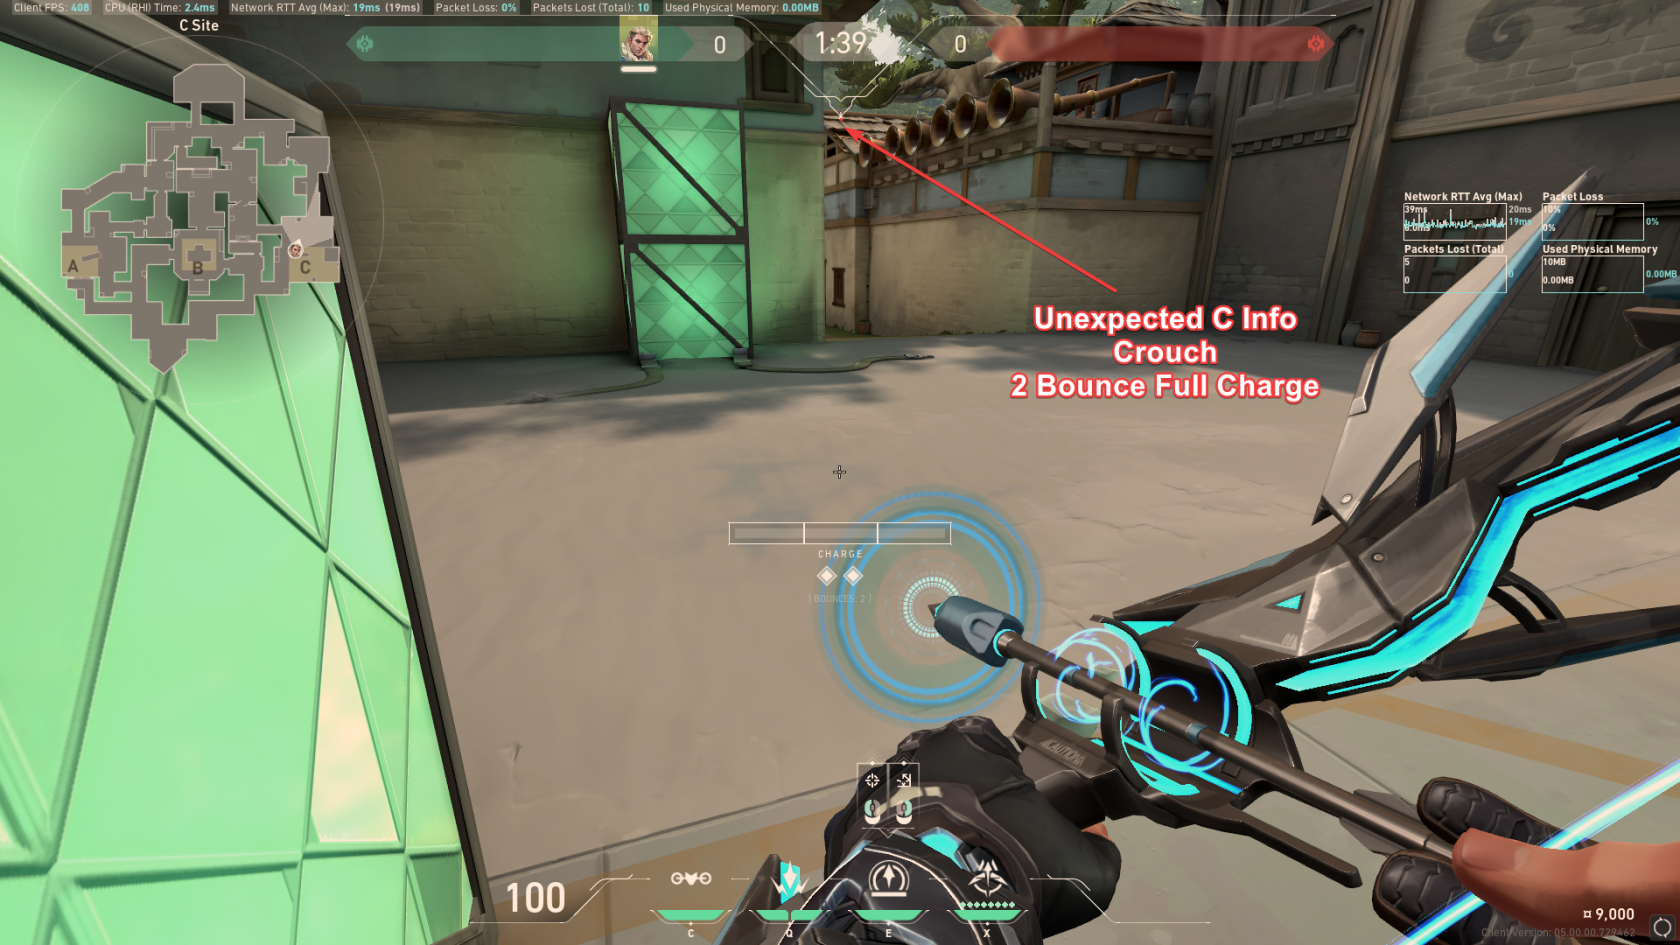](https://wiki.stoplagging.com/uploads/images/gallery/2022-07/image-1656884786114.png)
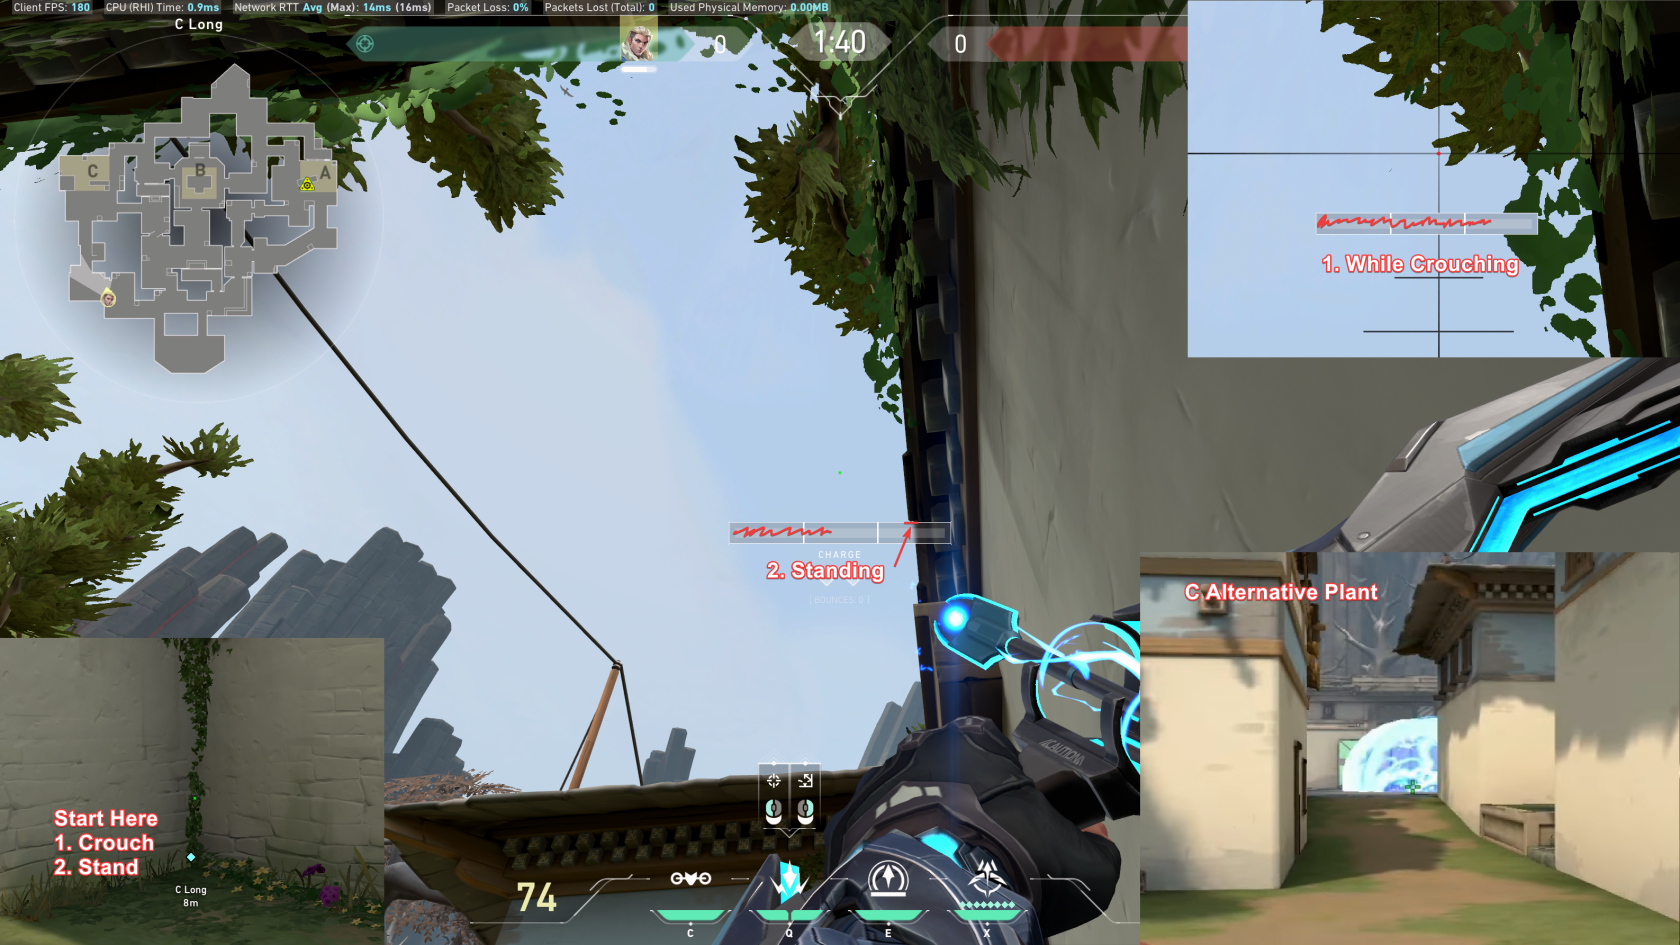
Unexpected C Long
## Shocks
##### Double shock A Default
[](https://wiki.stoplagging.com/uploads/images/gallery/2023-01/image-1674707547589.png)
##### Double shock C Default Plant
[](https://wiki.stoplagging.com/uploads/images/gallery/2023-01/image-1674708766595.png)
##### Double Shock Behind C Box Camper (Great for Pistol Round)
[](https://wiki.stoplagging.com/uploads/images/gallery/2023-01/image-1674708817278.png)
##### Double shock C Alt Plant
[](https://wiki.stoplagging.com/uploads/images/gallery/2023-01/image-1674709430925.png)
# Sova Line Ups Bind
##### Hookah to Pocket 2.5 Bars
[](https://wiki.stoplagging.com/uploads/images/gallery/2022-07/image-1656829081981.png)
##### Short to Cat (1 Bounce, Full Bars)
##### Short To Top of A Haven (1 Bar)
Line up to corner of newspaper. Then aim where 2nd wire and leaf intersect.
##### Long B Flank From B Site (Full Bars)
Line up first bar with wooden beam.
##### B Defense To Long Recon (0 Bars)
Cover top of window with first knuckle.
# Sova Line Ups Split
## Offense
##### **God** Arrow Outside B Garage to Heaven (2 Bounces, Full Bars)
Use the 3rd white bar line it up against the right most pipe. Shoot slightly below 2nd power line.
##### Variation of Outside B Garage To Heaven (1 Bar)
##### **God** Bugged Reveal of CT Spawn from B Site (1 Bounce, Full Bars)
Same idea aim for the slit except do one bounce.
##### Tspawn to A Checks Elbow But Not Close Right (Full Bars)
Line up to edge of gravel box. Aim as shown.
##### Tspawn to A Checks Most But Not Elbow (Full Bars)
Line up to edge of gravel box. Aim as shown. Dark rectangle next to billboard.
##### Bugged Arrow From T Spawn To Mid (1 Bar)
Line up to dark spot on concrete.
##### Cheese T-Spawn to A-Ramp for Ult (1 Bar)
## Defense
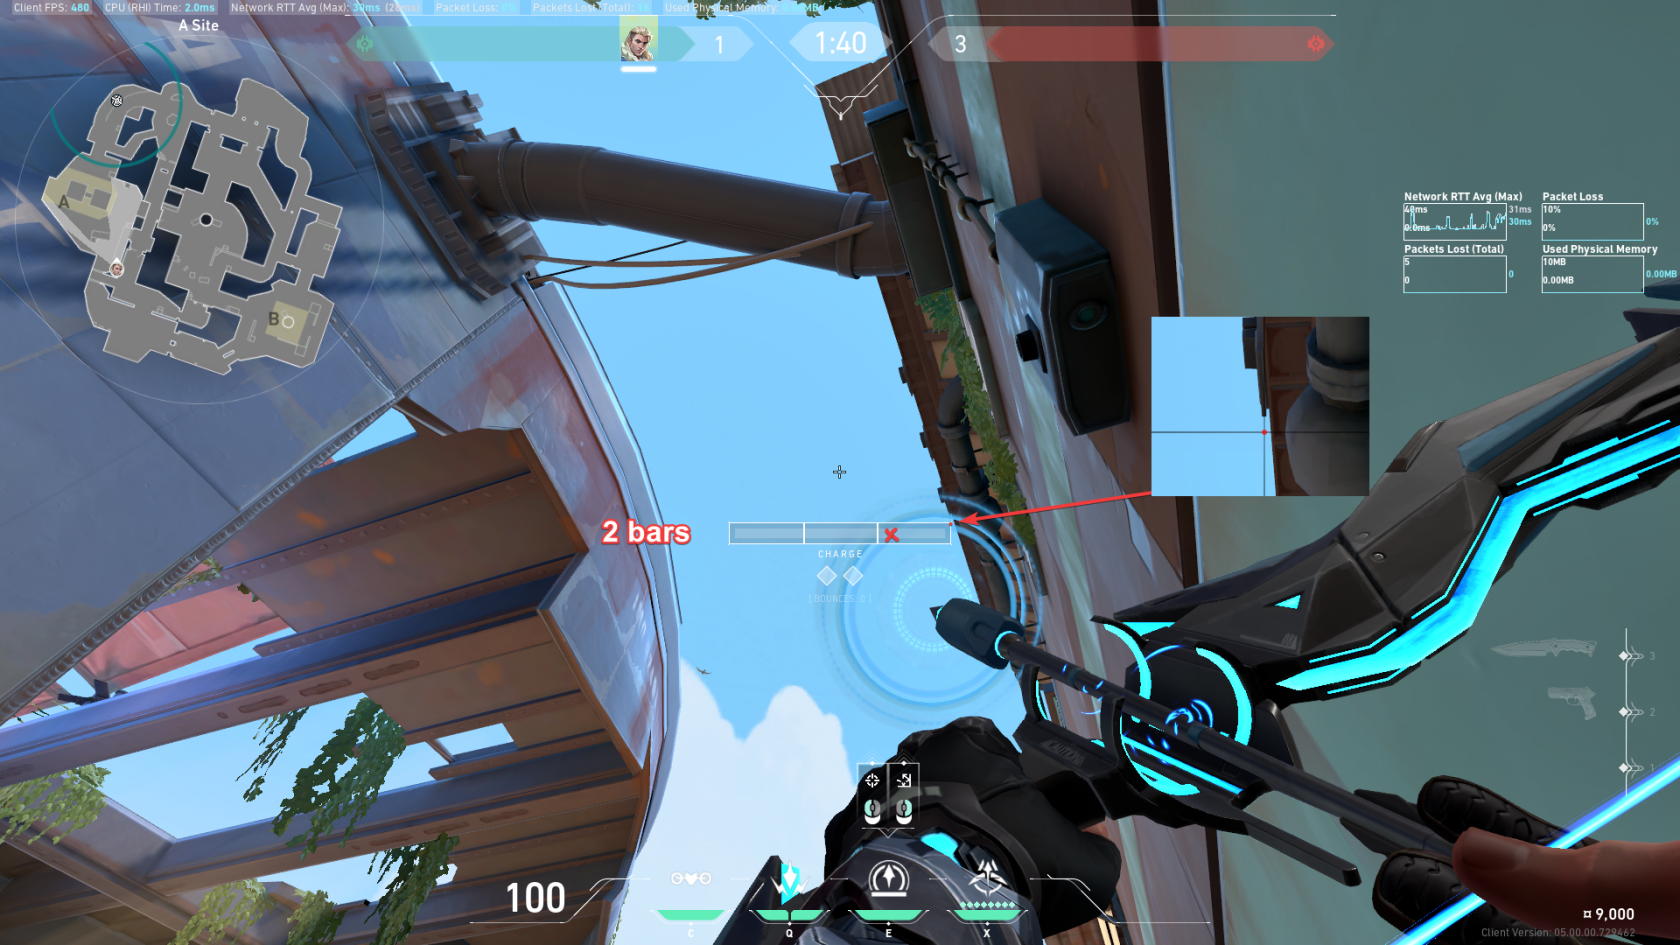
##### B Retake From CT Side of Heaven (1 Bounce, 2 Bars)
Notes line up till wall edge dissapears then aim on top of the red thing.
##### **God** Bugged Retake from Heaven (Full Bars)
Very easy just aim for the slit of the sliding window doesn't matter where you are at heaven.
##### Another Retake B From Heaven (Full Bars)
Literally aim just above the circled B Symbol.
##### A Corner to Recon T Spawn (1 Bar)
First diamond's bottom tip touches top of the corner building
# Sova Lineups Breeze
#### Offense
[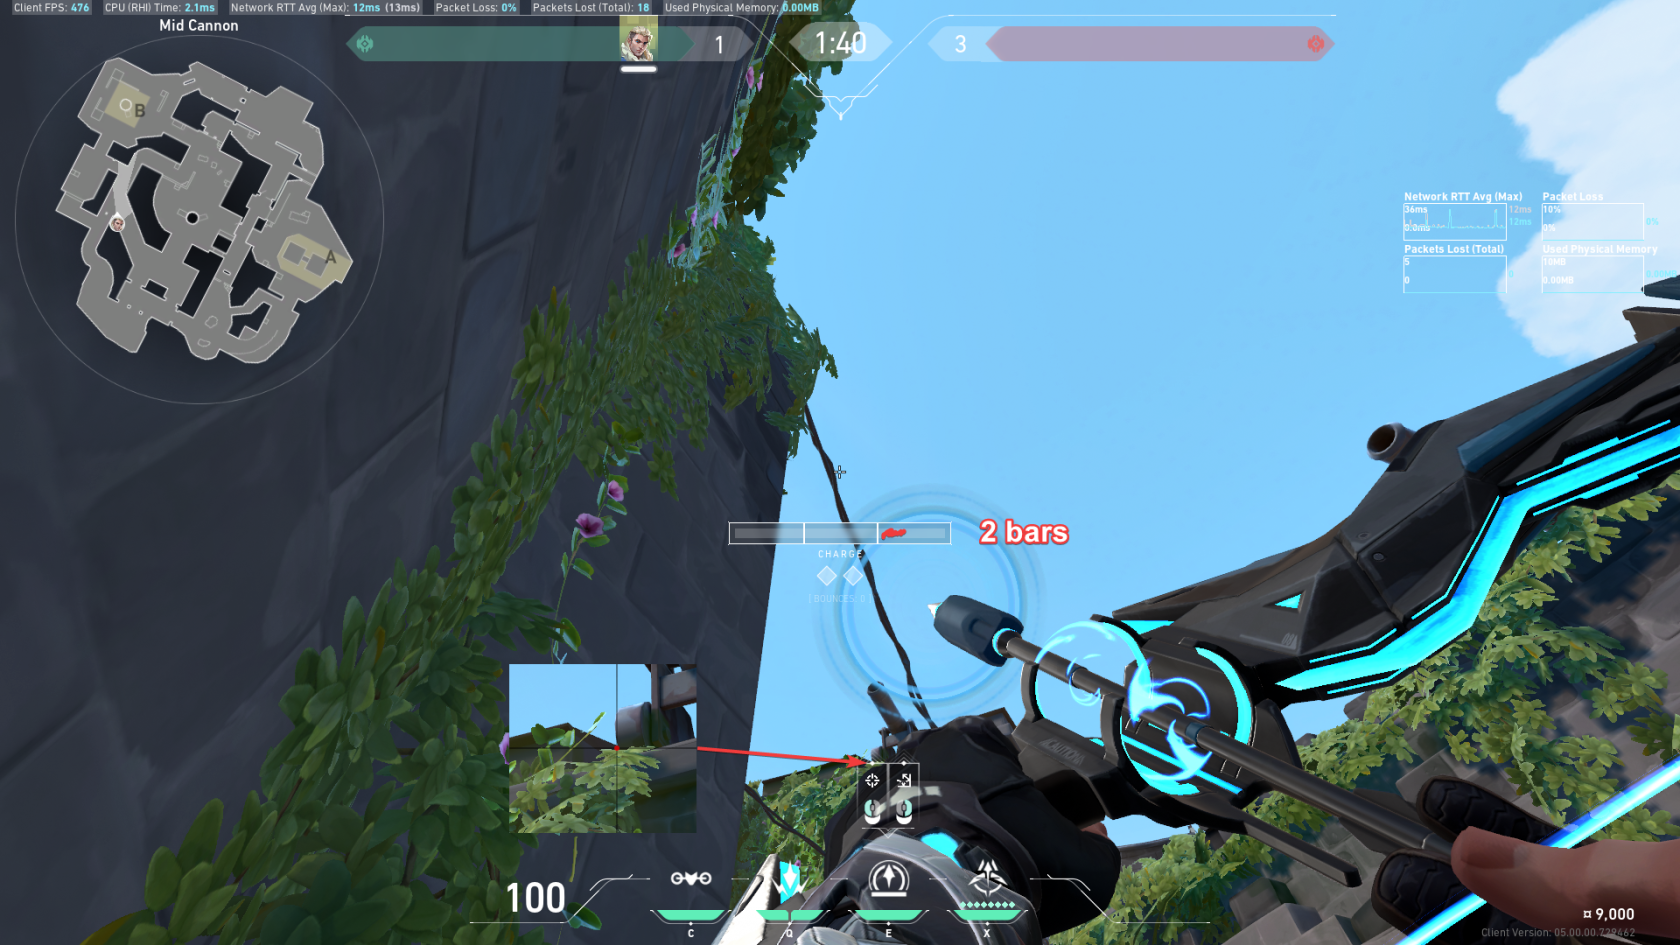](https://wiki.stoplagging.com/uploads/images/gallery/2022-07/image-1656846273869.png)
To B Site
[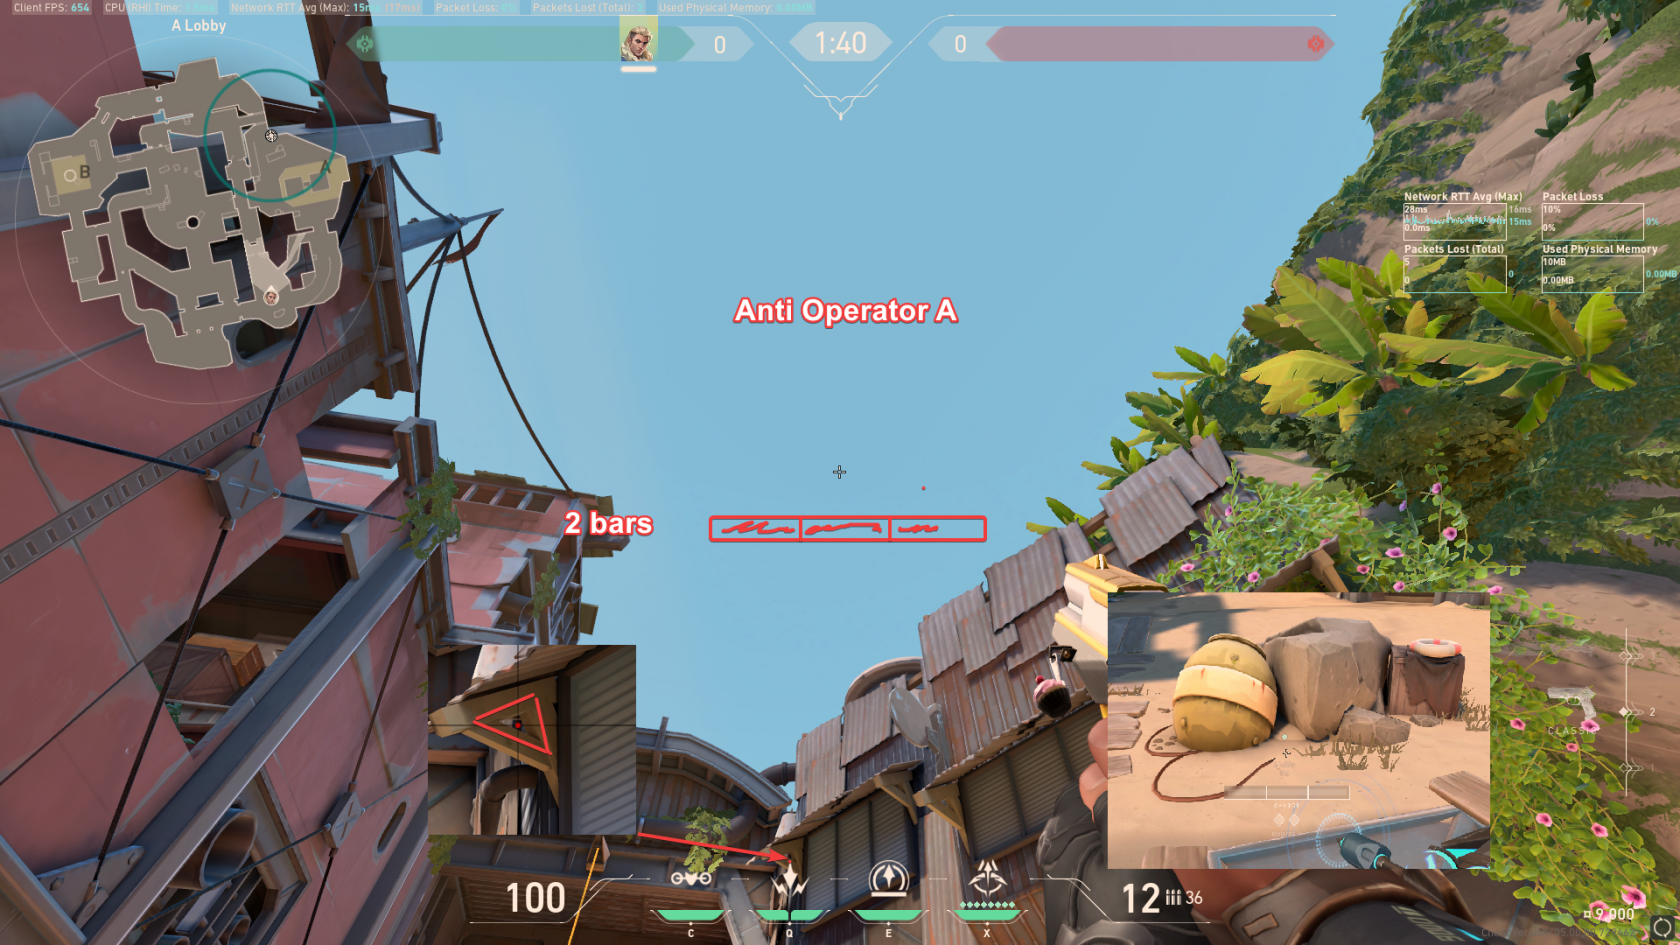](https://wiki.stoplagging.com/uploads/images/gallery/2022-07/image-1656878359121.png)
To A Site Anti Operator
[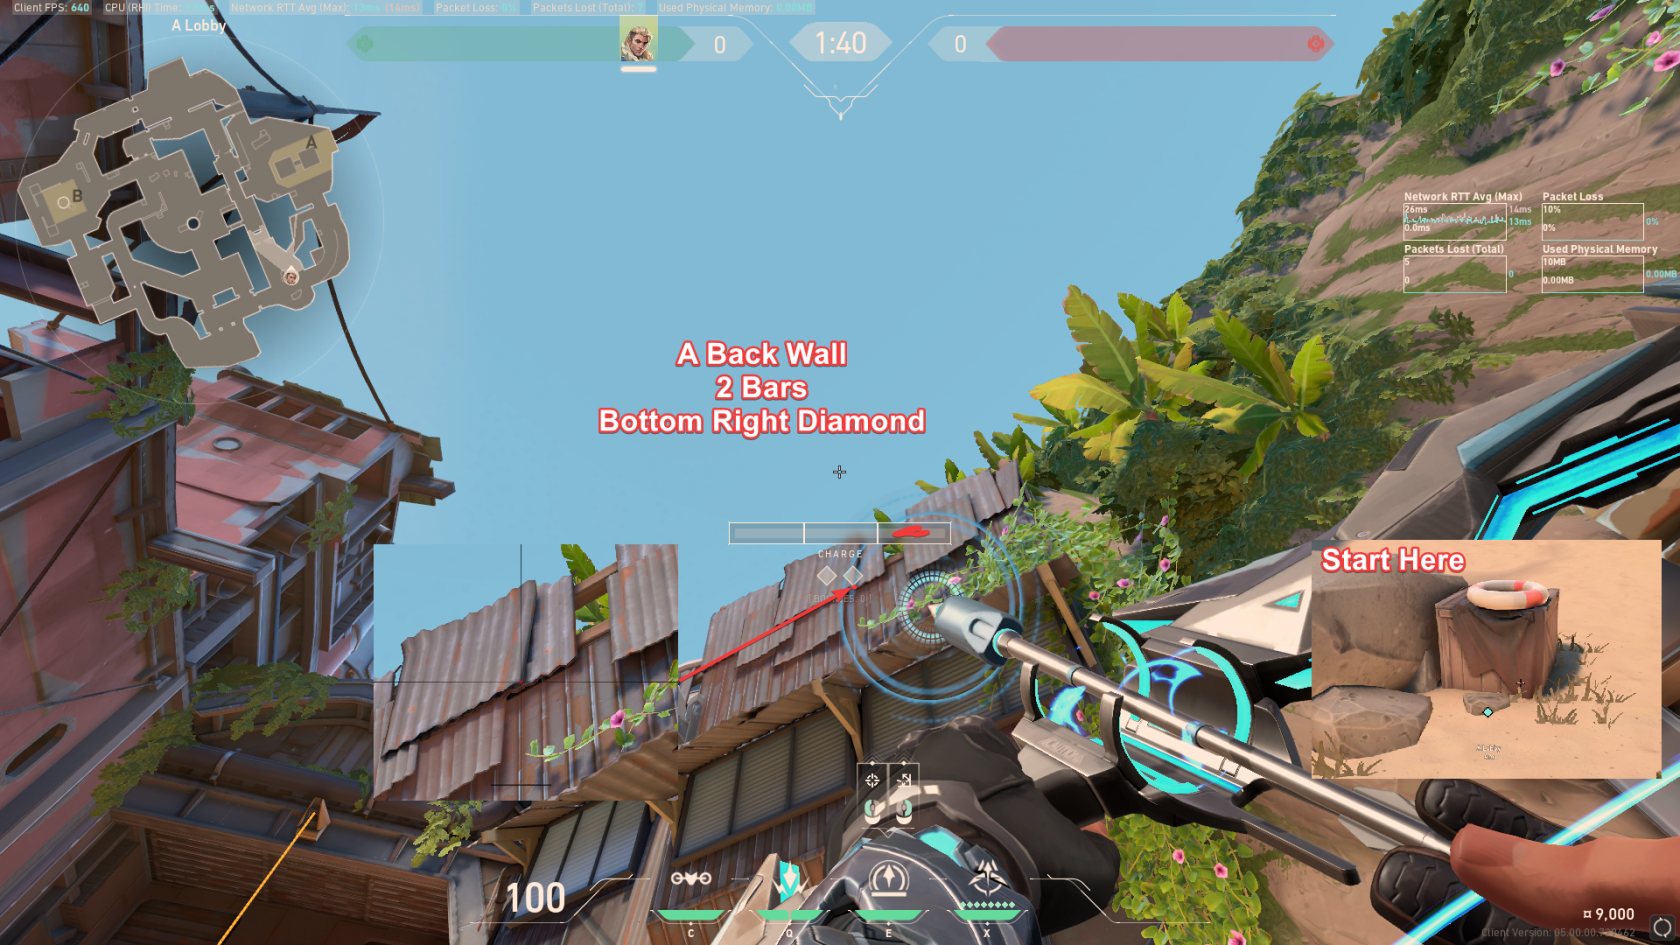](https://wiki.stoplagging.com/uploads/images/gallery/2022-07/image-1656878611878.png)
To A Site Back Wall
#### Defense
[](https://wiki.stoplagging.com/uploads/images/gallery/2022-07/image-1656846310381.png)
To B Cave
[](https://wiki.stoplagging.com/uploads/images/gallery/2022-07/image-1656846327730.png)
To A Cave
# Sova Lineups Ascent
### Defense
[](https://wiki.stoplagging.com/uploads/images/gallery/2022-07/image-1656875455226.png)
A Retake #1
[](https://wiki.stoplagging.com/uploads/images/gallery/2022-07/image-1656876059517.png)
A Retake #2
[](https://wiki.stoplagging.com/uploads/images/gallery/2022-07/image-1656875980412.png)
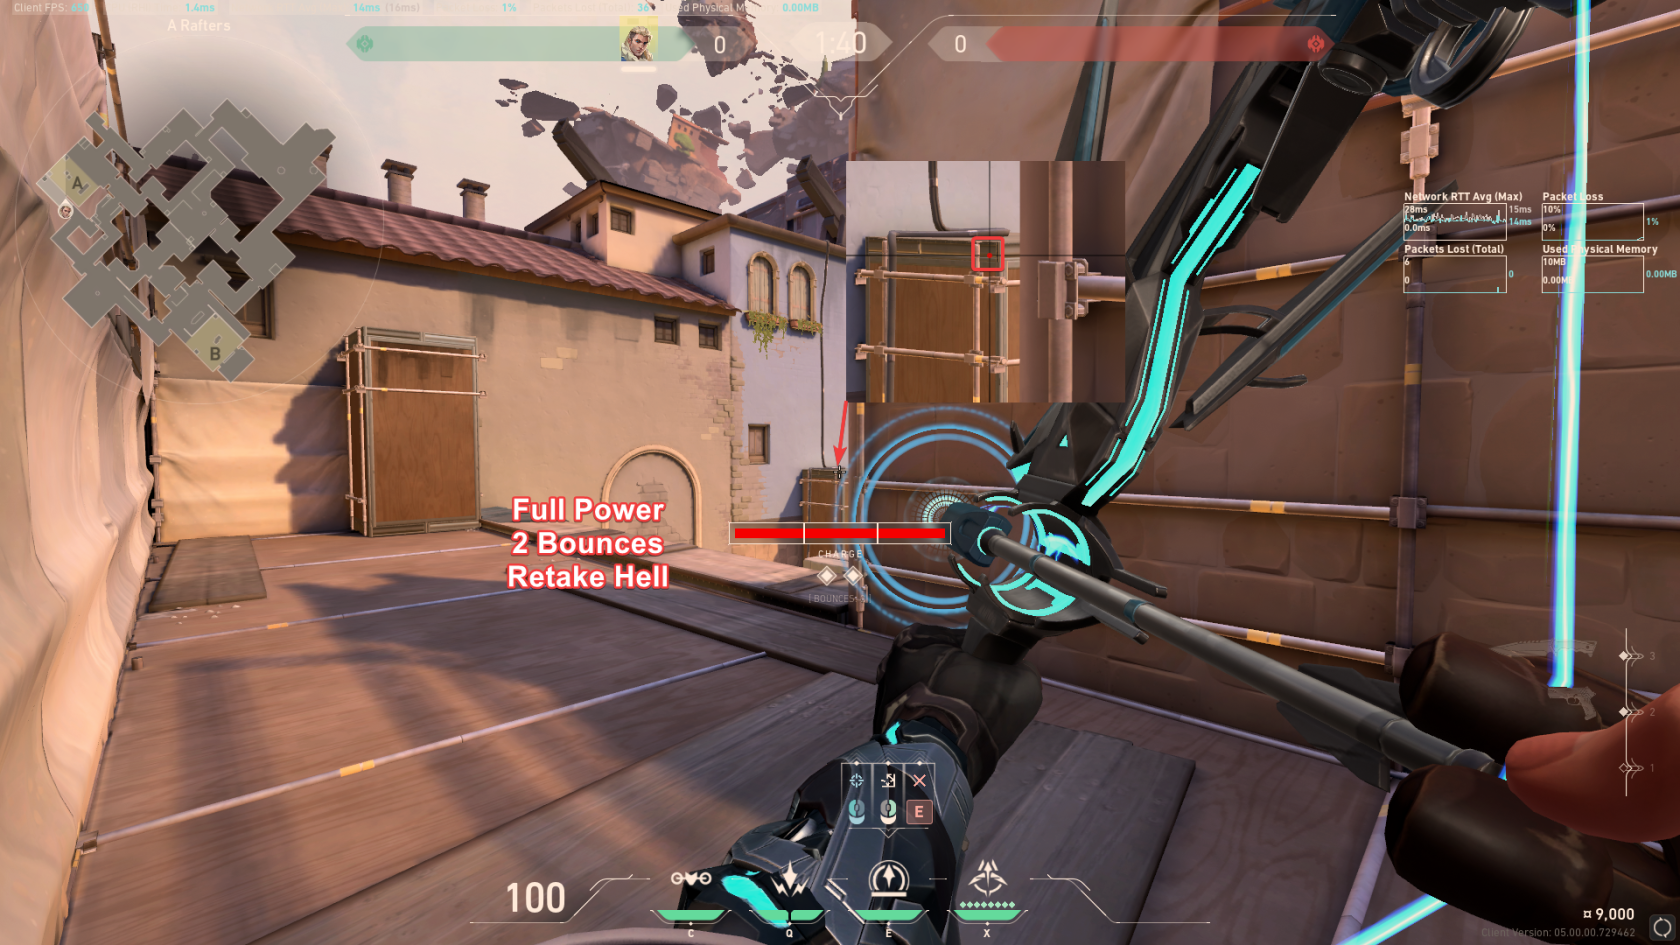
A Hell Retake
[](https://wiki.stoplagging.com/uploads/images/gallery/2022-07/image-1656876212923.png)
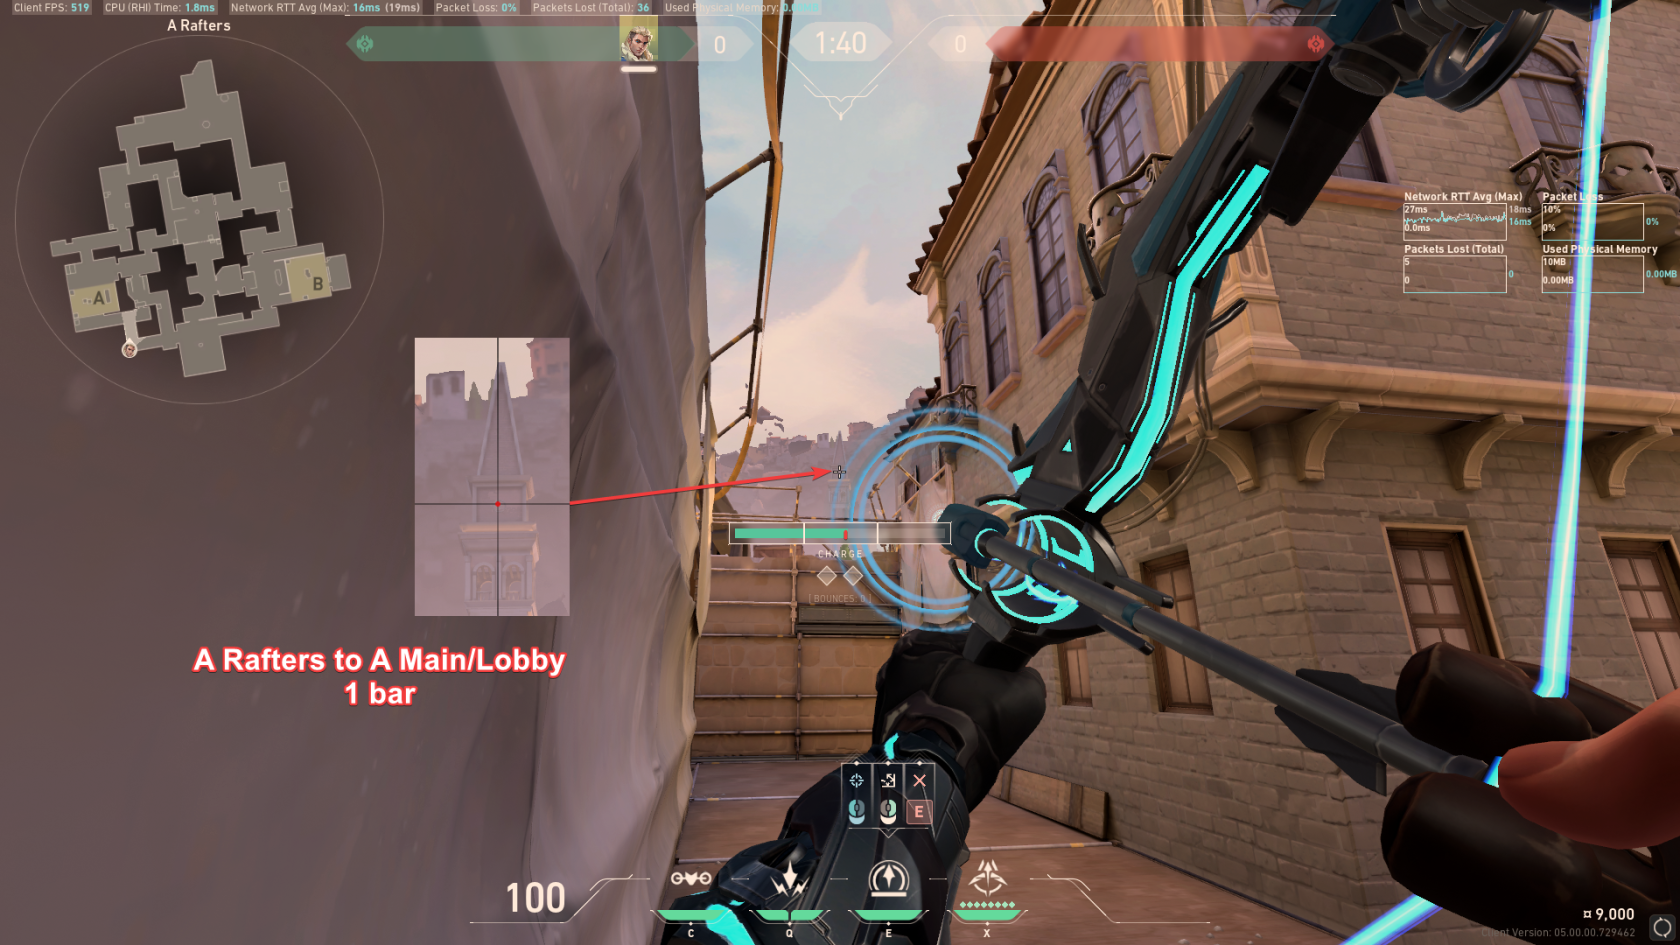
A Rafters to A Lobby
### Attack
[](https://wiki.stoplagging.com/uploads/images/gallery/2022-07/image-1656875525290.png)
Clear A Site
[](https://wiki.stoplagging.com/uploads/images/gallery/2022-07/image-1656875722896.png)
Clear Tree
[](https://wiki.stoplagging.com/uploads/images/gallery/2022-07/image-1656877018709.png)
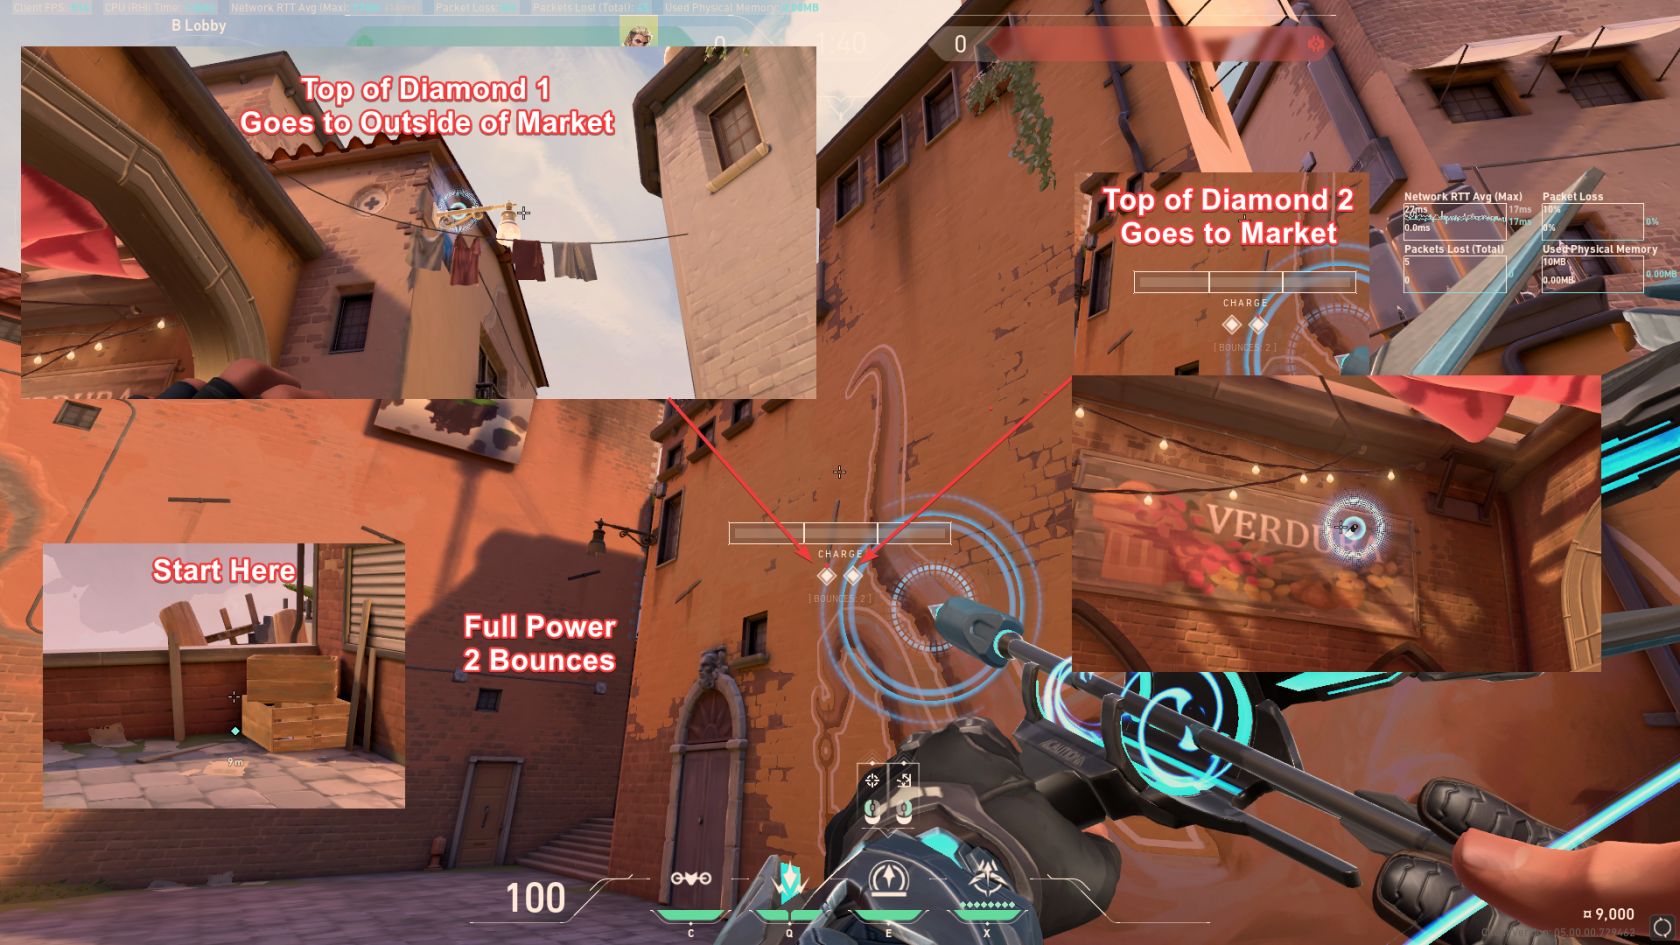
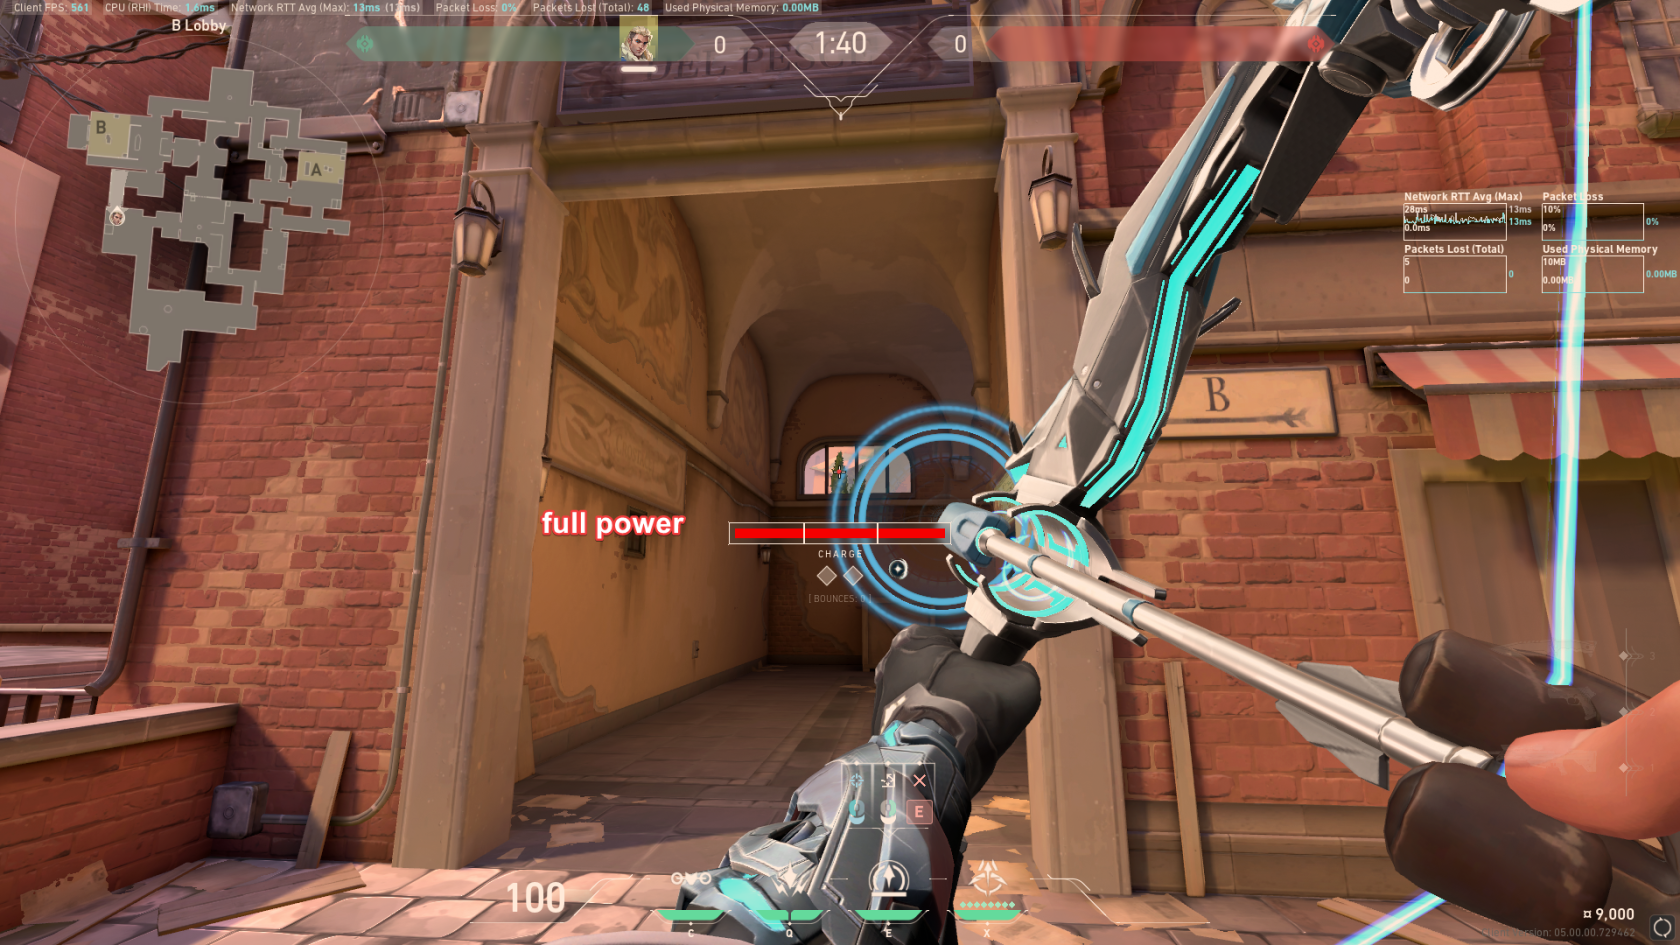
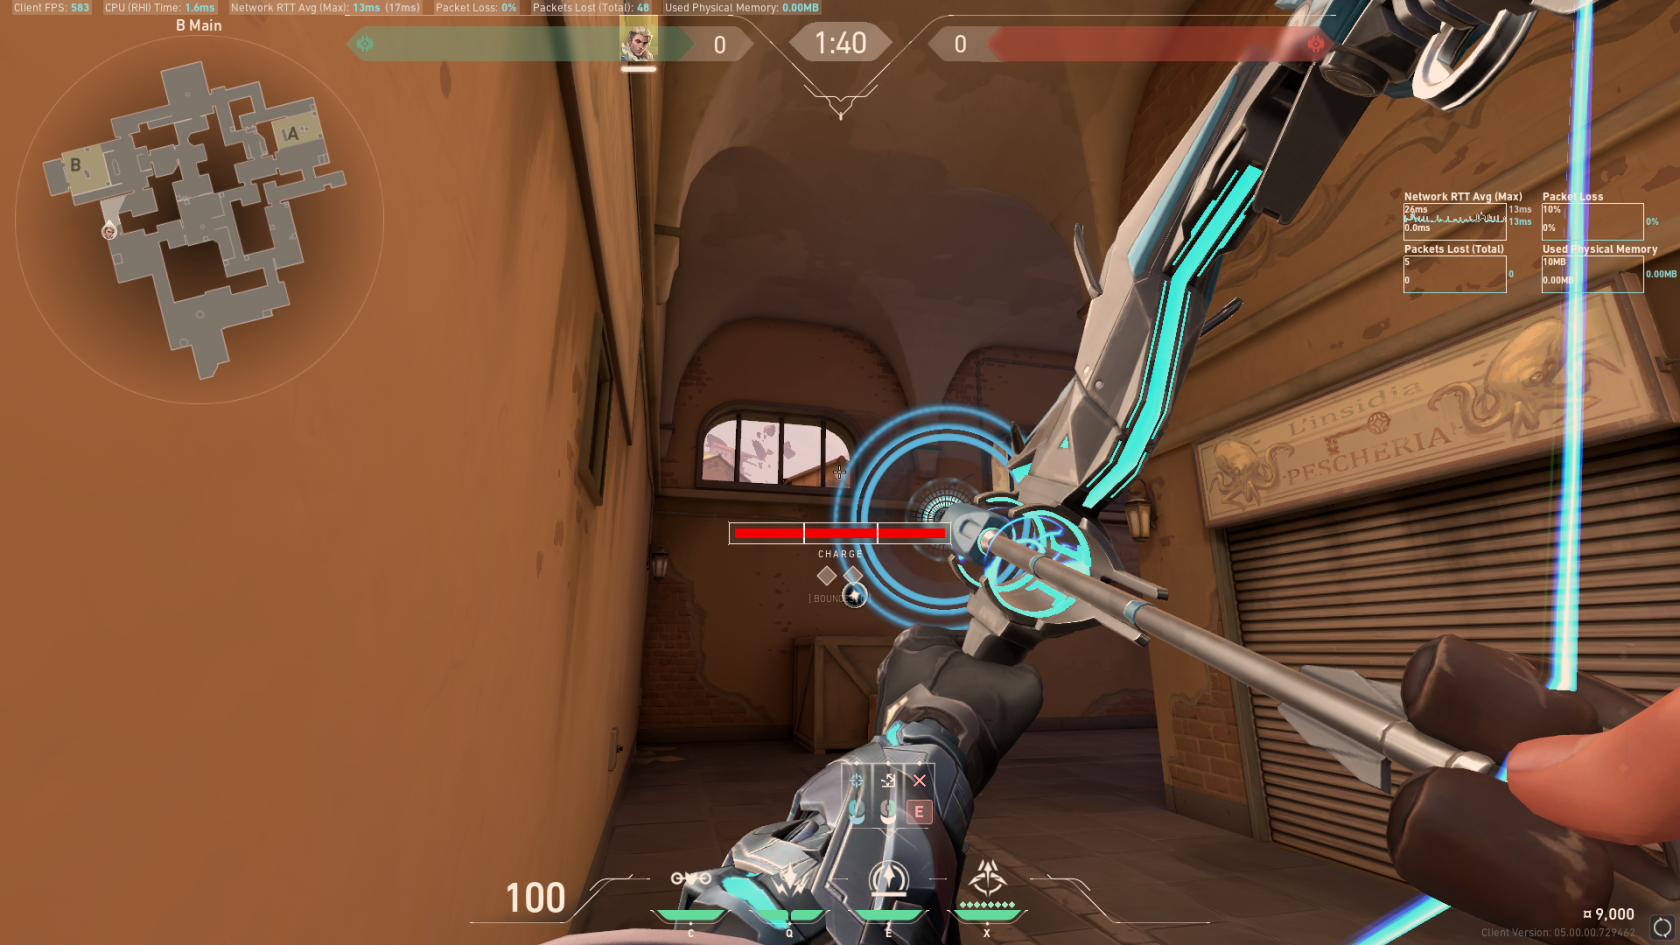
Clear Market or Outside Market
[](https://wiki.stoplagging.com/uploads/images/gallery/2022-07/image-1656877696932.png)
Clear Deep B
[](https://wiki.stoplagging.com/uploads/images/gallery/2022-07/image-1656877757240.png)
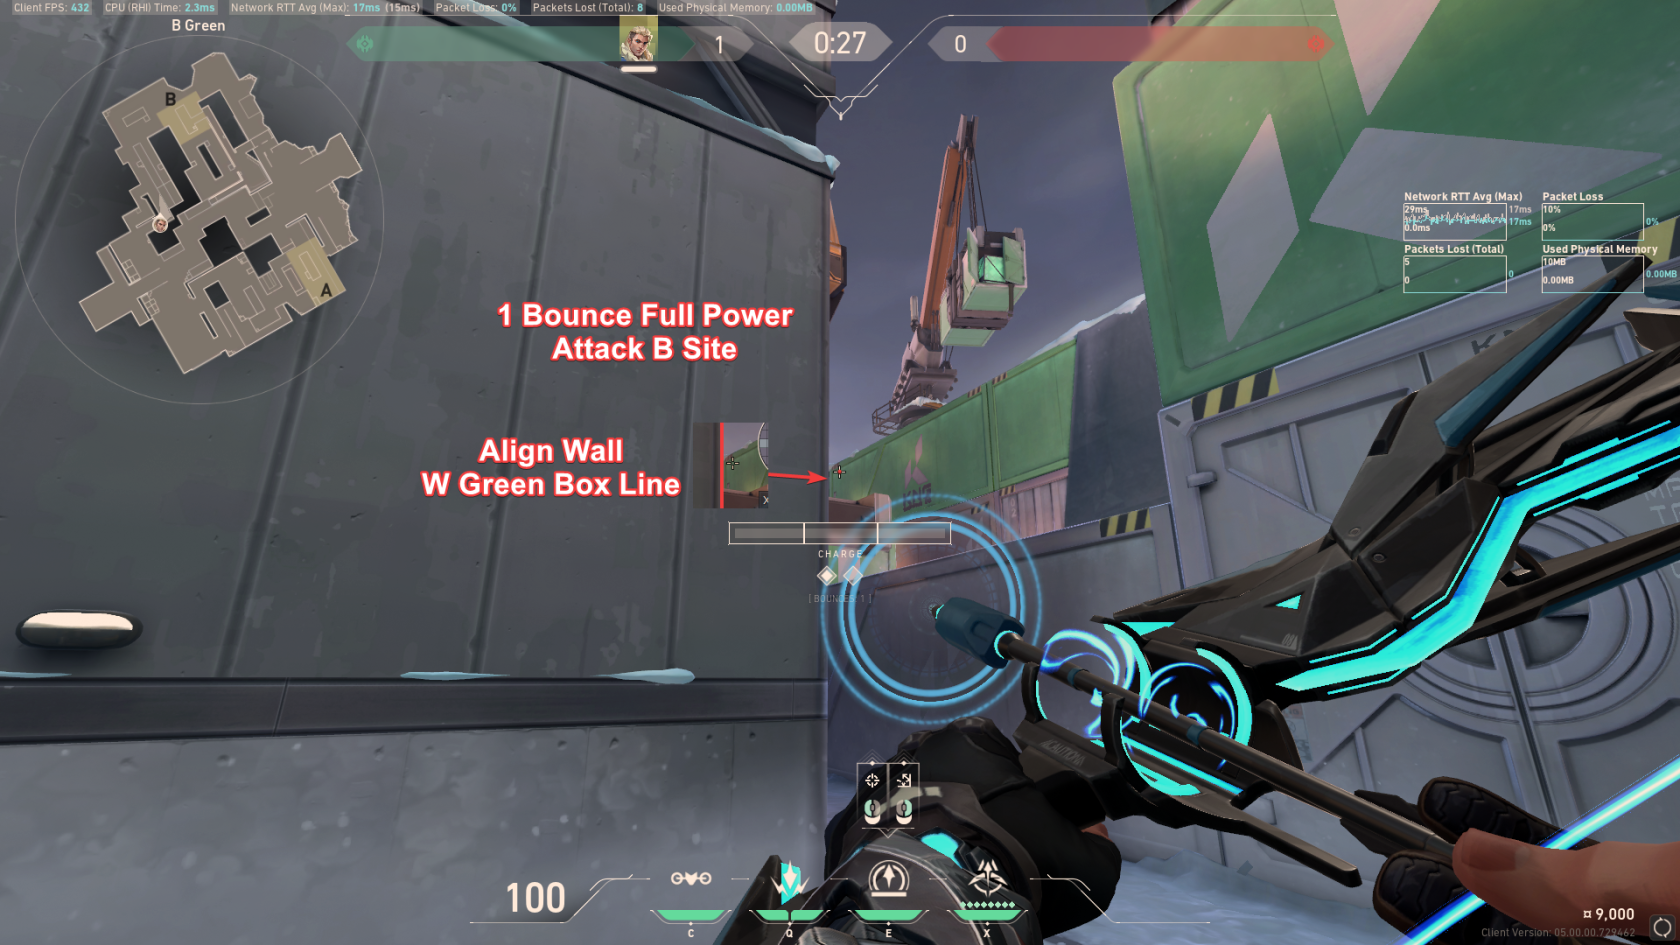
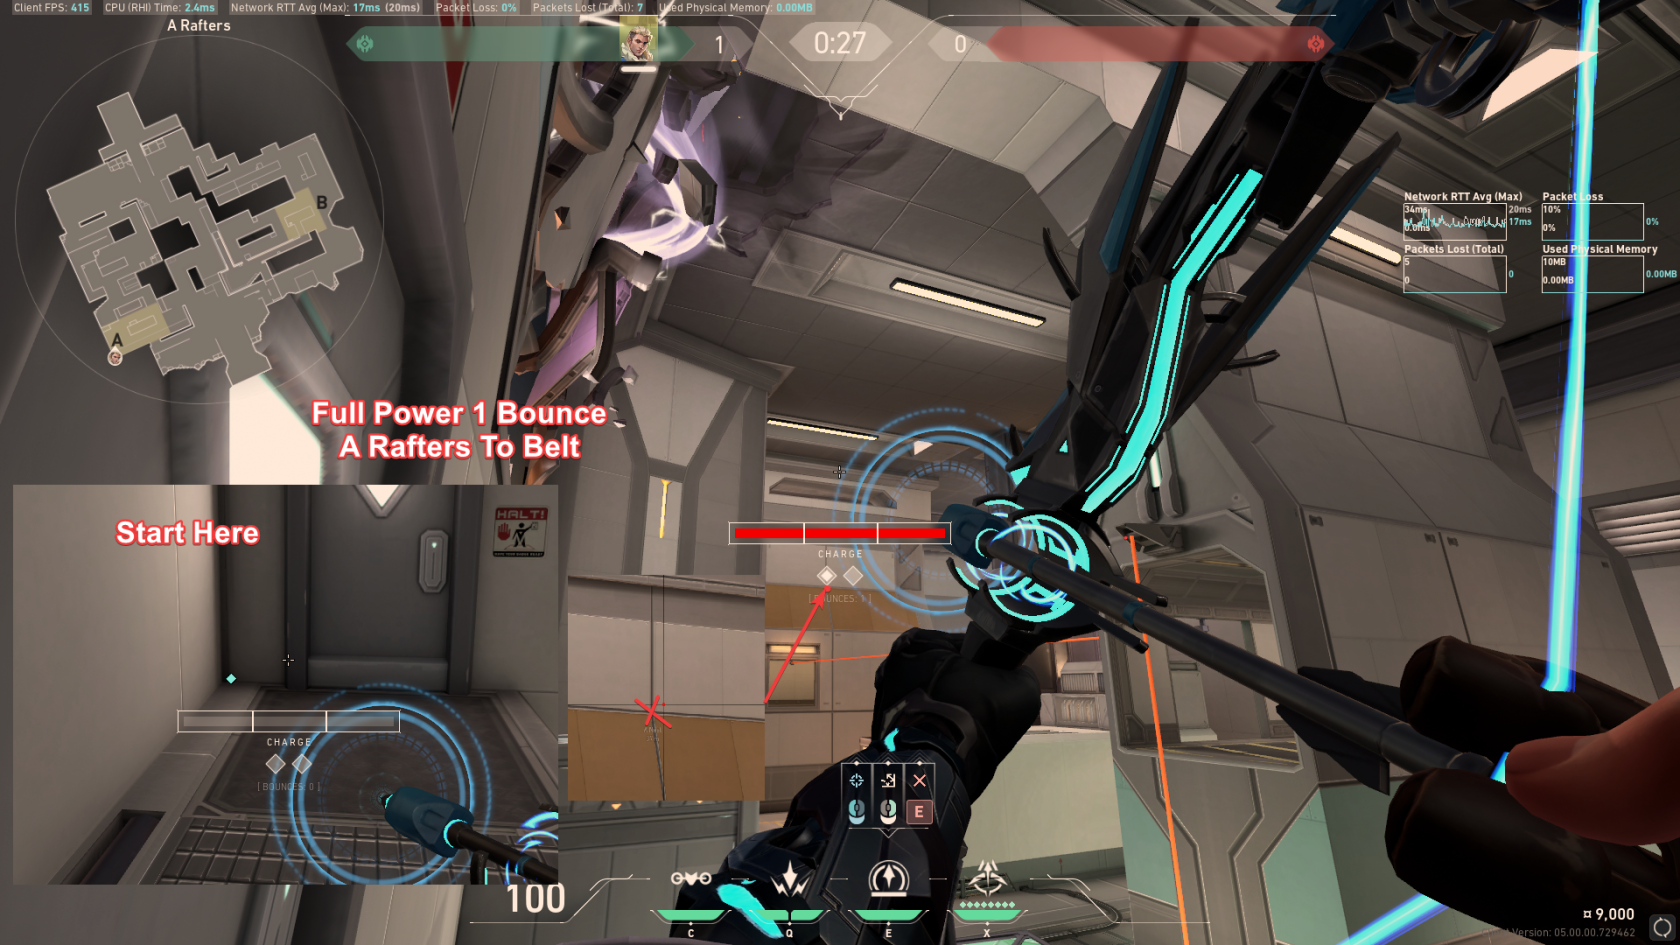
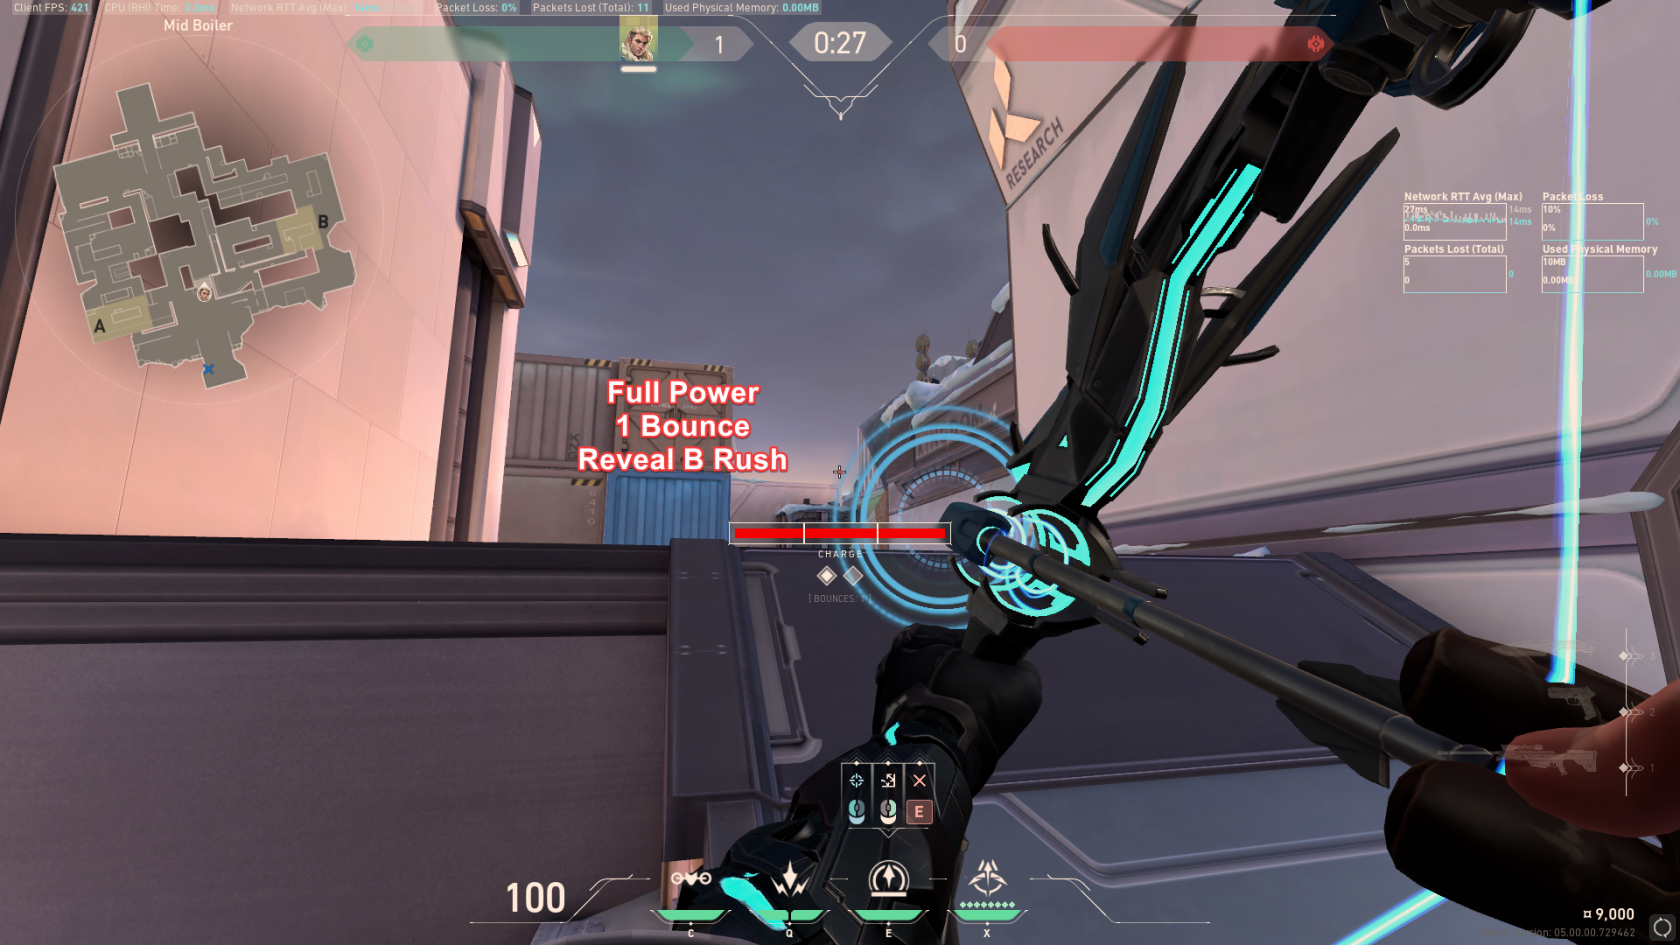
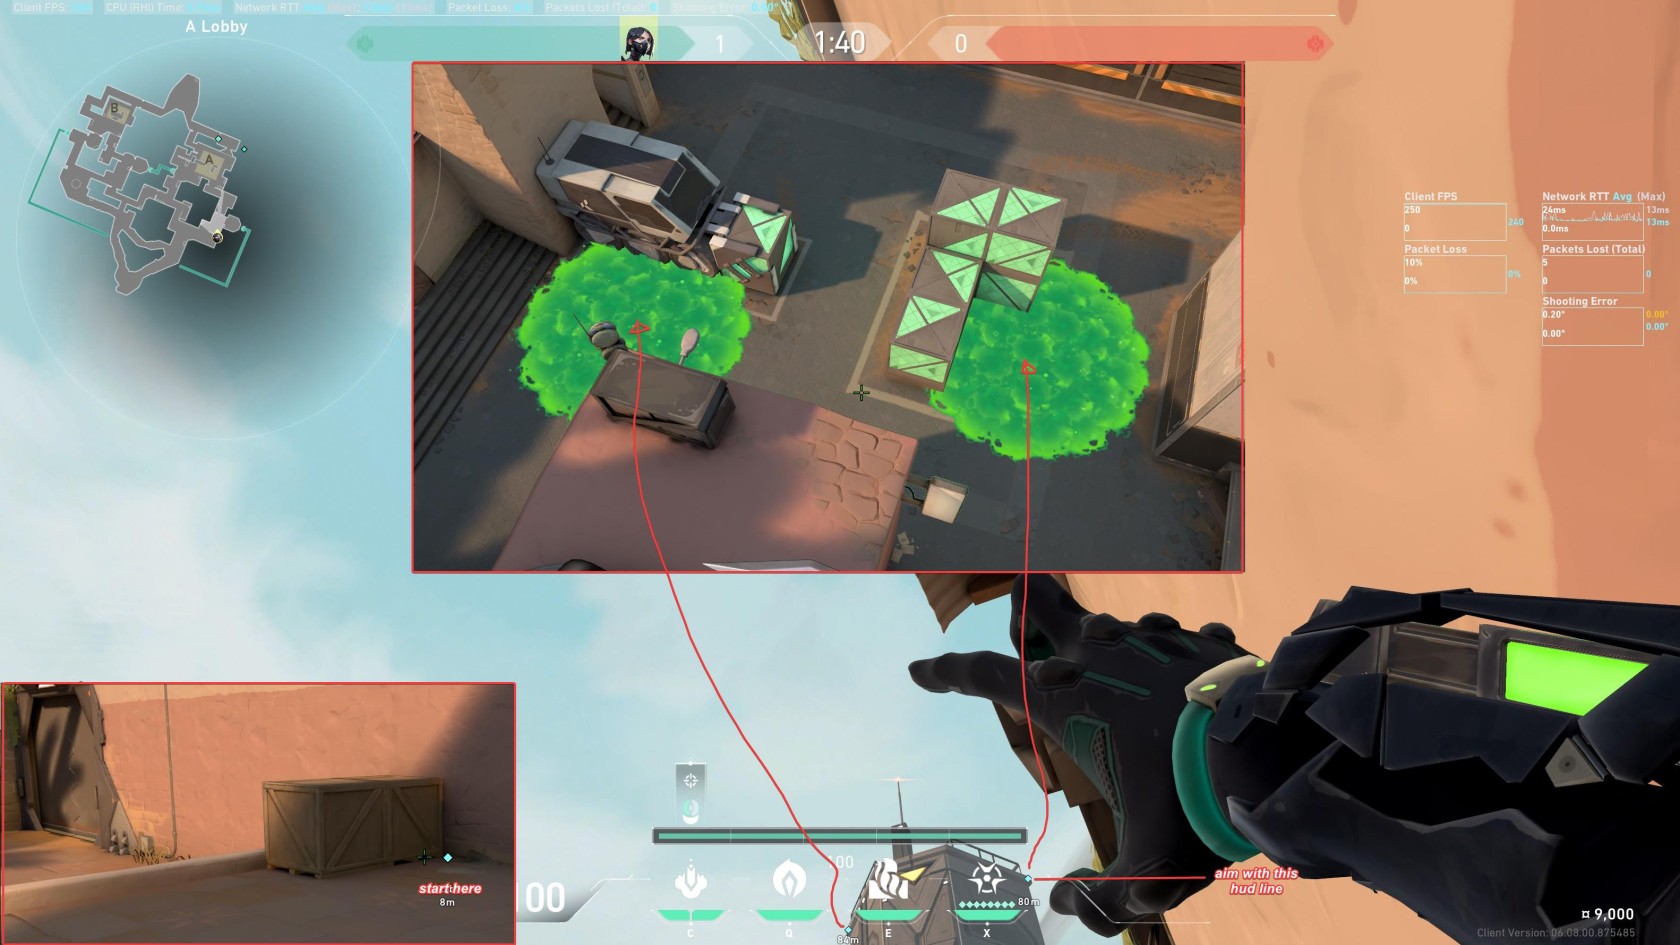
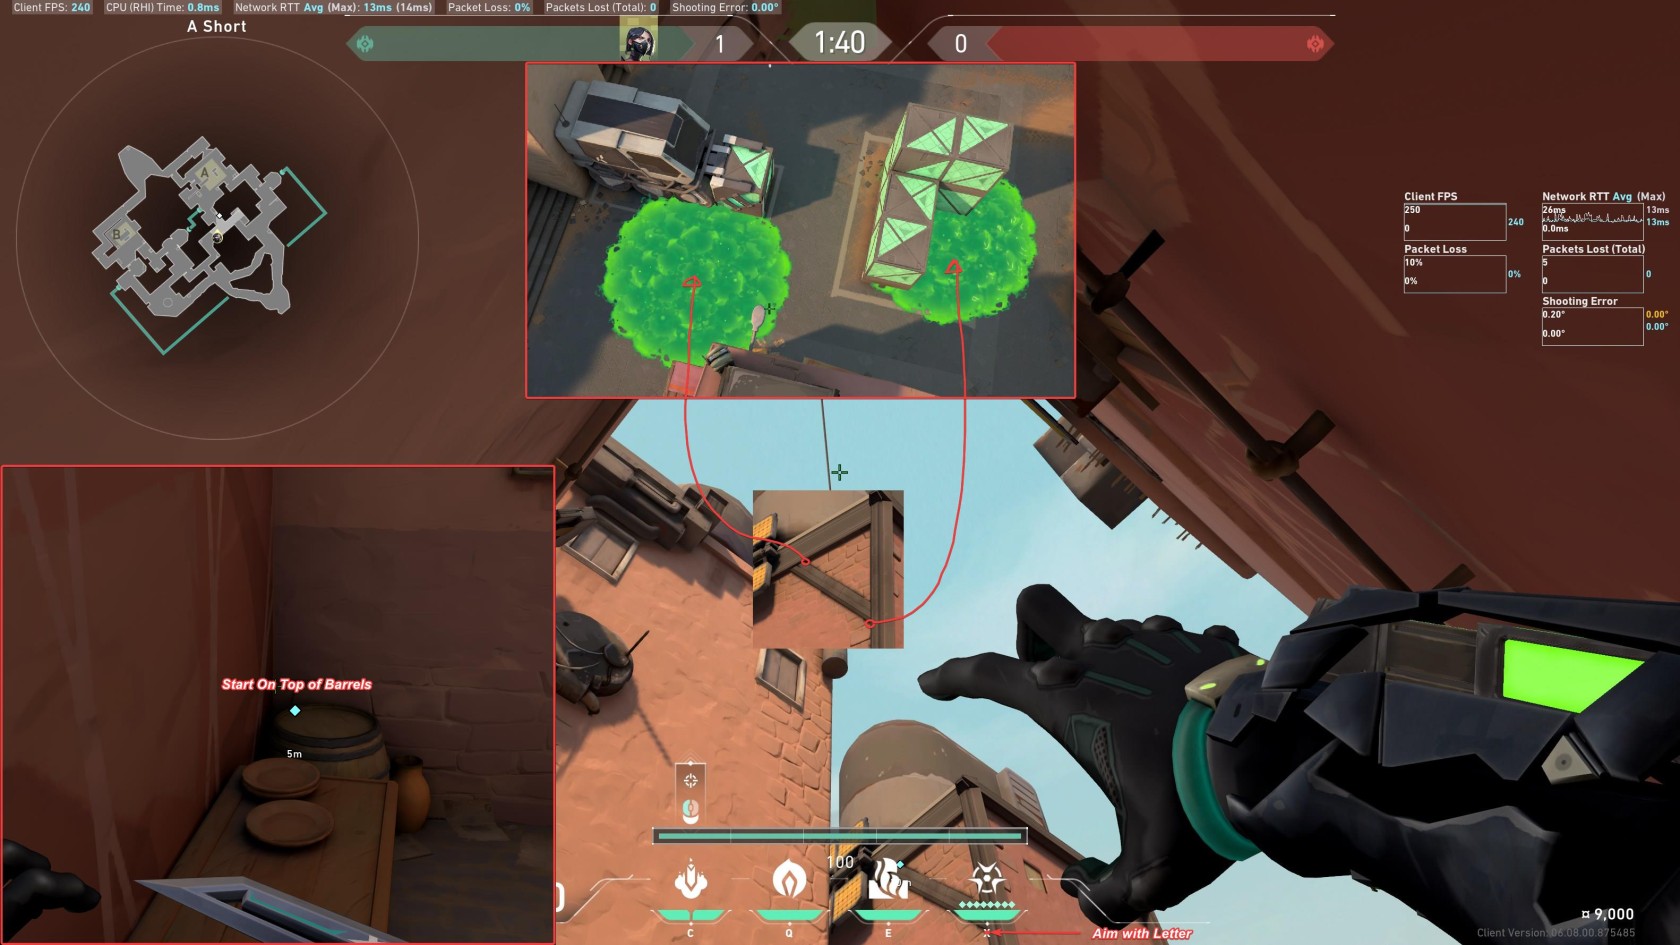
# Sova Lineups Icebox
### Attack
[](https://wiki.stoplagging.com/uploads/images/gallery/2022-07/image-1656881711183.png)
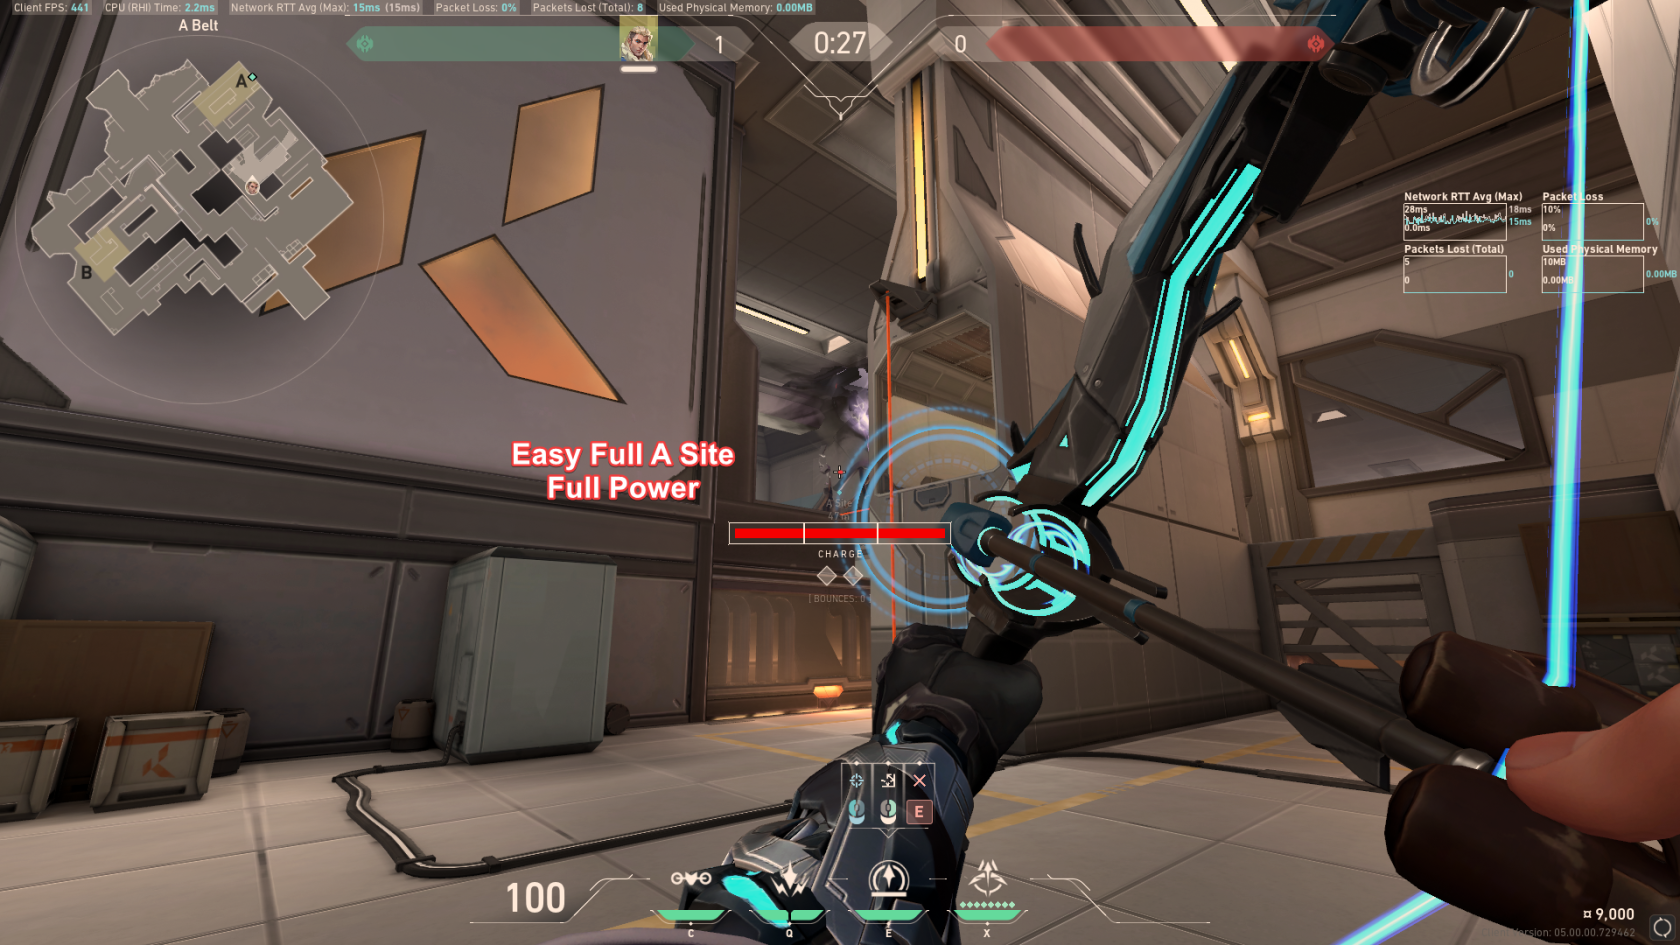
Full A Site Easy
[](https://wiki.stoplagging.com/uploads/images/gallery/2022-07/image-1656882094325.png)
B Site Attack
### Defense
[](https://wiki.stoplagging.com/uploads/images/gallery/2022-07/image-1656881556294.png)
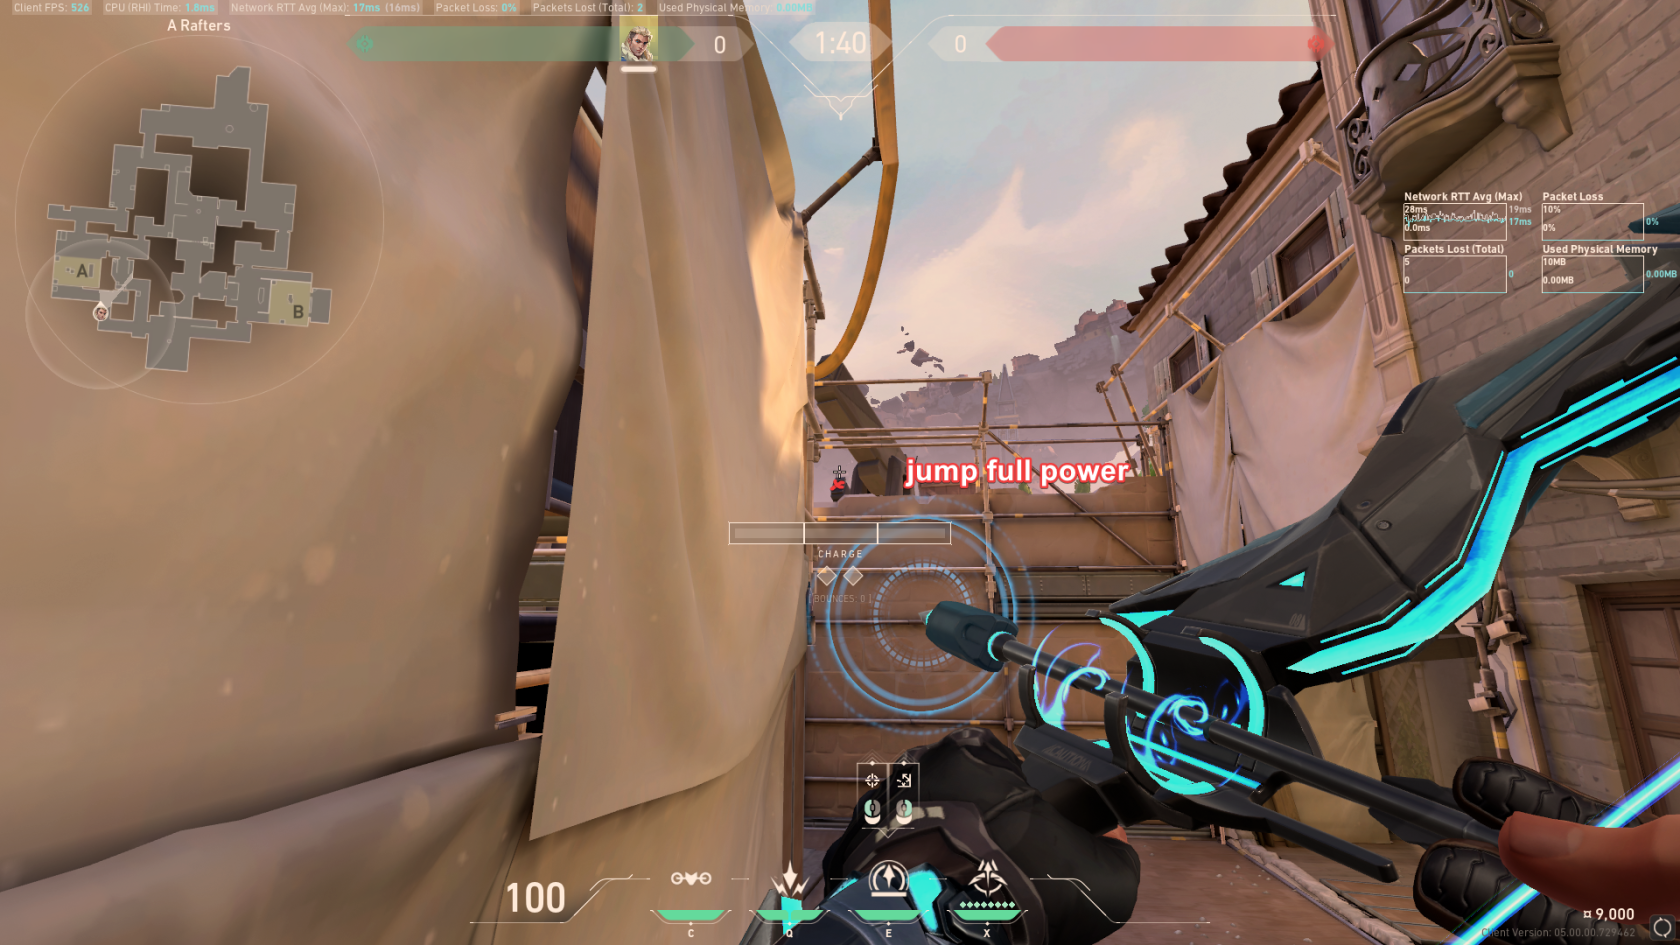
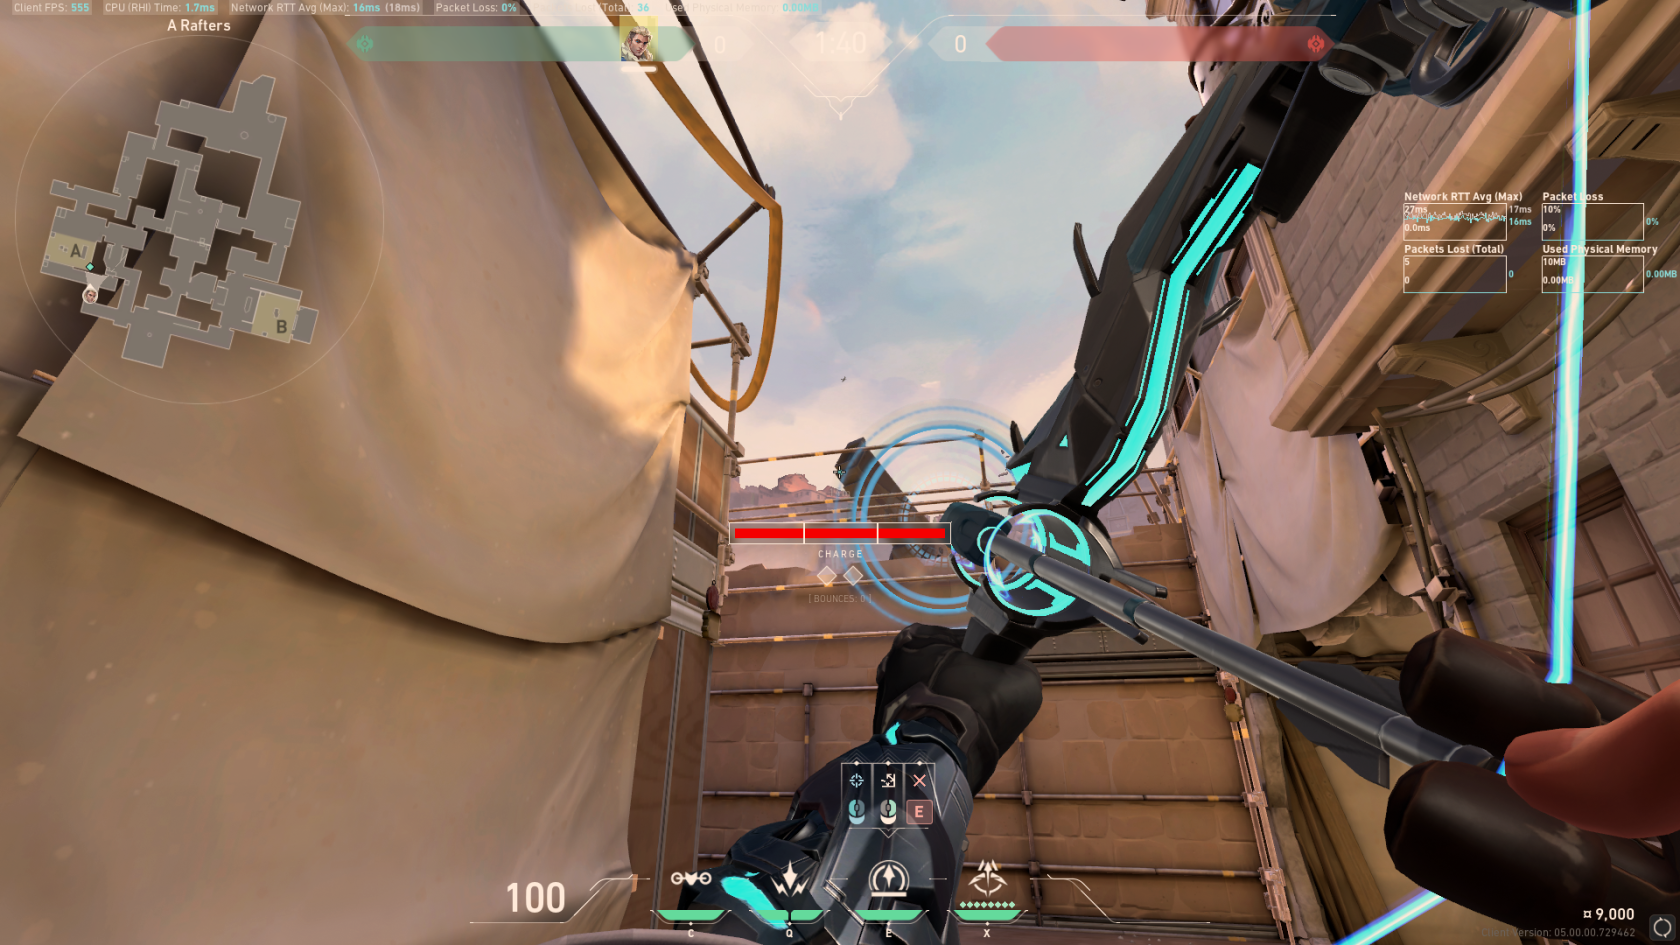
A Rafters to Belt (God)
[](https://wiki.stoplagging.com/uploads/images/gallery/2022-07/image-1656882352204.png)
Easy A Wall
[](https://wiki.stoplagging.com/uploads/images/gallery/2022-07/image-1656880574837.png)
God Retake B
[](https://wiki.stoplagging.com/uploads/images/gallery/2022-07/image-1656882442601.png)
Easy Info B
# Old / Not Relavent
# Valorant Viper Attack Lineups + 1 Defense Lineup
## Map: Bind
#### A Site: Showers Smoke, Poison, Wall
**Photo 1: Mollys**
**Photo 2: Smoke**
**Photo 3: Wall**
**Video: Outside Showers to A Site. Smoke, Mollys, Wall & Final Result**
#### A Site: Short Push Setup
For the wall use the mini map to make sure it reaches the corner. For the smoke line up with the bricks then throw in the point show in the video.
**Video: A Site Short Push Setup**
#### A Site: Smoking Heaven from Showers
Line up with the towers and bricks as shown in the video. Then throw smoke at the antenna seen thru the ceiling of showers.
**Video: Smoking A Site Heaven from Showers**
#### B Site: Hookah Wall & Smoke
To position... line up with the wall until you see it disappear and you only see the security camera shown in the video. The wall is straight forward just aim at the general location in the video and check the mini map to make sure it can get across.
The smoke is harder to execute because it depends on jump timing. You want to jump first then throw q before you reach the apex of your jump.
**Video: B Site Hookah Wall & Smoke**
## Map: Split
#### A Site: Walling off both Ramp and Heaven
**Video: Split A Site Walling off Ramp & Heaven**
1\. Position yourself so that the leafs of the tree on the right hit the shadow edges of the building.
2\. Then point your crosshair along the 3rd line of the skyscraper building.
3\. Finally, move your cursor along that third line until you see that the wall will reach heaven on the mini map.
4\. Then launch your wall.
#### B Site: Smoke Heaven, Molly Wooden Shed, And Wall
**Video: B Site Wall, Smoke, and Molly**
1\. Line up in the corner near the garbage can until you can't move.
2\. Shoot your wall on the 2nd wooden bar from the left of the roof's edge.
3\. Shoot your smoke on the edge in the middle of the 3rd and 4th wooden bars from the left.
4\. Shoot your molly by imagining a 90 degree triangle between the first bar and the angled bar.
## Map: Haven
#### C Site: Smoke, Wall, Mollys
**Photo: Make sure you hold crouch... C Molly #1**
****
**Photo: Make sure you hold crouch... C Molly #2**
**Video: C Smoke, C Wall, 2x C Molly Together**
#### A Site: Wall, Smoke 2x Molly
I'm not even going to bother explaining this one because I can't do it consistently either. See Video Below
**Video: A Site - Wall, Smoke, 2x Molly**
### Bind Short A Defense 1 Way Smoke
# Brimstone Haven Mollys
##### A Default Long Corner Plant
[](https://wiki.stoplagging.com/uploads/images/gallery/2023-02/image-1675838457085.png)
##### A Default Plant (7s flight)
[](https://wiki.stoplagging.com/uploads/images/gallery/2023-02/image-1675838485368.png)
##### B Post Plant from Spawn
[](https://wiki.stoplagging.com/uploads/images/gallery/2023-02/image-1675838501177.jpg)
##### B Post Plant Alternatives
[](https://wiki.stoplagging.com/uploads/images/gallery/2023-02/image-1675838523158.jpg)
##### C Long Safe Plant
[](https://wiki.stoplagging.com/uploads/images/gallery/2023-02/image-1675838535186.jpg)
##### C Long Long Plant
[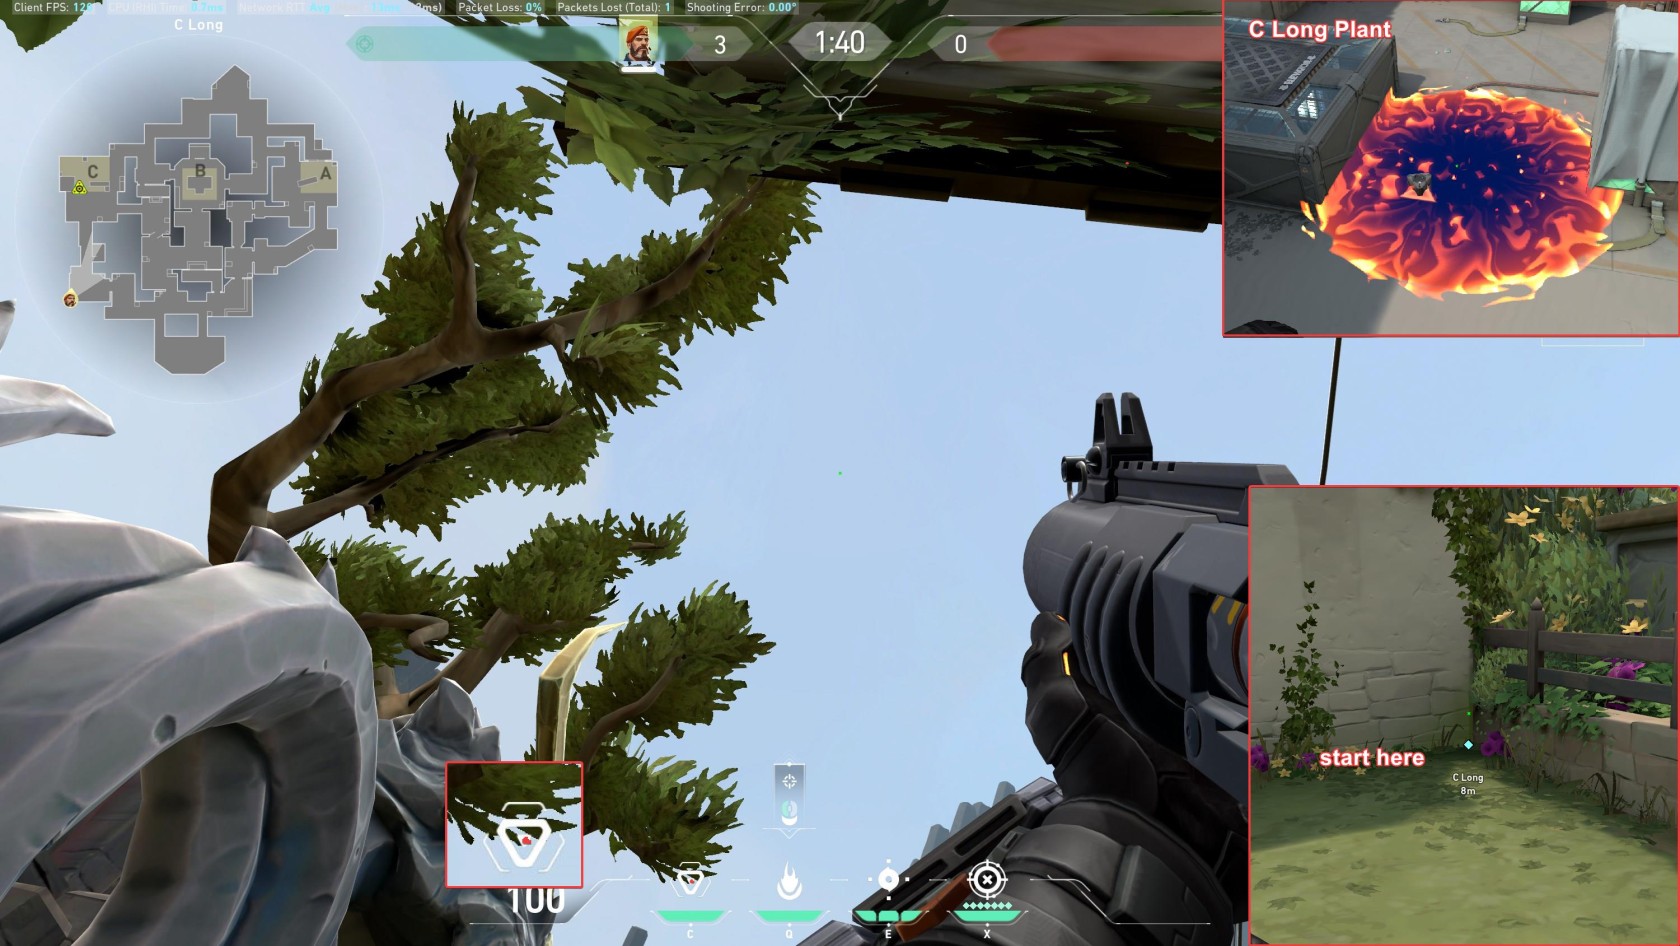](https://wiki.stoplagging.com/uploads/images/gallery/2023-02/image-1675838554877.jpg)
##### C Long Cubby Post Plants
[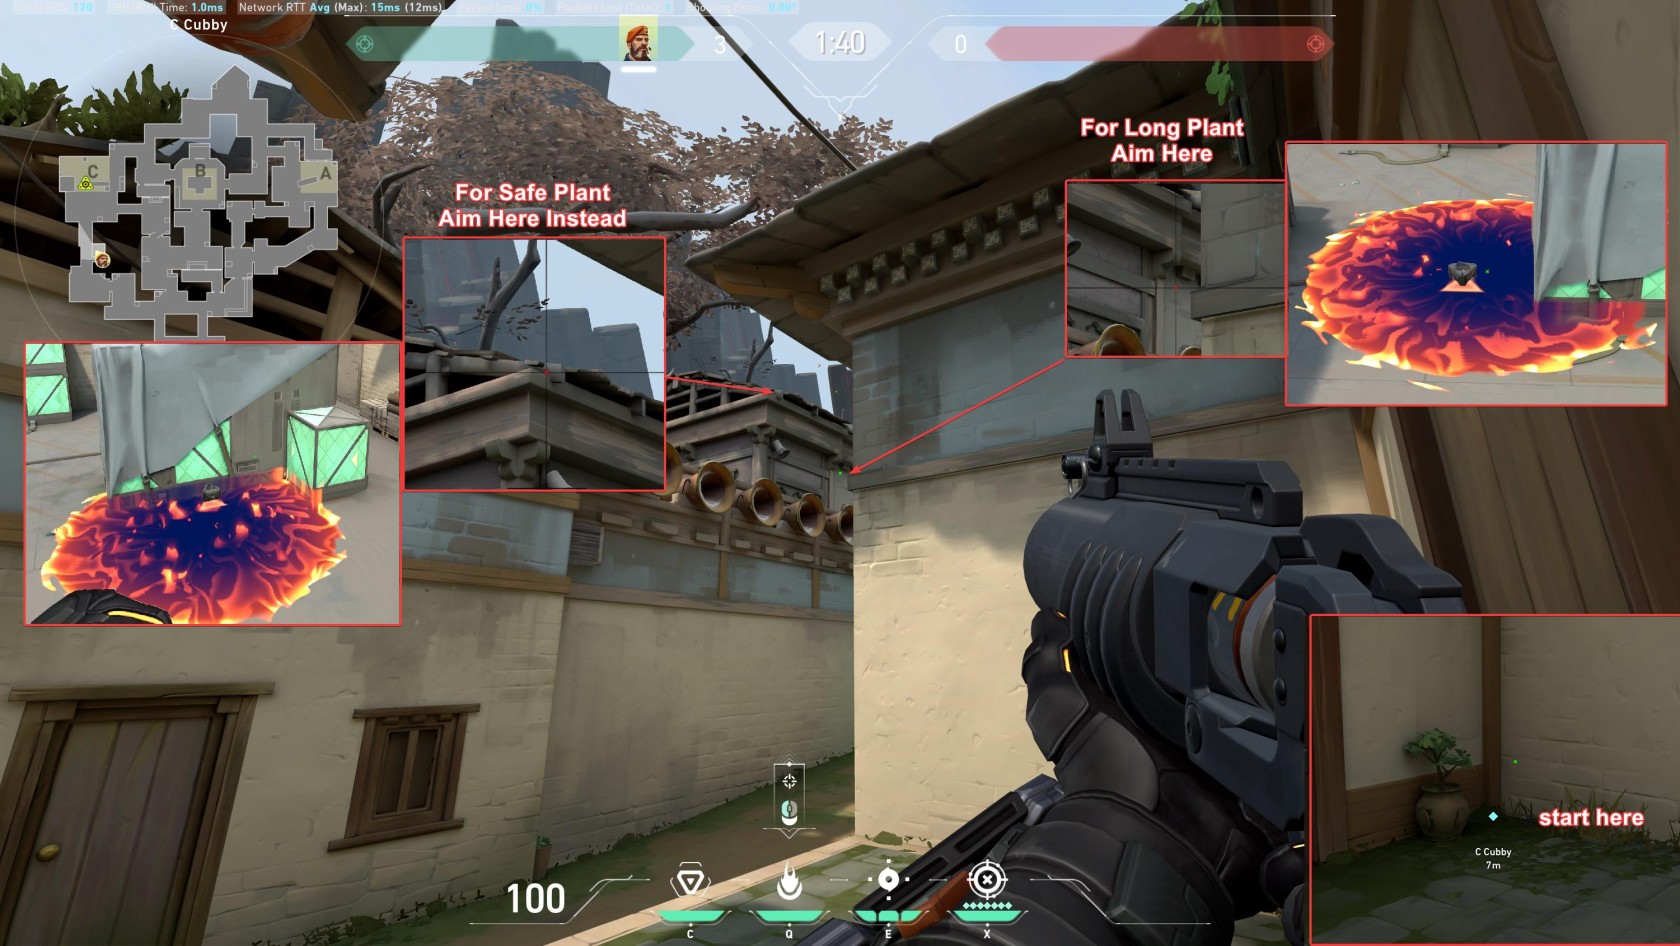](https://wiki.stoplagging.com/uploads/images/gallery/2023-02/image-1675838573657.jpg)
# Valorant Lineups Viper New Bind
## Attack
### Mollys
#### From A Shower Side
[](https://wiki.stoplagging.com/uploads/images/gallery/2023-05/valorant-win64-shipping-mdl2gad2gt.jpg)
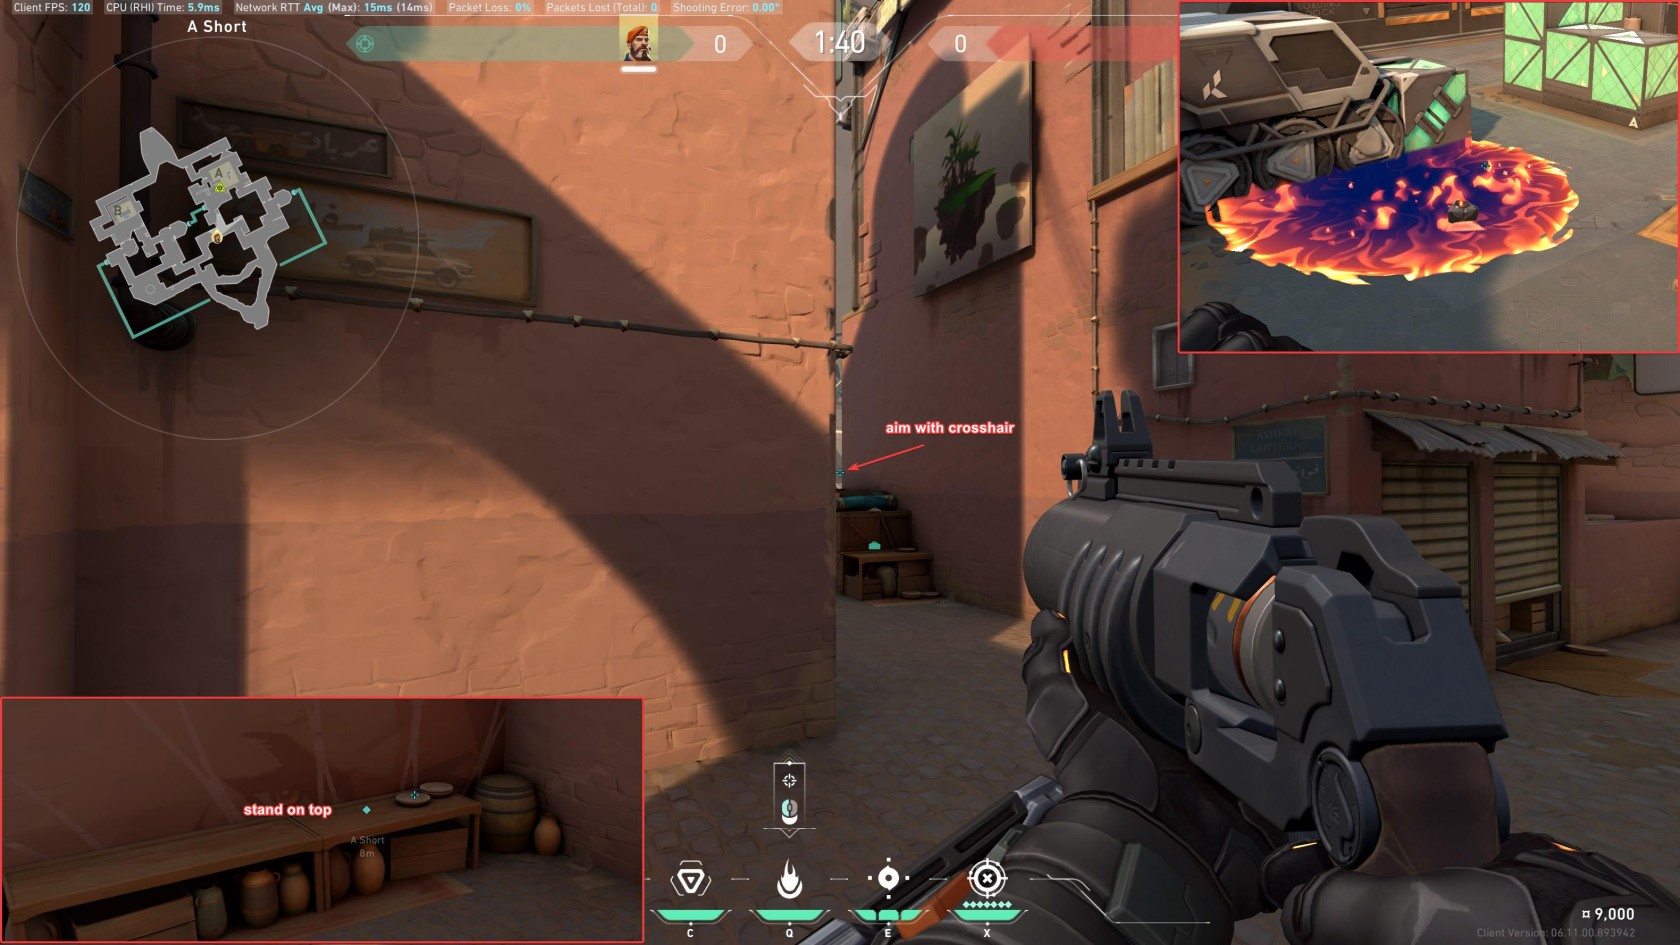
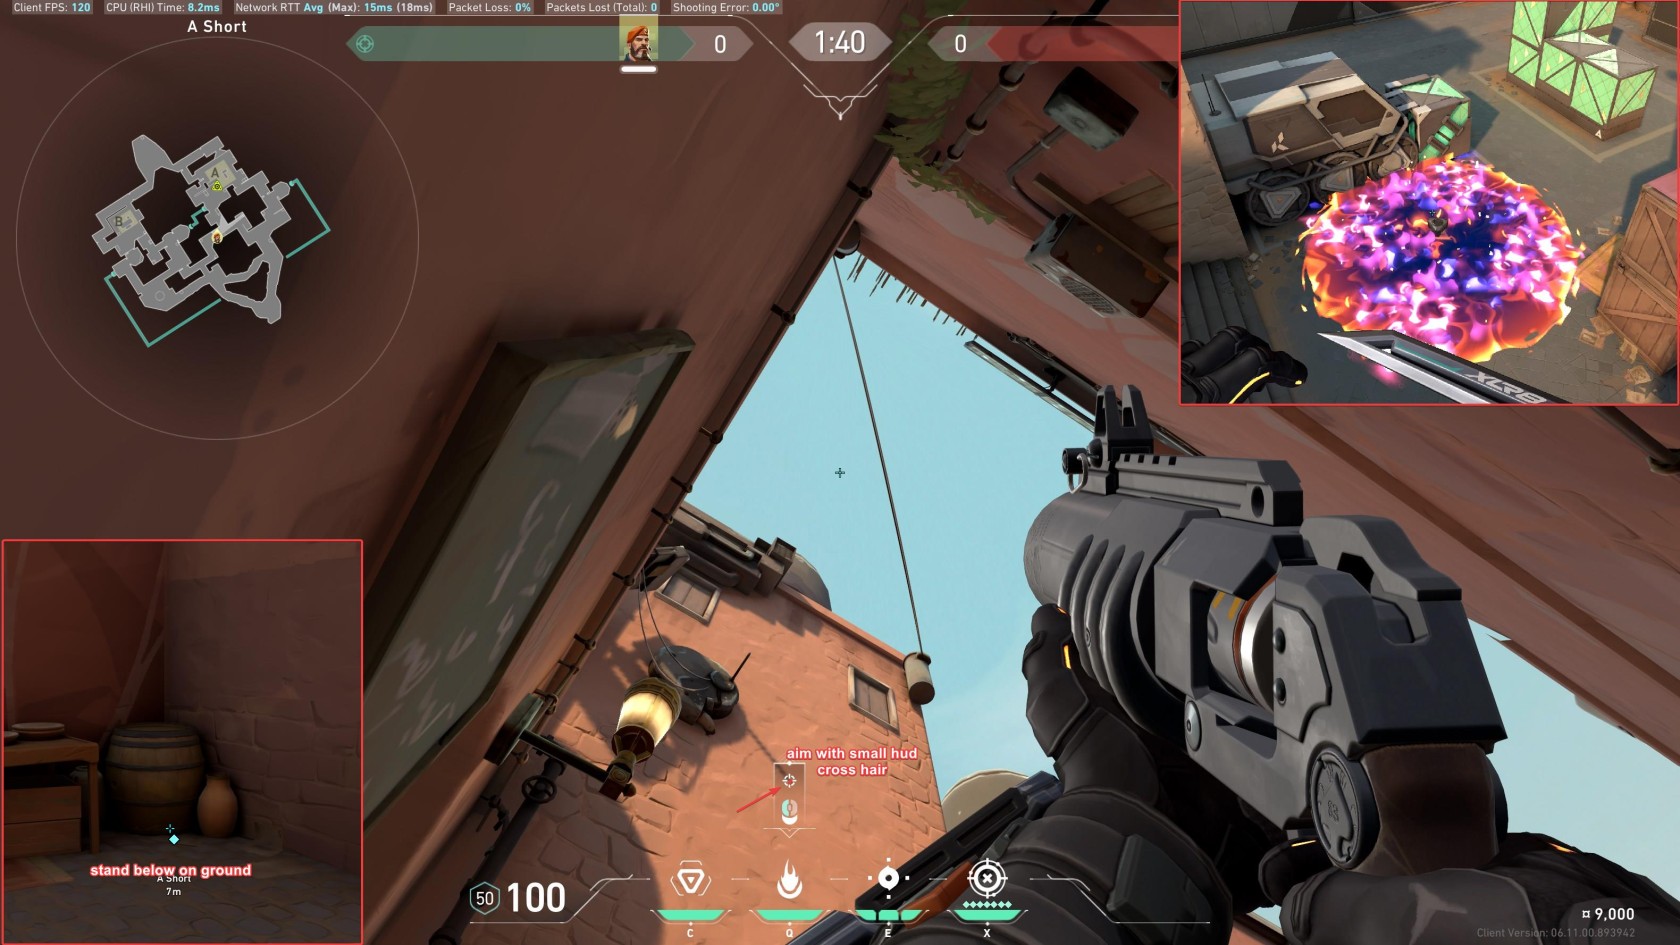
#### From A Short side
[](https://wiki.stoplagging.com/uploads/images/gallery/2023-05/valorant-win64-shipping-z0ucr9pjhk.jpg)
#### From B Teleport
[](https://wiki.stoplagging.com/uploads/images/gallery/2023-05/valorant-win64-shipping-mk6lcqwopj.jpg)
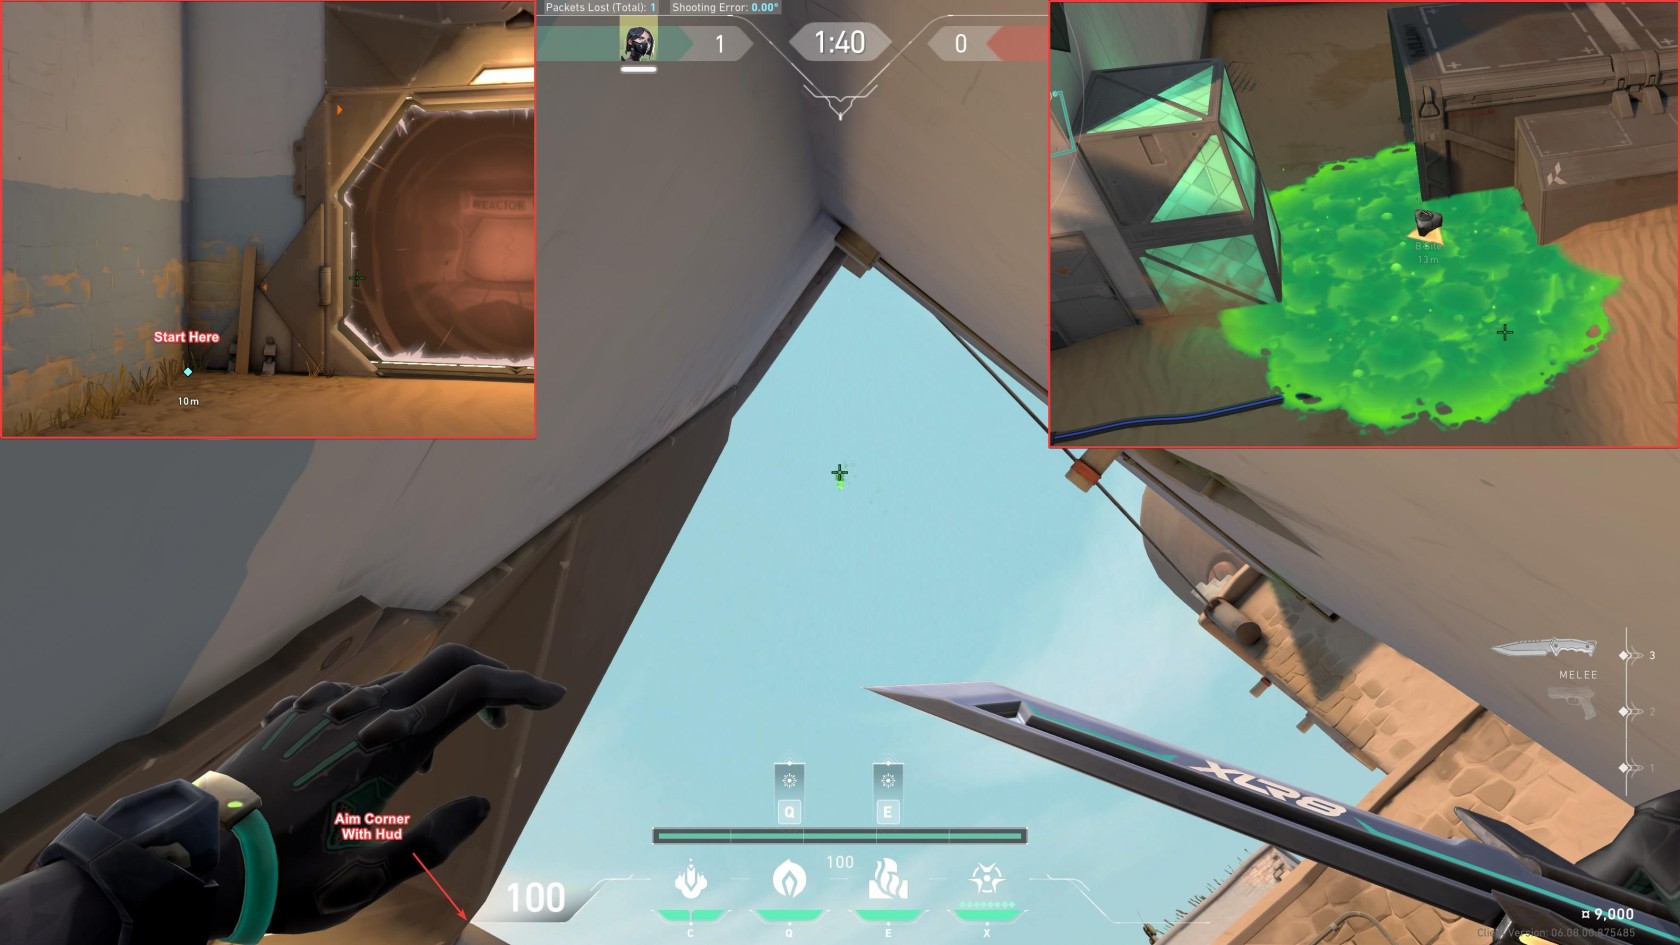
#### From B Fountain (Open & Default Plant)
[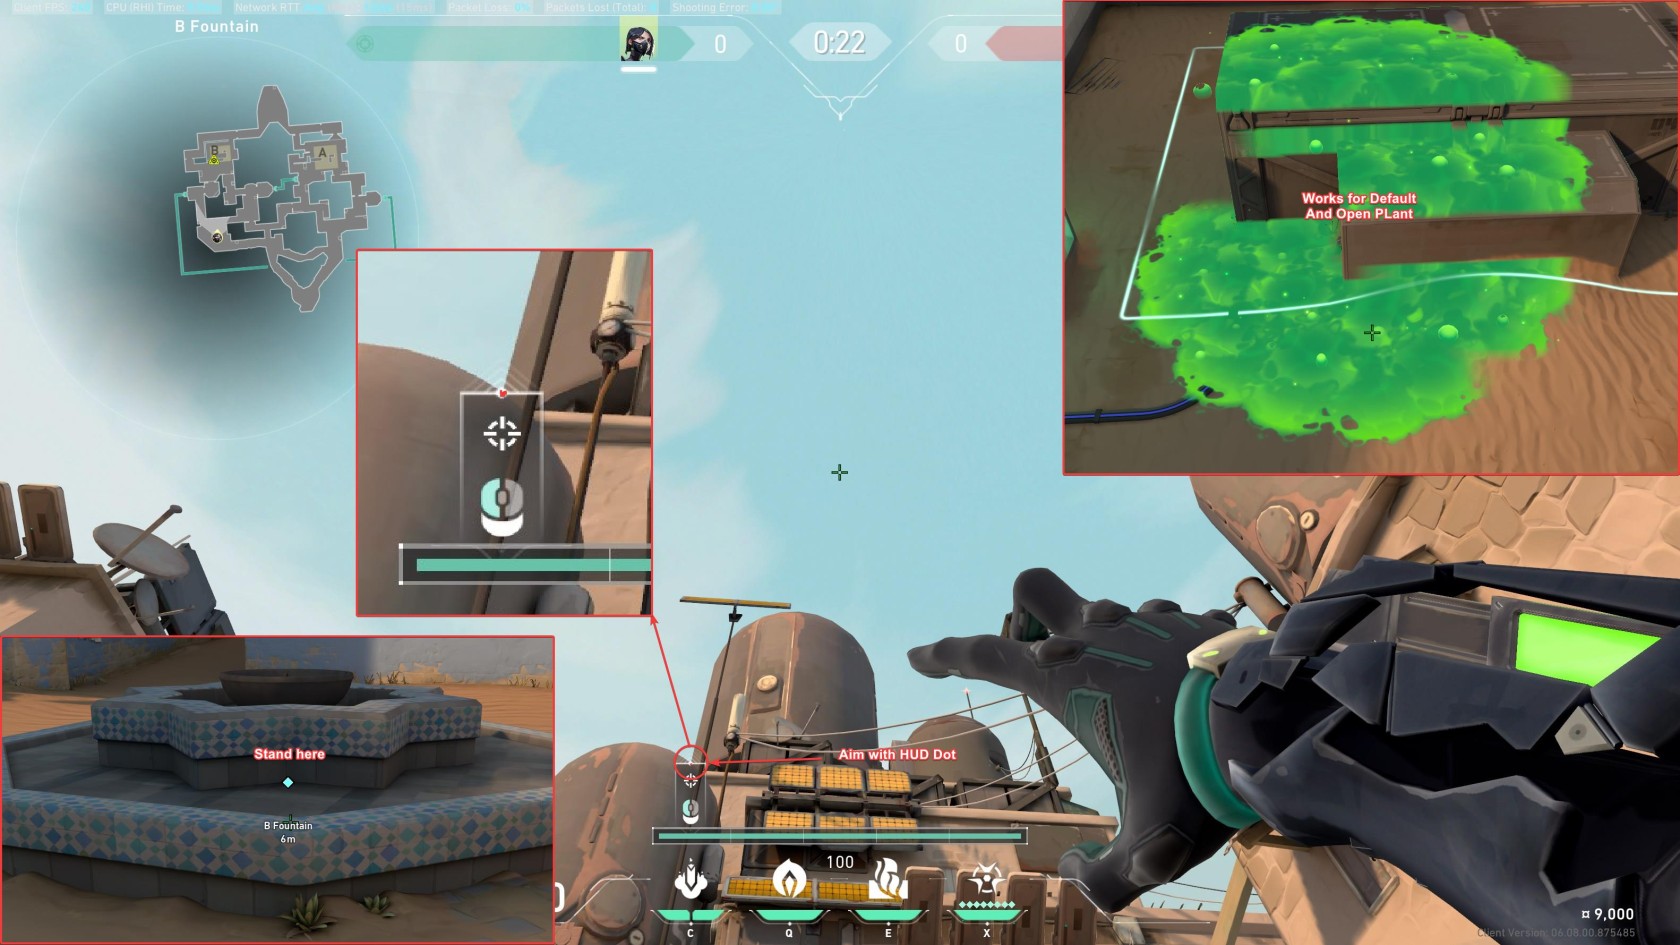](https://wiki.stoplagging.com/uploads/images/gallery/2023-05/valorant-win64-shipping-zjyhy6i8hg.jpg)
### Attack Setups
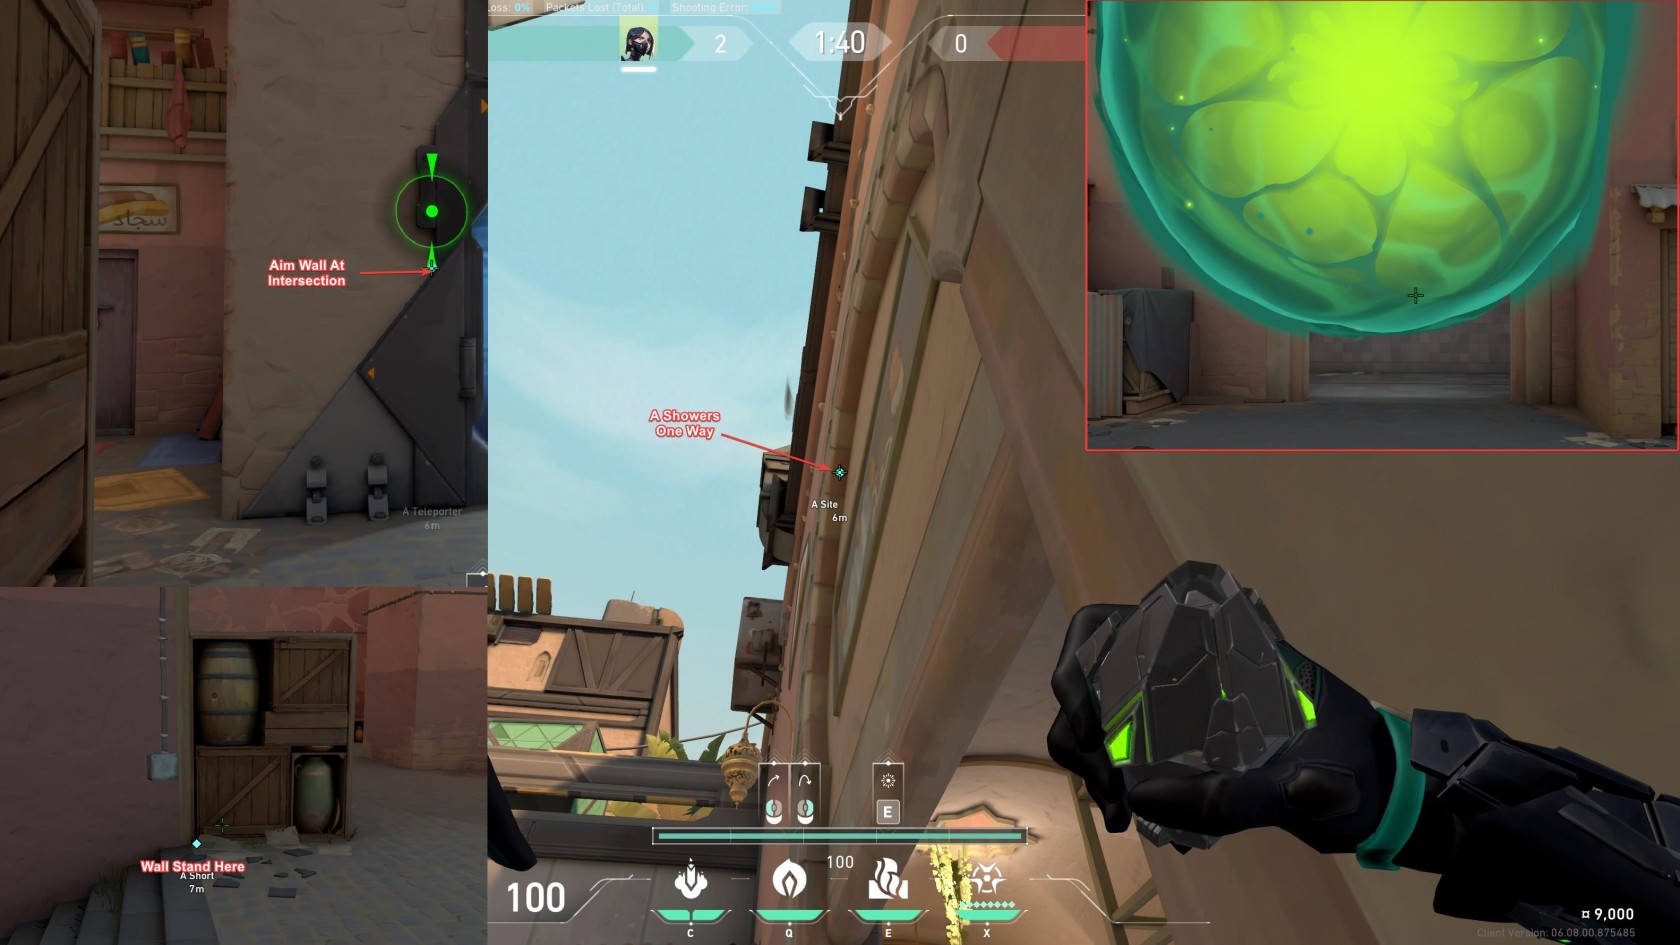
#### A Short Attack Setup
[](https://wiki.stoplagging.com/uploads/images/gallery/2023-05/valorant-win64-shipping-vloeefwkgg.jpg)
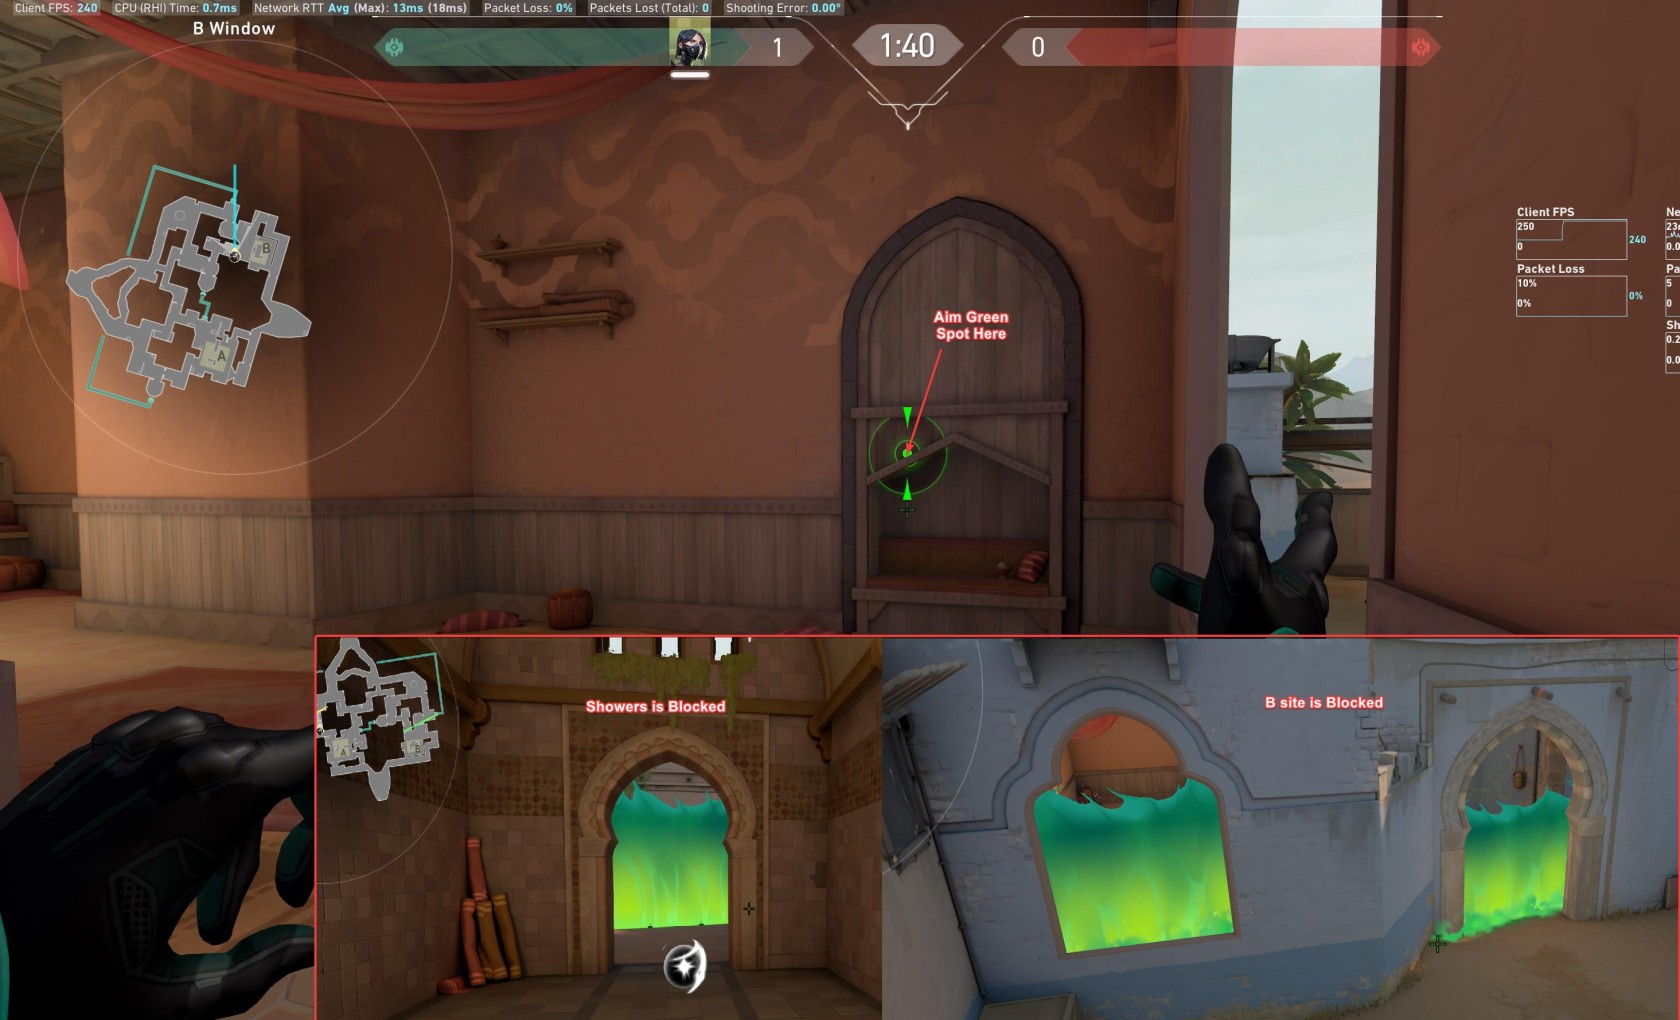
#### A Showers Attack Setup
[](https://wiki.stoplagging.com/uploads/images/gallery/2023-05/valorant-win64-shipping-raebey1ufr.jpg)
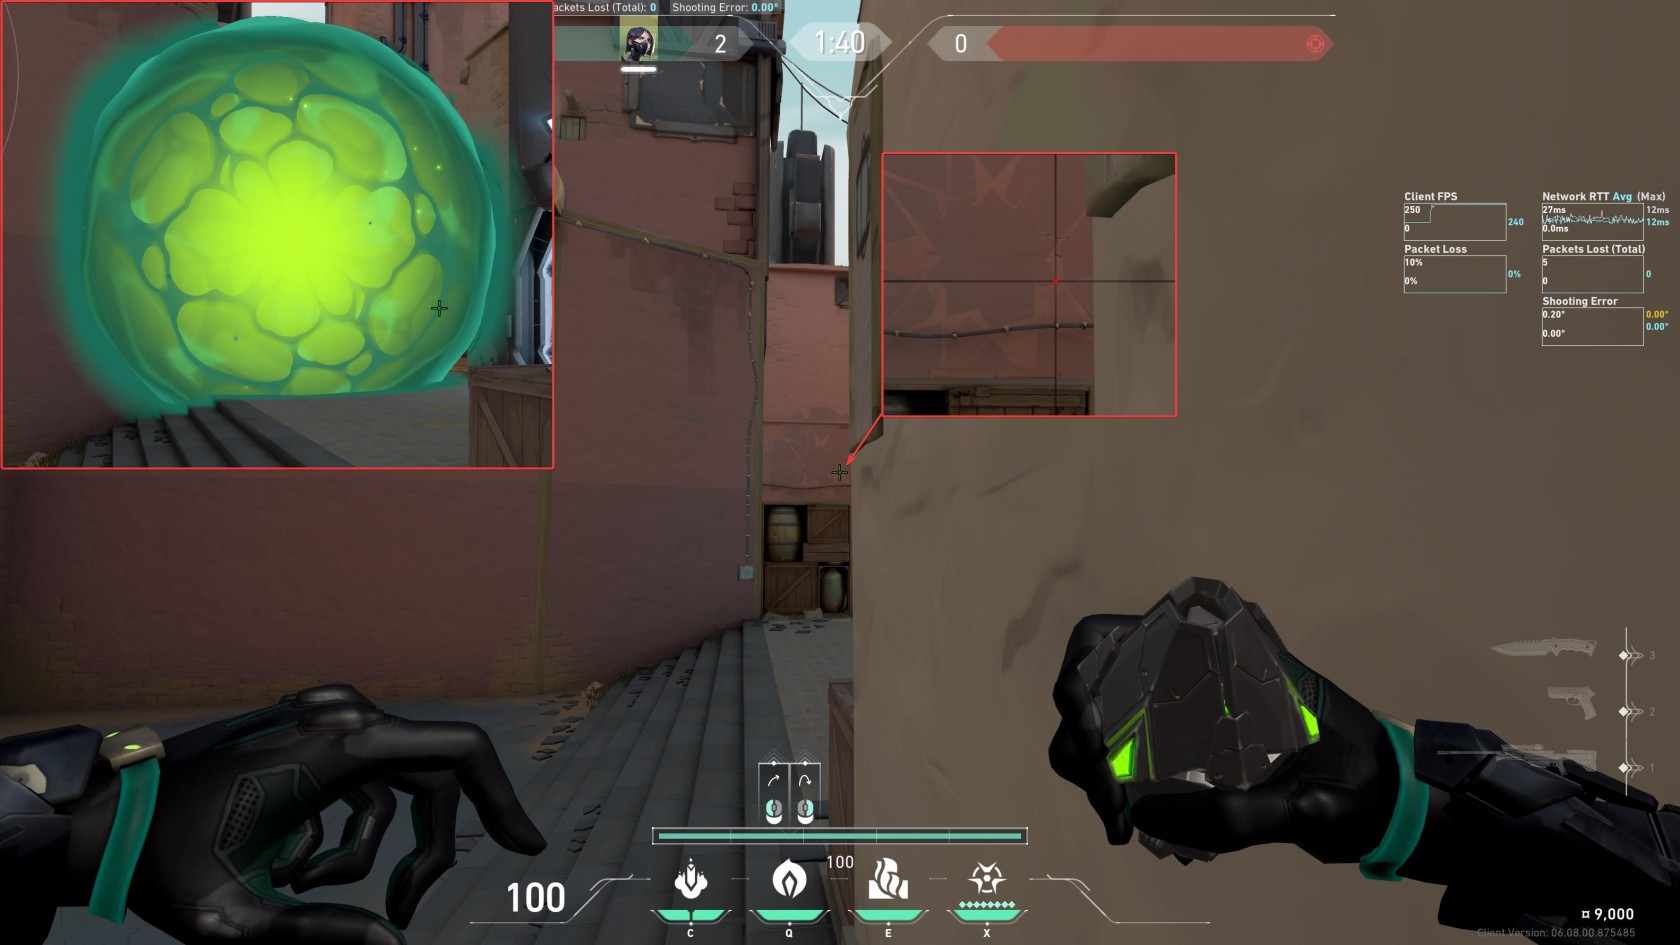
#### B Side Attack Setup
[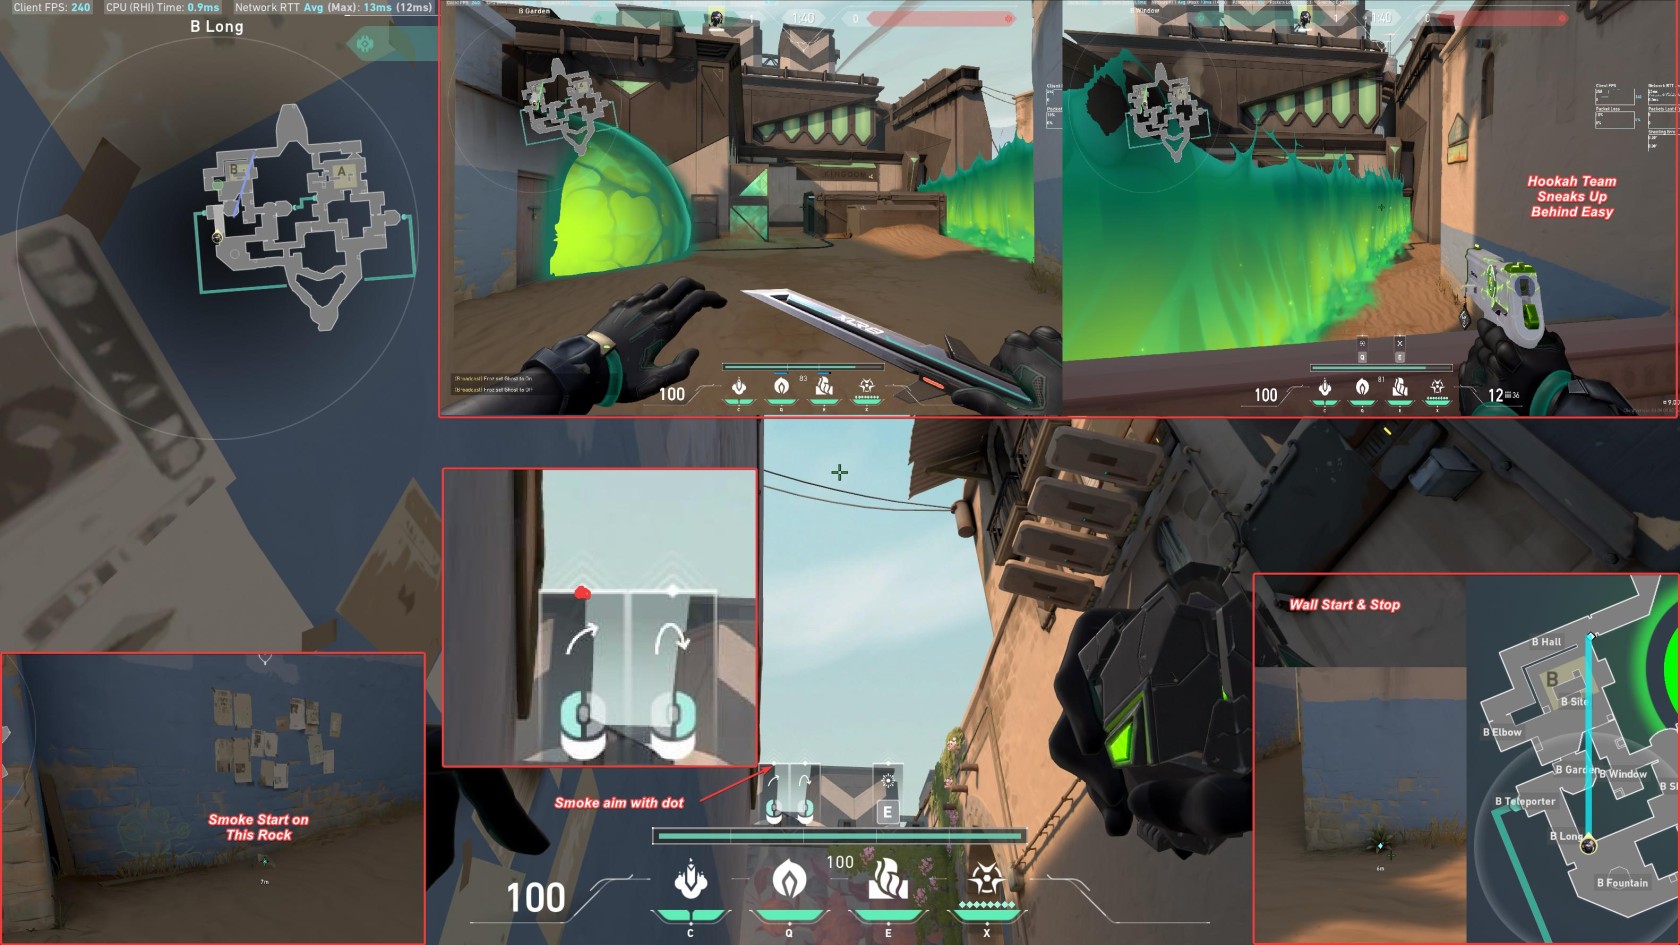](https://wiki.stoplagging.com/uploads/images/gallery/2023-05/valorant-win64-shipping-uzheljz8jo.jpg)
## Defense Setups
#### The OP Viper Wall Thru Teleporter
[](https://wiki.stoplagging.com/uploads/images/gallery/2023-05/valorant-win64-shipping-awpnz7hkti.jpg)
#### The A Short One Way
[](https://wiki.stoplagging.com/uploads/images/gallery/2023-05/valorant-win64-shipping-sml25ec7xg.jpg)
#### The Viper Wall W/ Showers One Way
[](https://wiki.stoplagging.com/uploads/images/gallery/2023-05/valorant-win64-shipping-mqs0oqetbw.jpg)
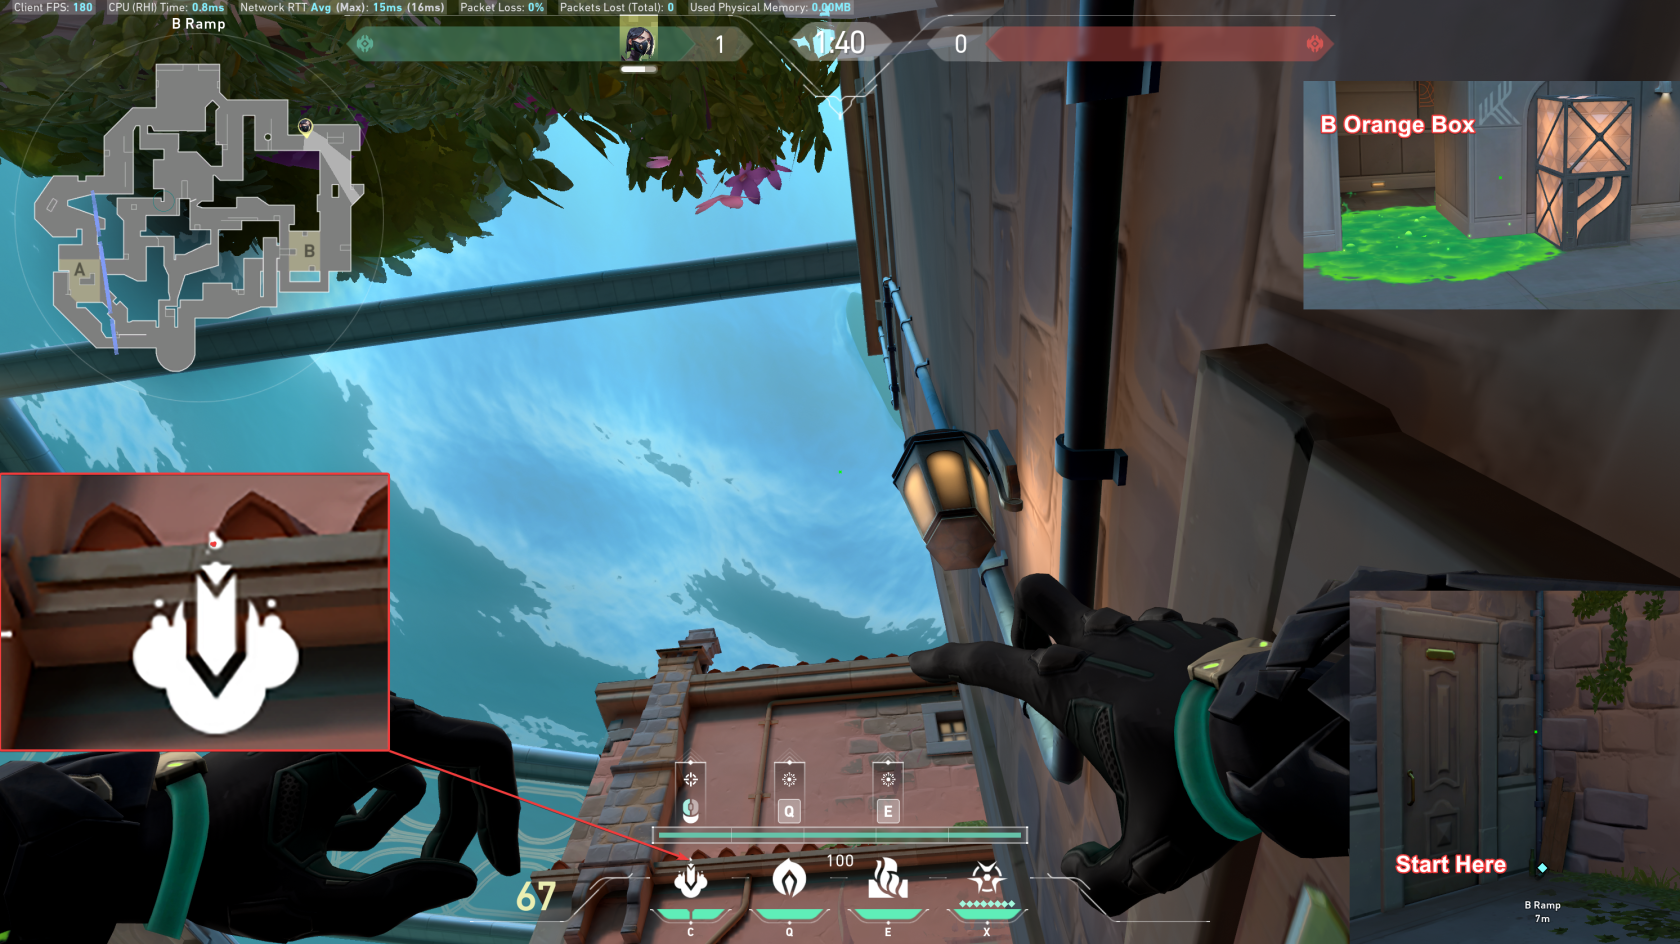
# Brimstone Bind
## B Default Mollys
#### From B Teleporter
[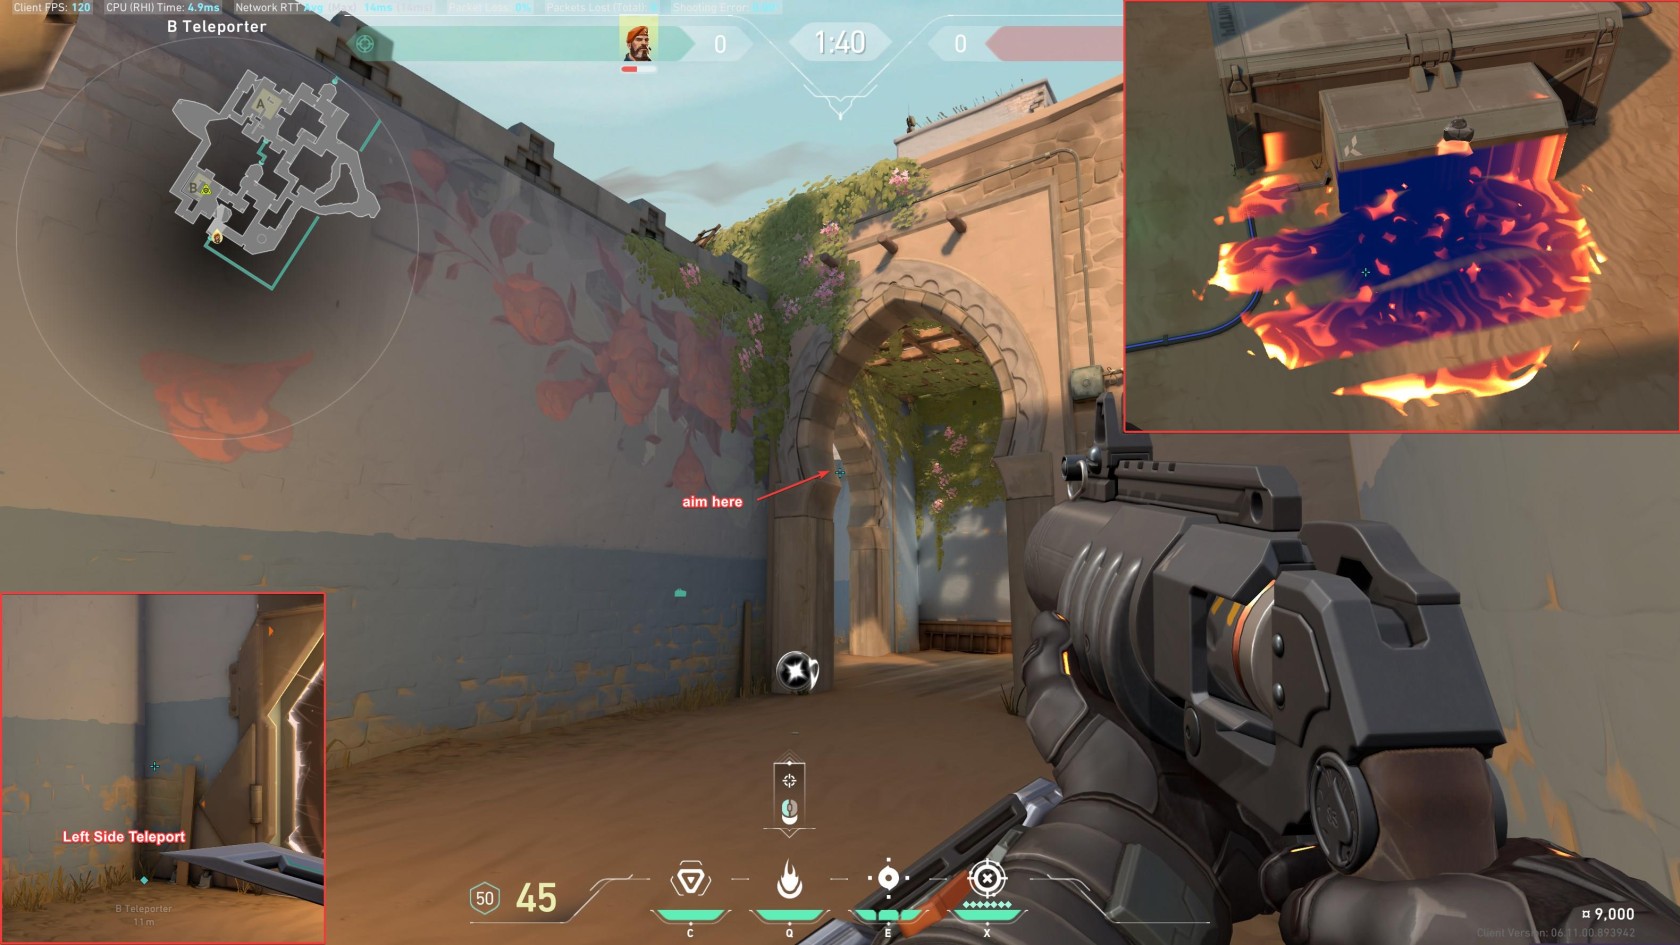](https://wiki.stoplagging.com/uploads/images/gallery/2023-06/b-teleporter-to-b-middle.jpg)
#### From B Fountain
[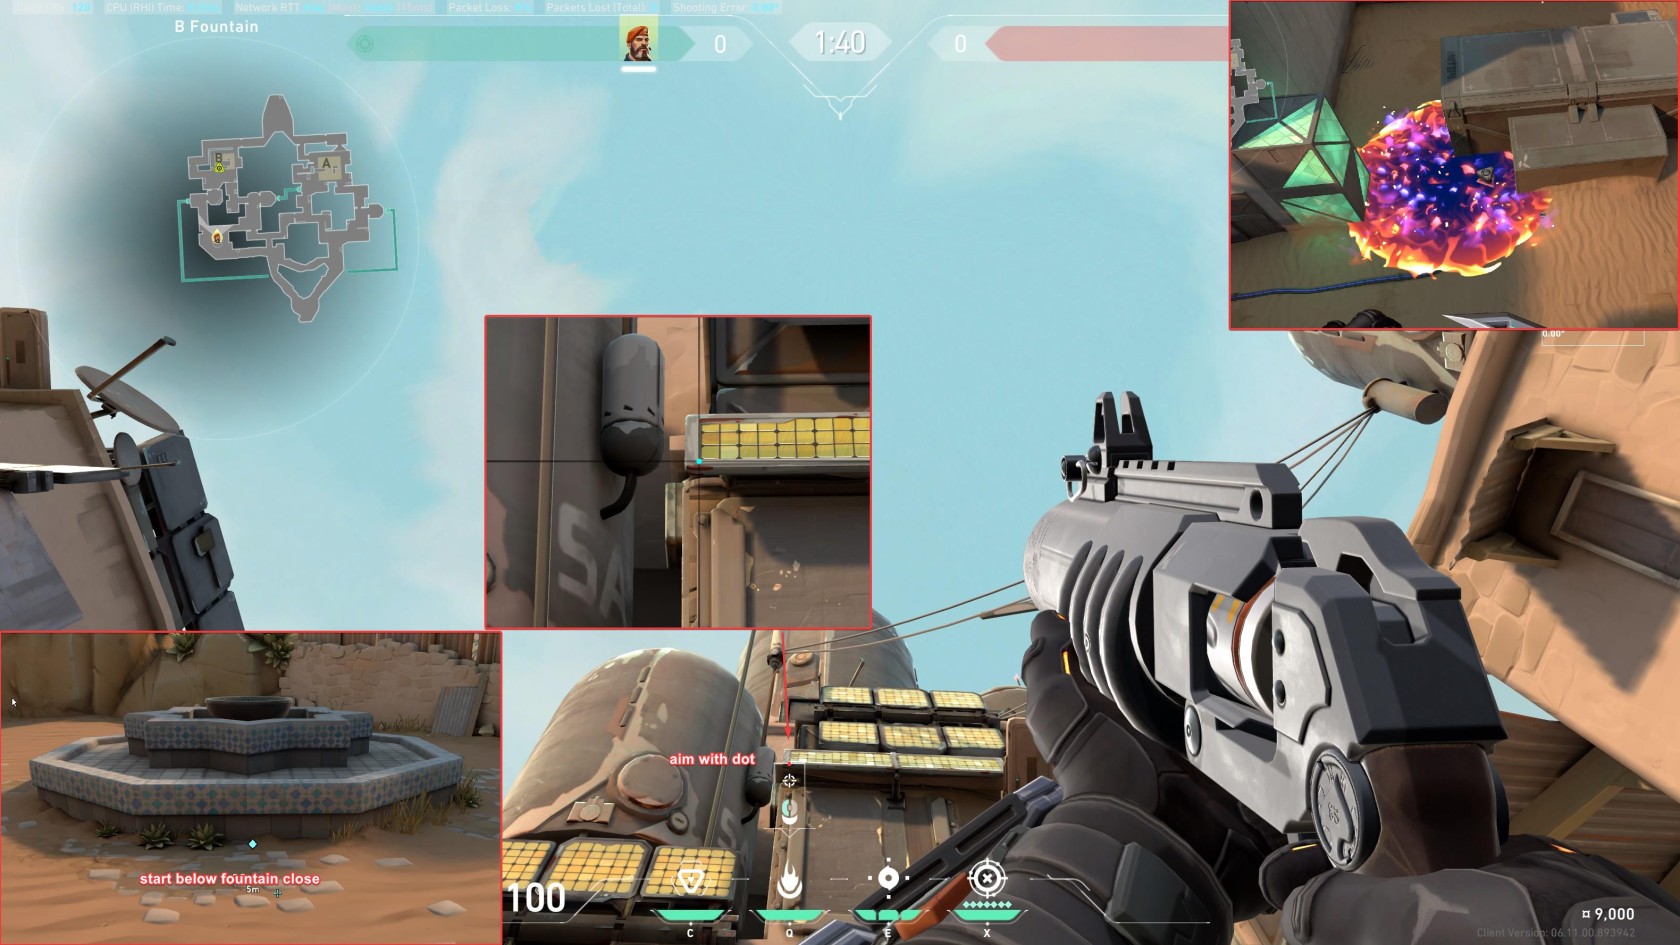](https://wiki.stoplagging.com/uploads/images/gallery/2023-06/b-default-from-fountain.jpg)
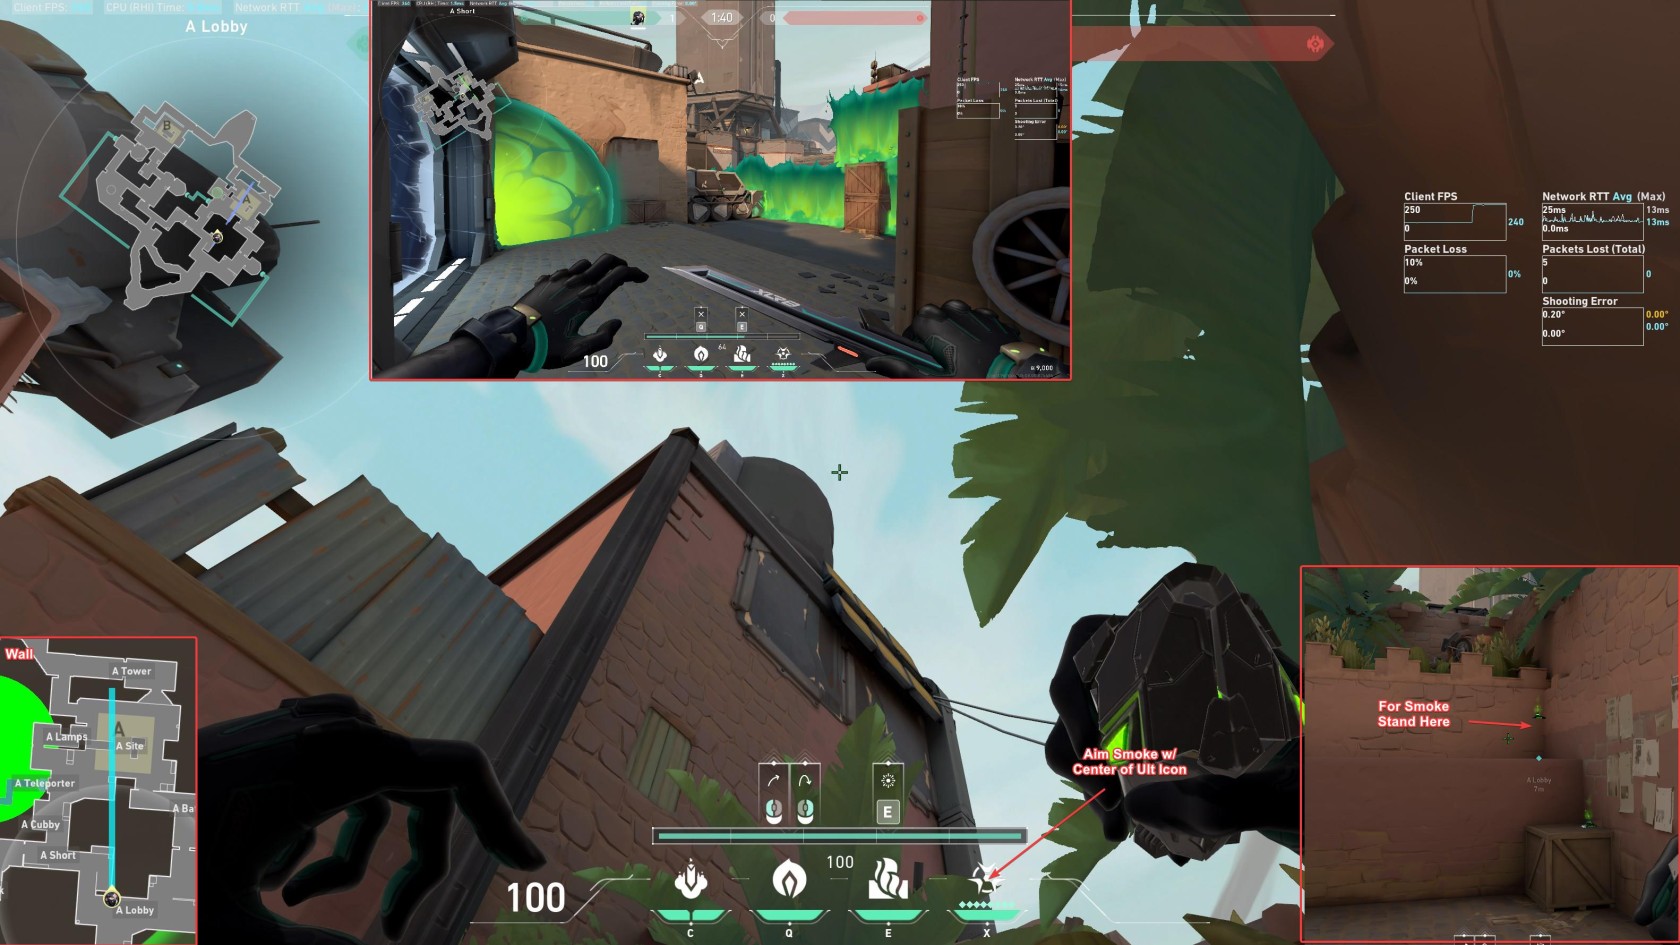
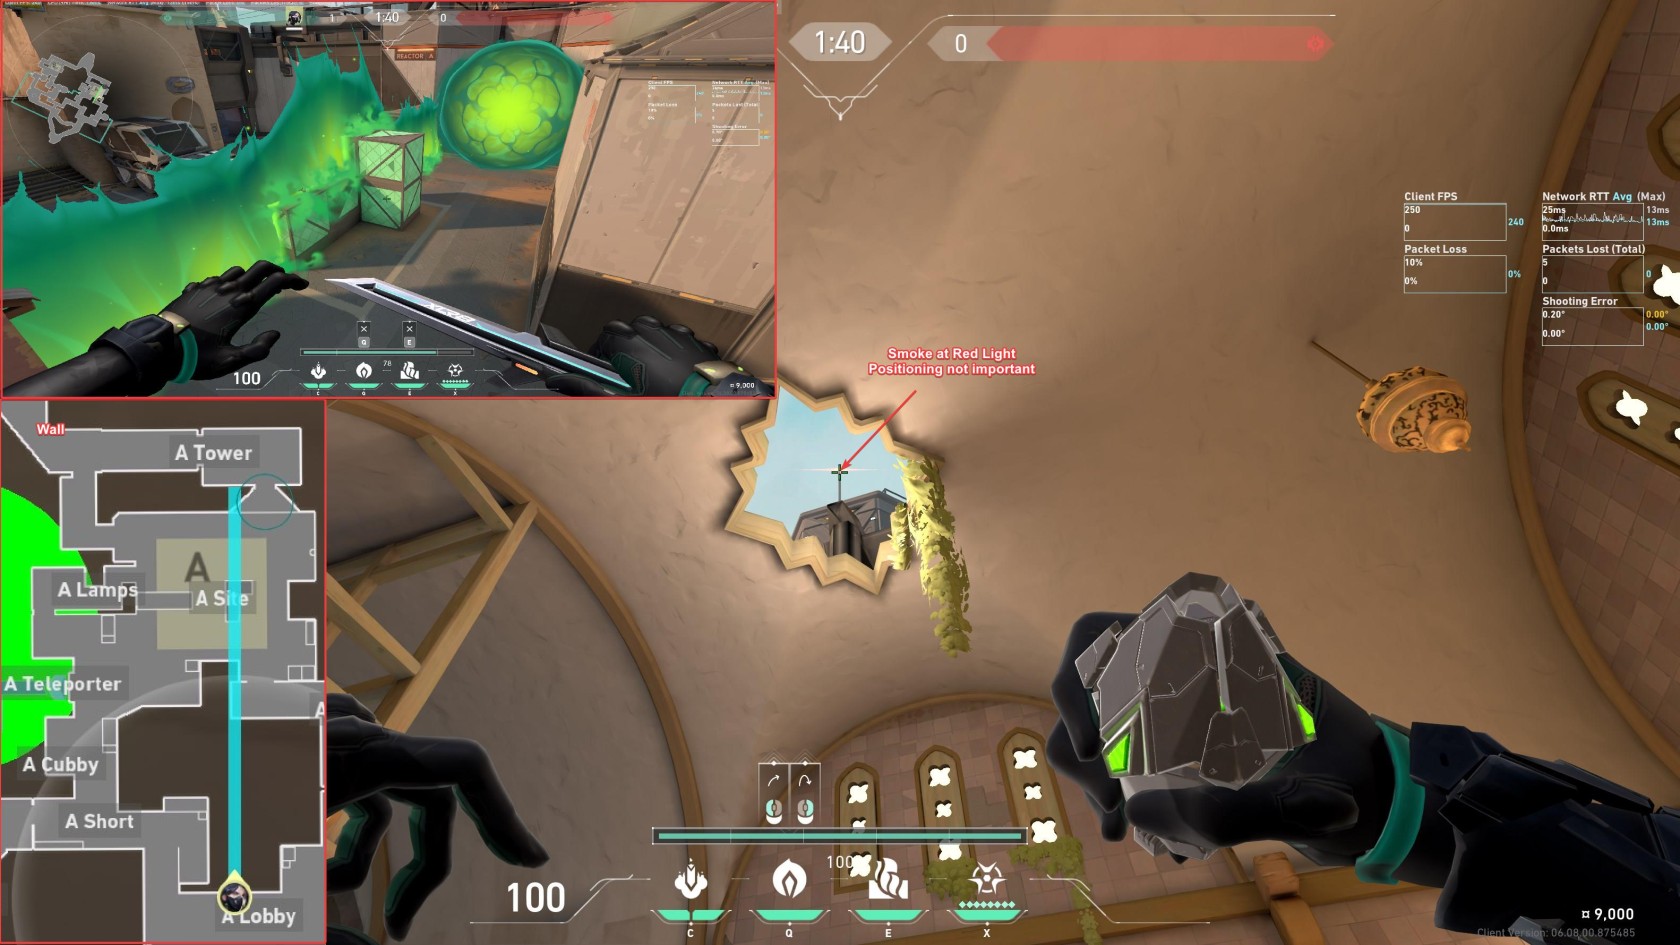
## A Mollys Triple Stack
#### From Sands
[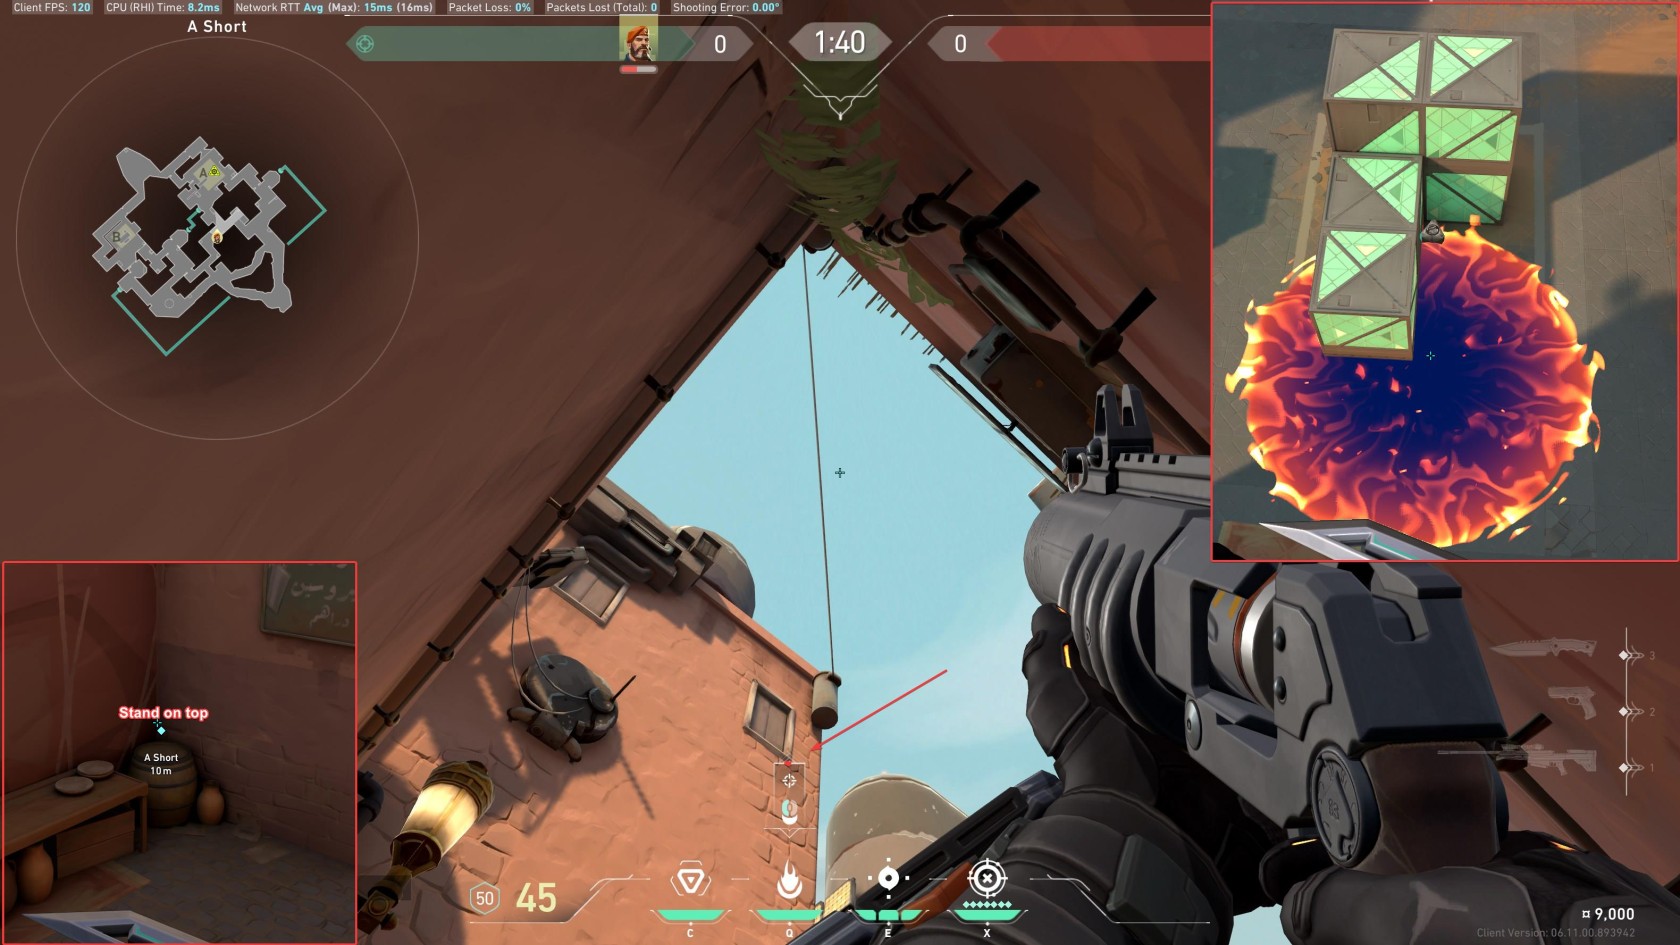](https://wiki.stoplagging.com/uploads/images/gallery/2023-06/ashorttotripleboxes.jpg)
#### From Shower TP
[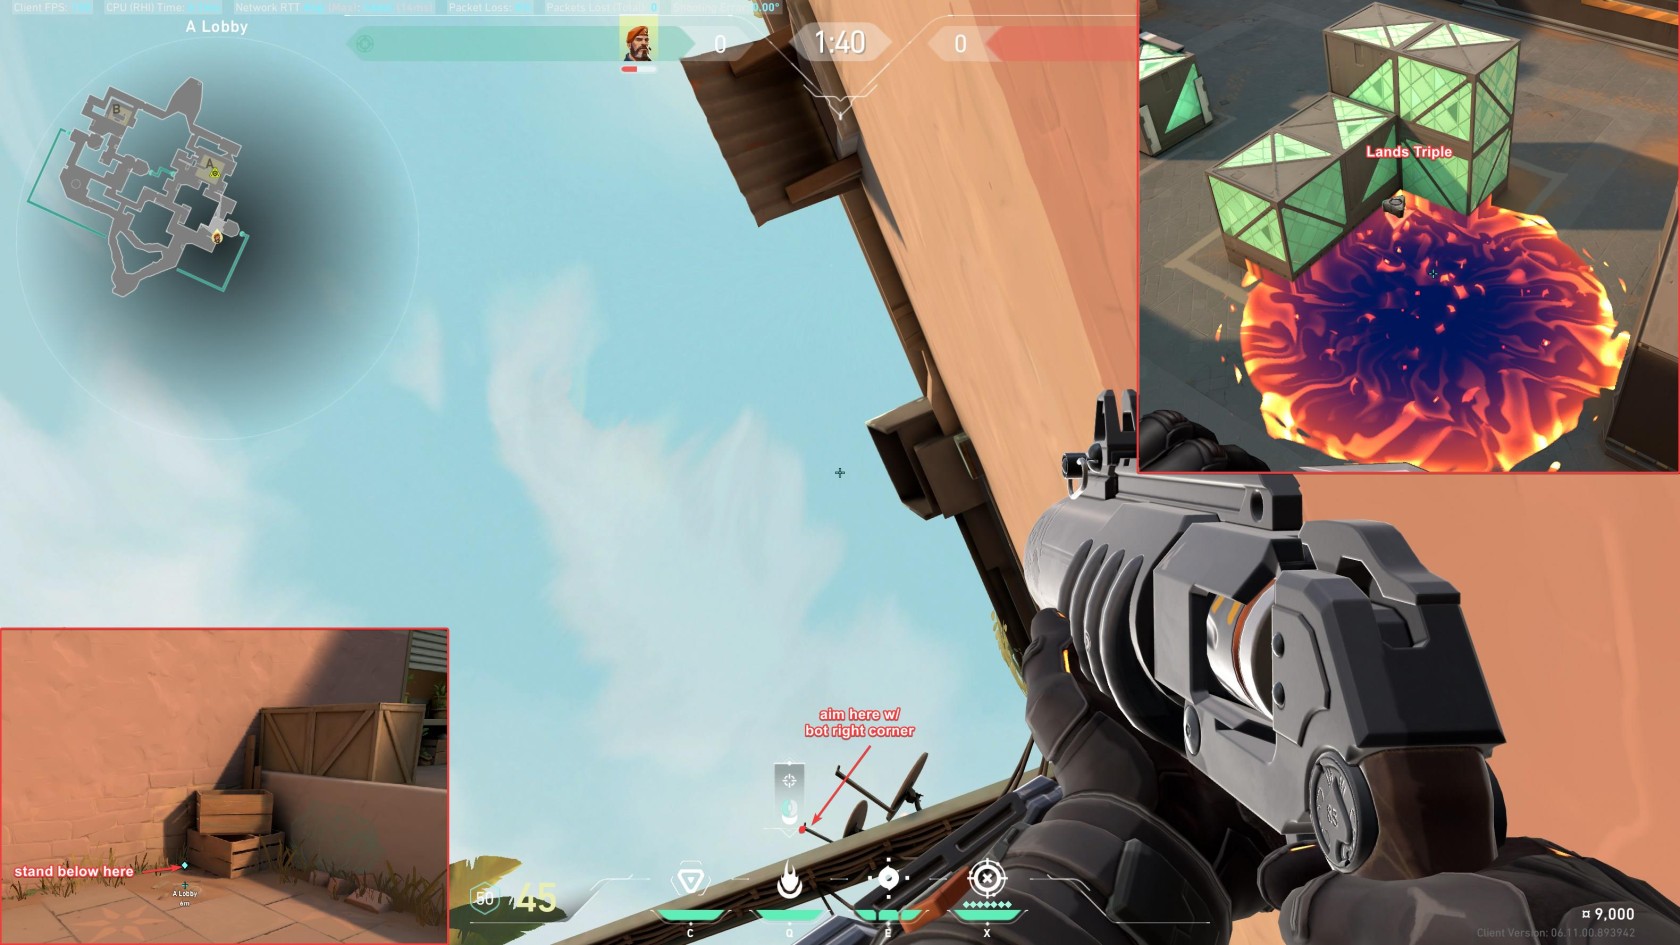](https://wiki.stoplagging.com/uploads/images/gallery/2023-06/ashowerstotriple.jpg)
## A Mollys Truck
#### Fast
[](https://wiki.stoplagging.com/uploads/images/gallery/2023-06/fast-a-short-to-a-default.jpg)
#### Slow
[](https://wiki.stoplagging.com/uploads/images/gallery/2023-06/a-short-to-a-default.jpg)