I made a new significant discovery on 2024.01.07 that makes the NanoPi R6S capable of pushing past 1400+ Mbps with cake on!!! Hooray! See [here](https://github.com/StarWhiz/NanoPi-R6S-CPU-Optimization-for-Gigabit-SQM/blob/main/README.md). On 2024.01.11 I discovered the same for the [NanoPi R4S](https://github.com/StarWhiz/NanoPi-R6S-CPU-Optimization-for-Gigabit-SQM/tree/main/R4S%20CPU%20Optimization) which is now able to push up to 800 Mbps with cake SQM.
As of 2025.02.15 The NanoPi R6S is official supported by OpenWrt. Performance tweaks are no longer necessary! See [https://github.com/StarWhiz/NanoPi-R6S-CPU-Optimization-for-Gigabit-SQM/tree/main/How%20To%20Flash%20Official%20OpenWrt%20To%20R6S%20eMMC](https://github.com/StarWhiz/NanoPi-R6S-CPU-Optimization-for-Gigabit-SQM/tree/main/How%20To%20Flash%20Official%20OpenWrt%20To%20R6S%20eMMC) on how to flash!
[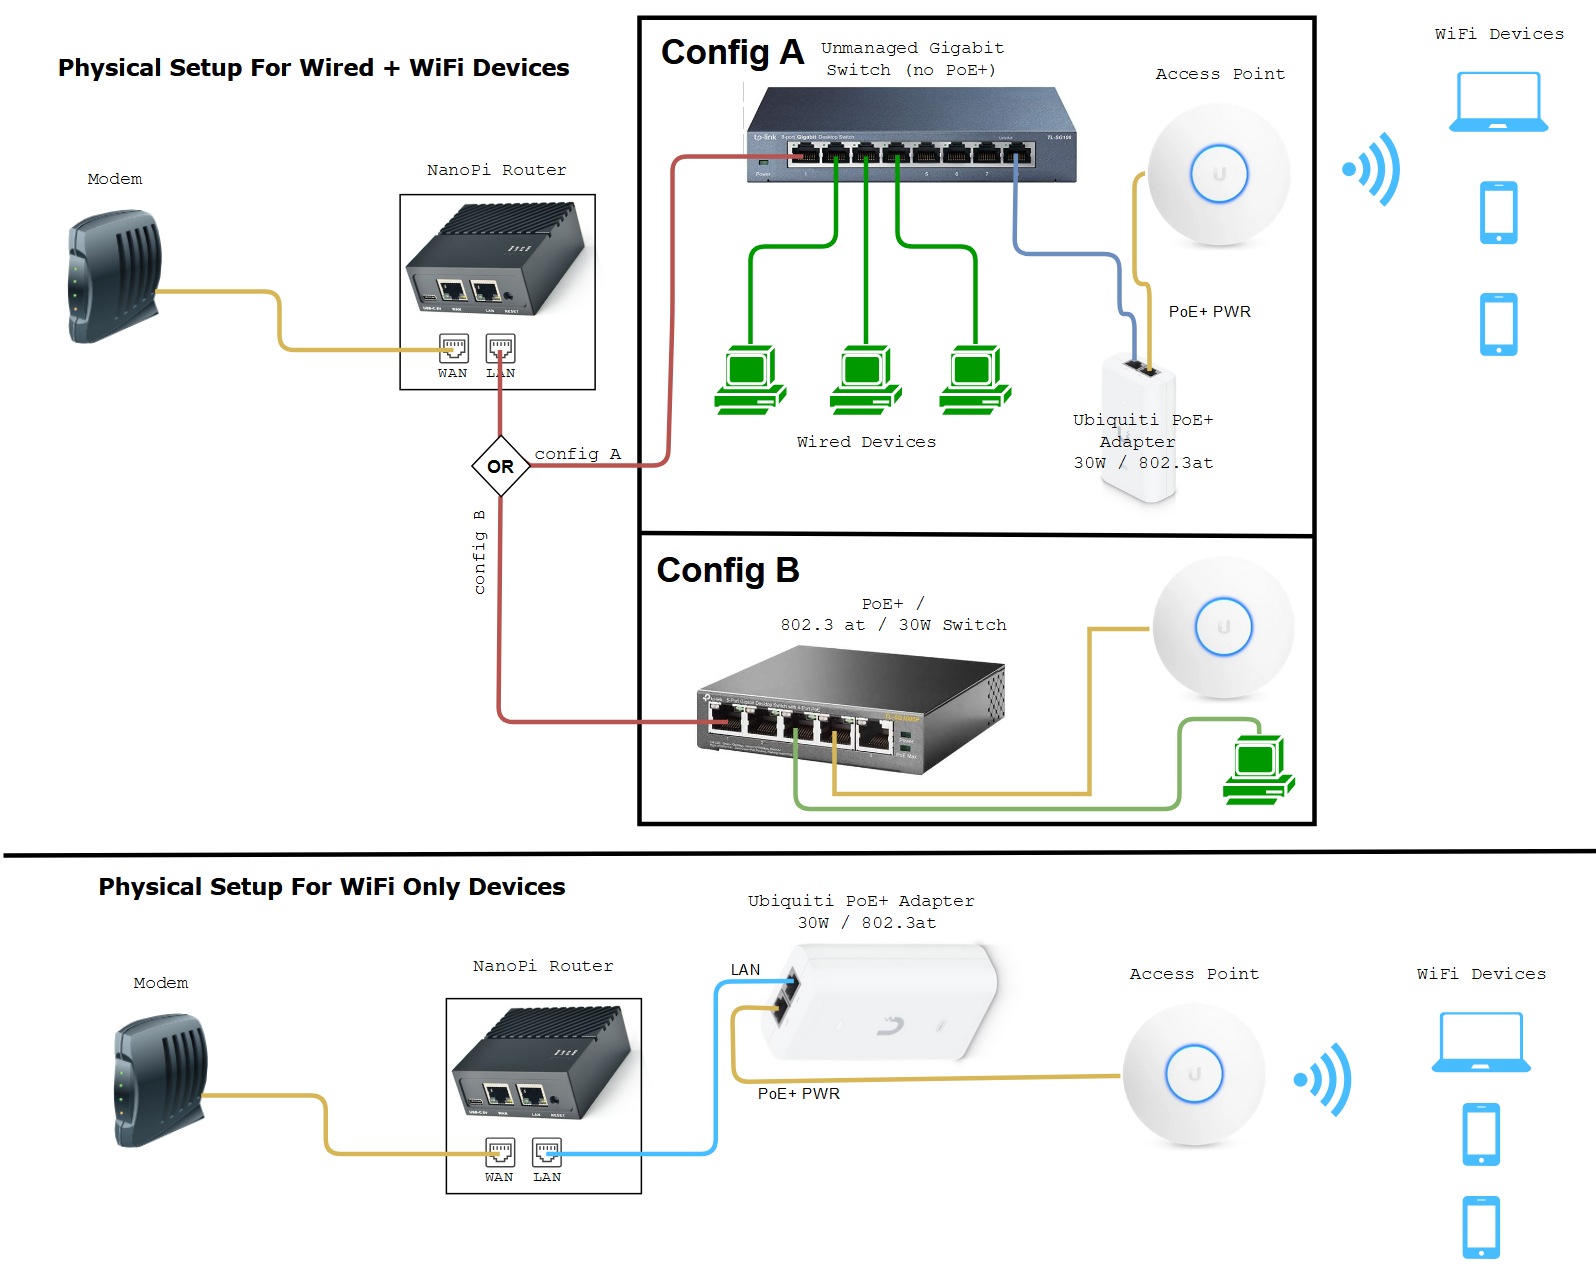](https://wiki.stoplagging.com/uploads/images/gallery/2024-12/firefox-izbtl64clx.png) Pictured Gigabit Switch: [TP-Link 8-Port Gigabit Ethernet Switch](https://wiki.stoplagging.com/Pictured%20Access%20Point%20-%20Ubiquiti%20Unifi%206%20Pro%20(Official%20Link)%20Note:%20If%20Ubiquiti%20is%20out%20of%20stock%20you%20or%20if%20you%20don't%20like%20them,%20I%20heard%20that%20the%20TP-Link%20EAP670%20(Amazon%20Referral%20Link)%20from%20their%20Omada%20lines%20work%20just%20as%20great.%20I%20just%20have%20never%20tried%20it%20myself%20as%20I've%20been%20using%20Ubiquiti%20APs.) (**Amazon Referral Link)** Pictured Access Point - [Ubiquiti Unifi 6 Pro](https://store.ui.com/us/en/pro/category/wifi-flagship/products/u6-pro) (**Official Link)** Note: If Ubiquiti is out of stock you or if you don't like them, I heard that the [TP-Link EAP670](https://www.amazon.com/TP-Link-EAP670-Wireless-Seamless-Integrated/dp/B09ZV19DBP/ref=sr_1_4?crid=1M4Y8LX621QPT&keywords=tp-link+omada+access+point&qid=1704591674&sprefix=tp-link+omada+access+poin%252Caps%252C161&sr=8-4&_encoding=UTF8&tag=stopl02-20&linkCode=ur2&linkId=1d304da599013ae323d3ed5495bd3061&camp=1789&creative=9325) **(Amazon Referral Link)** from their Omada lines work just as great. I just have never tried TP-Link EAPs myself as I've been using Ubiquiti APs. **Note:** The Unifi 6's don't include power. So you need to buy the (30W aka 802.3at or PoE+) Injector to power it as shown in the picture. Alternative you can get a switch that supports PoE+, 802.3at, 30W). Pictured OpenWrt Device: [NanoPi R4SE](https://www.friendlyelec.com/index.php?route=product/product&product_id=288) **(Official Link).**R4SE - Can do cake SQM up to 800 Mbps (w/ [performance tweak](https://github.com/StarWhiz/NanoPi-R6S-CPU-Optimization-for-Gigabit-SQM/tree/main)).** Also has official OpenWrt software available. **R6S - Can do cake SQM up to 1500 Mbps (w/ [performance tweak](https://github.com/StarWhiz/NanoPi-R6S-CPU-Optimization-for-Gigabit-SQM/tree/main/R4S%20CPU%20Optimization))**. Only has official FriendlyWrt software for now.
If you're interested in using cake SQM on an x86 machine please refer to this page instead: [https://wiki.stoplagging.com/books/technical-guides/page/sqm-for-beyond-1-gbps-lines-with-openwrt](https://wiki.stoplagging.com/books/technical-guides/page/x86-routers-for-gigabit-sqm-with-openwrt) ### 1.1 Introduction and Why? The diagram above demonstrates how you would install a more powerful ARM PC, the nanoPi as a router into your network. Building your home network infrastructure like this, is more reliable and better than consumer routers which try to put the modem, routing, and wireless all in one. The reason why we would want to do this is so we can stop [bufferbloat](#bkmrk-what-is-bufferbloat-) at higher bandwidths with SQM (Smart Queue Management) turned on. Currently consumer routers usually can't push past 350 Mbps with cake or fq\_codel SQM they are limited by their CPU power. Most consumer routers have underpowered CPUs so that's why the NanoPis are a solid choice. They are low power usage, small and have solid CPU that can handle cake at **800 Mbps** (R4SE) and **1400+ Mbps** (R6S w/ CPU fixes) ##### What is Bufferbloat and why stop it? It is lag or ping spikes in video games or zoom calls that is caused when you or someone else uses up all your bandwidth. It could be torrenting, 4k streaming, bulk downloads, or even a speedtest. SQM algorithms (fq\_codel or cake) which are available on OpenWrt, can completely mitigate these pings and ensures low latency even under full load. Overall, you do sacrifice a little max speed 5-10% for guaranteed low latencies. #### NanoPi R4S / R4SE Performance By default, the FriendlyWrt firmware on R4S doesn't optimally single out the use of it's faster A72 cores for Queues. This causes the cap to be around **630 Mbps**. Do the performance tweak [here](https://github.com/StarWhiz/NanoPi-R6S-CPU-Optimization-for-Gigabit-SQM/tree/main/R4S%20CPU%20Optimization) and the improvement for cake SQM jumps from **630 Mbps** up to **800 Mbps** afterwards. Note: Don't copy me here and set max bandwidth as 920000 Mbps I was just testing the limits. You should be setting 90-95% of you max bandwidth for best performance! The video is just to demonstrate it's possible to do up to 800 Mbps cake. #### NanoPi R6S Performance By default, the FriendlyWrt firmware on R6S doesn't optimally single out the use of it's faster A76 cores for Queues. This causes the cap to be around **800 Mbps**. Do the performance tweak [here](https://github.com/StarWhiz/NanoPi-R6S-CPU-Optimization-for-Gigabit-SQM/tree/main) and the improvement for cake SQM jumps from **800 Mbps** to **1400+ Mbps** afterwards. #### NanoPi Software Installation Installation is easy. You just need to flash a microSD card with friendlyWrt. They have a tutorial here for **R4SE**: [https://wiki.friendlyelec.com/wiki/index.php/NanoPi\_R4S#Install\_OS](https://wiki.friendlyelec.com/wiki/index.php/NanoPi_R4S#Install_OS) And a tutorial here for **R6S**: [https://wiki.friendlyelec.com/wiki/index.php/NanoPi\_R6S#Install\_OS\_to\_eMMC](https://wiki.friendlyelec.com/wiki/index.php/NanoPi_R6S#Install_OS_to_eMMC) **All you have to do to install is...** 1\. Plug in a microSD card to your computer. 2\. Download the appropriate image (usually the eflasher) from the FriendlyWrt wiki 3\. Get win32diskimager and launch it. 4\. On win32diskimager select your image file that you downloaded and select your microSD drive letter. Then flash! 5\. After flashing is done eject microSD and unplug. 6\. Plug in microSD into your NanoPi and wait for it to flash (LEDs pictured below for reference) [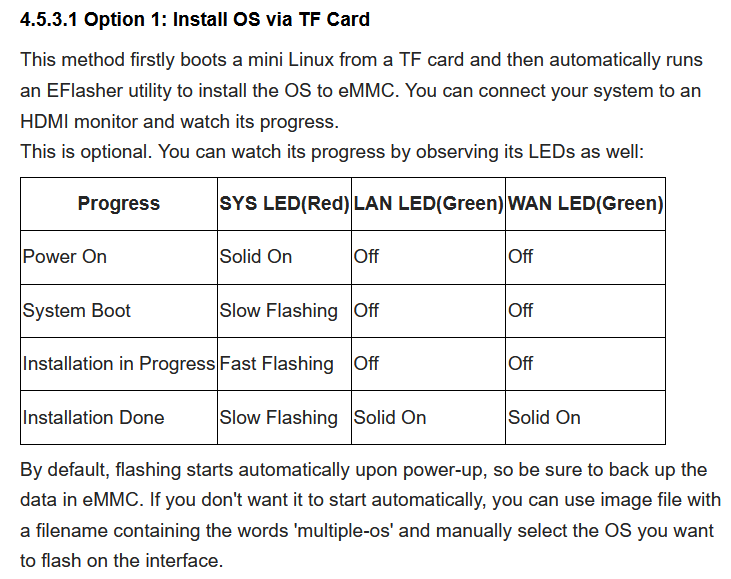](https://wiki.stoplagging.com/uploads/images/gallery/2024-01/B44image.png) 7\. Hook up WAN to your modem. Hook up LAN to either your switch which connects to a computer or hook up LAN directly to your computer. 8\. Power on. Wait about 3 minutes. 9\. On the computer that is connected to the switch or NanoPi's LAN port. Go to web browser and enter in [http://192.168.2.1](http://192.168.2.1) to access your router That's it! All that is left is to configure SQM with fq\_codel as shown . There's no need to install luci-app-sqm because the FriendlyWrt image has everything already! You just need to enable SQM via the [official openWrt guide](https://openwrt.org/docs/guide-user/network/traffic-shaping/sqm) or my [guide.](https://www.stoplagging.com/openwrt-method-fq_codel-cake/) Either way feel free to improve it further with the [advanced cake config section of this page](https://wiki.stoplagging.com/books/technical-guides/page/x86-routers-for-gigabit-sqm-with-openwrt#bkmrk-1.4-advanced-cake-co) If you want to fine tune cake further you can see the section below this page: [https://wiki.stoplagging.com/books/technical-guides/page/sqm-for-up-to-800-mbps-lines-with-openwrt#bkmrk-1.4-advanced-cake-co](https://wiki.stoplagging.com/books/technical-guides/page/sqm-for-up-to-1-gbps-lines-with-openwrt#bkmrk-1.4-advanced-cake-co) ### 1.3 What Access Point to Get? I keep hearing raving reviews about the Ubiquiti APs and use one myself. I have extremely stable WiFi with these and never have to reboot them. Ubiquiti also advertises up to 200 concurrent users as well! If you have a recommendation better than these I'd like to know. [Ubiquiti Unifi 6 Pro](https://store.ui.com/us/en/pro/category/wifi-flagship/products/u6-pro) (**Official Link)** If you plan on only having one Ubiquti AP I recommend [installing via the phone](https://lazyadmin.nl/home-network/setup-unifi-ap-without-controller/) so you don't have to bother with more complicated things like AP Controllers. If you're on a budget and can't buy a dedicated AP. You **can try turning your old router** into an **access point** by putting it into AP mode instead of routing mode. This is important because you should be letting the OpenWrt device do the routing to prevent bufferbloat not your old router. Another option you could try that I've heard are good are the [TP-Link EAP670](https://www.amazon.com/TP-Link-EAP670-Wireless-Seamless-Integrated/dp/B09ZV19DBP/ref=sr_1_4?crid=1M4Y8LX621QPT&keywords=tp-link+omada+access+point&qid=1704591674&sprefix=tp-link+omada+access+poin%252Caps%252C161&sr=8-4&_encoding=UTF8&tag=stopl02-20&linkCode=ur2&linkId=1d304da599013ae323d3ed5495bd3061&camp=1789&creative=9325) **(Amazon Referral Link)**. I have no real world experience with these as I don't own any, but I heard they are solid products in the /r/homenetworking community. ##### Facts about WiFi If you need more coverage you should get more APs not one single AP with a bunch of antennas, because those are marketing gimmicks. WiFi has limited range due to the physics of their frequency bands. 5Ghz can handle more bandwidth, but will usually be about half the range of 2.4Ghz. ### 1.4 Advanced Cake Configuration This section is for my own reference and these were recommended by the official docs: [https://openwrt.org/docs/guide-user/network/traffic-shaping/sqm-details#sqmqueue\_discipline\_tab](https://openwrt.org/docs/guide-user/network/traffic-shaping/sqm-details#sqmqueue_discipline_tab) It's not necessary to do this but if you want even further ping stability under load it might be worthwhile! Under the Queue Discipline tab of SQM. Enable the checkmark for advanced configuration and save& apply. This turns on squash\_dscp, squash\_ingress, ECN on ingress and NOECN on egress. Leave them as defaults as they are good the way they are. (If you have symmetrical fiber then ECN can be enabled on egress. Next checkmark and enable "Dangerous Configuration" which is below the "Advanced Configuration" section. We are going to disable triple-isolate and enable per host isolation... Here's a short explanation. To quote the docs, by default, cake will use triple-isolate: “which will first make sure that no internal or internal host will hog too much bandwidth and then will still guarantee for fairness for each host. In that mode, Cake mostly does the right thing. It would ensure that no single stream and no single host could hog all the capacity of the WAN link. However, it can’t prevent a BitTorrent client – with multiple connections – from monopolizing most of the capacity.” You can enable per host isolation, which will identify all source/destination information. To enable that, Add the following to the “Advanced option strings” (in the Interfaces → SQM-QoS page; Queue Discipline tab, look for the Dangerous Configuration options): For queueing disciplines handling incoming packets from the internet (internet-ingress): nat dual-dsthost ingress For queueing disciplines handling outgoing packets to the internet (internet-egress): nat dual-srchost For me that means Qdisc options (ingress) I wrote in "nat dual-dsthost ingress" while for Qdisc options (egress) I wrote in "nat dual-srchost" ### 1.5 Performance Tweaks for R4S and R6SAs of 2025.02.15 The NanoPi R6S is official supported by OpenWrt! Performance tweaks are no longer necessary! See [https://github.com/StarWhiz/NanoPi-R6S-CPU-Optimization-for-Gigabit-SQM/tree/main/How%20To%20Flash%20Official%20OpenWrt%20To%20R6S%20eMMC](https://github.com/StarWhiz/NanoPi-R6S-CPU-Optimization-for-Gigabit-SQM/tree/main/How%20To%20Flash%20Official%20OpenWrt%20To%20R6S%20eMMC) on how to flash!
- [https://github.com/StarWhiz/NanoPi-R6S-CPU-Optimization-for-Gigabit-SQM/tree/main](https://github.com/StarWhiz/NanoPi-R6S-CPU-Optimization-for-Gigabit-SQM/tree/main) for NanoPi R6S - Performance improvement for cake SQM jumps from 800 Mbps to 1400+ Mbps afterwards - [https://github.com/StarWhiz/NanoPi-R6S-CPU-Optimization-for-Gigabit-SQM/tree/main/R4S%20CPU%20Optimization](https://github.com/StarWhiz/NanoPi-R6S-CPU-Optimization-for-Gigabit-SQM/tree/main/R4S%20CPU%20Optimization) for NanoPi R4S - Performance improvement for cake SQM jumps from 630 Mbps up to 800 Mbps afterwards. #### Deprecated way to fix this ``` ## Step1: Get CPU Frequencies to confirm that cores 4, 5, 6, and 7 are the faster cores. CPU0 starts from the top. cat /sys/devices/system/cpu/cpu*/cpufreq/cpuinfo_max_freq ## Step2: Get IRQ ##s (In my example below they are 31 for eth0 and 88 for eth1 yours may be different) grep eth /proc/interrupts ## My output of Step2 yours may be different grep eth /proc/interrupts 74: 0 0 0 0 0 0 0 0 GICv3 266 Level eth0 75: 0 0 0 0 0 0 0 0 GICv3 265 Level eth0 128: 0 0 61981 0 0 0 0 2335426 ITS-MSI 570949632 Edge eth1-0 144: 0 0 1236903 0 0 0 0 0 ITS-MSI 570949648 Edge eth1-16 146: 0 0 0 0 0 0 0 0 ITS-MSI 570949650 Edge eth1-18 149: 0 0 0 0 5 0 0 3 ITS-MSI 570949653 Edge eth1-21 160: 0 0 0 148716 4732058 0 0 0 ITS-MSI 428343296 Edge eth2-0 176: 0 0 0 1559148 0 0 0 0 ITS-MSI 428343312 Edge eth2-16 178: 0 0 0 0 0 0 0 0 ITS-MSI 428343314 Edge eth2-18 181: 0 0 0 0 0 0 0 7 ITS-MSI 428343317 Edge eth2-21 ## What is your IRQ ##? By default eth2-0 is the WAN port and eth1-0 is the 2.5gbps LAN port on the R6S. So the lines of interest are below: 160: 0 0 0 148716 4732058 0 0 0 ITS-MSI 428343296 Edge eth2-0 128: 0 0 61981 0 0 0 0 2335426 ITS-MSI 570949632 Edge eth1-0 Your IRQ number might be different from mine whcih is 160 for 2.5 Gbps WAN and 128 for 2.5Gbps LAN ## Optional Step: List CPU Cores Assigned to Current IRQs cat /proc/irq/160/smp_affinity cat /proc/irq/128/smp_affinity ## Optional Step: List CPU Cores Assigned Current Queues cat /sys/class/net/eth0/queues/rx-0/rps_cpus cat /sys/class/net/eth1/queues/rx-0/rps_cpus The optional steps above are to see what the values are currently. Nowe we will change them! ## Step3: The Performance Tweaks. The idea here is to put IRQ cpu affinities on Faster A76 Cores. And assign all CPU cores to the queues. #ETH0 irq on core 4,5 (a76 core) replace 160 with your actual IRQ number for WAN echo -n 30 > /proc/irq/160/smp_affinity #ETH1 irq on core 6,7 (a76 core) replace 128 with your actual IRQ number for WAN echo -n c0 > /proc/irq/128/smp_affinity #ETH0 queues on all CPU cores echo -n ff > /sys/class/net/eth0/queues/rx-0/rps_cpus #ETH1 queues on all CPU cores echo -n ff > /sys/class/net/eth1/queues/rx-0/rps_cpus #ETH2 queues on all CPU cores echo -n ff > /sys/class/net/eth1/queues/rx-0/rps_cpus ```If you restart [Smart Queue Management](https://openwrt.org/docs/guide-user/network/traffic-shaping/sqm "docs:guide-user:network:traffic-shaping:sqm") or change SQM settings, it will **reset** the CPU affinity and you will **need** to re-apply the performance tweaks again. I recommend doing it the new way
#### Optional understanding of CPU Affinity This section below is **optional** and is for my understanding of how the hex value selects certain CPU cores. ``` ## Performance Tweaks Quick Reference R6S Binary = hex ## = cpu core 00000001 = hex 1 = cpu core 0 (A55) selected 00000010 = hex 2 = cpu core 1 (A55) selected 00000100 = hex 4 = cpu core 2 (A55) selected 00001000 = hex 8 = cpu core 3 (A55) selected 00010000 = hex 10 = cpu core 4 (A76) selected 00100000 = hex 20 = cpu core 5 (A76) selected 01000000 = hex 40 = cpu core 6 (A76) selected 10000000 = hex 80 = cpu core 7 (A76) selected ## Examples (Note CPU0 starts on the right. CPU7 ends on the left. Read from right to left) 00001111 = hex 0f = cpu cores 0, 1, 2 and 3 selected 11111111 = hex ff = all cpu cores selected 11110000 = hex f0 = cpu cores 4, 5, 6, 7 selected 00110000 = hex 30 = cpu cores 4, 5 selected 11000000 = hex c0 = cpu cores 6, 7 selected Just use binary and covert it to hex, 1 = select that cpu core and 0 = unselect that cpu core. ``` ### 1.6 Contact If you need help or consultation please join my rocket.chat server at [https://chat.stoplagging.com/invite/zaMu6X](https://chat.stoplagging.com/invite/zaMu6X) you can message me @Starfroz by looking me up under the globe icon after registering and logging in. [](https://wiki.stoplagging.com/uploads/images/gallery/2021-01/image-1609968043493.png) ### External Resources for Nano Pi R4S **R4S Benchmarks by Van Tech Corner on Youtube**: [https://www.youtube.com/watch?v=t5xuTy1xn64](https://www.youtube.com/watch?v=t5xuTy1xn64) **R6S Benchmarks by Van Tech Corner on Youtube**: [https://www.youtube.com/watch?v=2bCf8Xchrfc](https://www.youtube.com/watch?v=2bCf8Xchrfc) **R4S Performance Tweaking:** https://forum.openwrt.org/t/nanopi-r4s-rk3399-4g-is-a-great-new-openwrt-device/79143/406 # Miyoo Mini V3 20221216 or 20221224 Firmware Specific Guide for Onion OS This wiki comes with 20221216 or 20221224 firmware specific instructions for the Miyoo Mini V3 journey that I personally went thru. ##### Backup your official Miyoo SD Card It's not mentioned on the OnionOS GitHub Installation Guide, but you should back up your official Miyoo SD Card. I just copied all the contents to my PC. It contains BIOS files and the ROMs. The BIOS being more important. If you want to be extra safe you can make an image of the stock Miyoo MicroSD Card w/ a program called WIN32DiskImager on Windows. [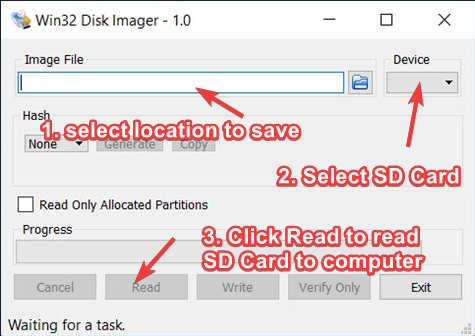](https://wiki.stoplagging.com/uploads/images/gallery/2023-01/image-1673087611871.png) On **WIN32DiskImager** I plugged in the Official SD Card into my Windows computer. Selected a location to save to. Then clicked "Read" to read the SD card image into my computer. ##### A. How to Use Higher Capacity MicroSD Cards on Miyoo V3 Skip this step if you're not using a microSD card bigger than 32GB. If you have a card higher than 32GB you'll have to format your higher capacity card in FAT32. I did this with [Rufus](https://rufus.ie/en/) in Windows. Video below shows you how to format. ##### B. Follow Onion OS Official Documentation I followed the "Installing (on an empty SD card)" instructions since I wanted to use my bigger 256GB Samsung MicroSD card. Official Onion OS GitHub Repository: [https://github.com/OnionUI/Onion/wiki/Installation](https://github.com/OnionUI/Onion/wiki/Installation)Only install Onion OS v.4.0.4 or later for firmware versions starting with 20221216 or 20221224. If you don't you may encounter soft brick and have to recover w/ I2C methods. As long as you downloaded 4.0.4 or later you should be safe.
You can reference this [section](https://wiki.stoplagging.com/books/technical-guides/page/miyoo-mini-v3-20221216-or-20221224-firmware-specific-guide-for-onion-os#bkmrk-miyoo-to-onionos-rom) if you are having trouble w/ the folder mappings in Step 3 of the official doc. ##### C. Upgrade Firmware from 20221216/2022124 to Hotfix Firmware I was able to proceed w/ this step after "[Step 2: Copy the installation files and boot up your device to begin the installation](https://github.com/OnionUI/Onion/wiki/Installation#step-2-copy-the-installation-files-and-boot-up-your-device-to-begin-the-installation)", but you can also do it after Step 3.This is an important upgrade for our specific units running firmware 20221216XXXX or 20221224XXXX. Do not use this upgrade from any other firmware versions. Why it is important? \* Reduces the startup time from 20s to 12s. \* Allows system settings to persist after reboot (this is only an issue on 20221216). As of December 2022 Miyoo was no longer able to source the internal flash chip they were using so they sourced a new chip very similar in functionality, but they didn't immediately receive the additional drivers needed to enable full write functionality with this new chip. This is why the hotfix is solves the two issues above. Learn more [here.](https://docs.google.com/document/d/e/2PACX-1vQCTMHDUz2jJBPx3XbvXGVukRJ0t96JKe1gchuV9i5eo3RqY1mIwFx8H1Ja-3sQtFXcHh3U72O8DNcY/pub)
If you want to follow the discussion thread it is here: [https://www.reddit.com/r/MiyooMini/comments/104qbak/community\_firmware\_patch\_for\_new\_devices/?sort=new](https://www.reddit.com/r/MiyooMini/comments/104qbak/community_firmware_patch_for_new_devices/?sort=new) The actual firmware is downloaded here (make sure you dl the zip called "Firmware patch 20230104 (only for new devices).zip" not the other ones): [https://drive.google.com/drive/folders/1OvmkKEtSMEWv1RY8LPsbDk0ylWzOg\_7j?usp=sharing](https://drive.google.com/drive/folders/1OvmkKEtSMEWv1RY8LPsbDk0ylWzOg_7j?usp=sharing) **Official Instructions Below** Notes: Don't be like me and use a USB-C to USB-C cable w/ PD. It only worked w/ a USB-A to USB- C Cable. It's important that you follow all the steps, but especially "Step #3 Delete the firmware file". ``` Step 1 - Transfer the file -------------------------- Copy the firmware image (miyoo283_fw.img) to the root of the SD card. Step 2 - Flash the firmware --------------------------- IMPORTANT: Do not power off device when upgrade starts 1. Make sure the device is off. 2. Insert the SD card into the device. 3. Insert the charging cable. - Do not press the POWER button. - It will power on and do the firmware upgrade automatically. 4. Wait for the upgrade to finish (about 2 minutes). 5. Unplug the charging cable when the charging screen appears. - Some devices will show "FINAL GATE / UNLOCKED", this is just a themed charging screen. - If you wait too long the screen will be off, it is still save to unplug then. - After removing the cable, wait for the device to power off. Step 3 - Delete the firmware file --------------------------------- IMPORTANT: Delete the firmware file from the SD card after the upgrade! Notes on charging ----------------- Use a known good USB-A to C charger. ``` Now you should be done with your Miyoo. The rest of the topics below are optional. #### #### Optional: Miyoo to OnionOS Rom Folder Mappings This mapping list was determined from this source: [https://github.com/OnionUI/Onion/wiki/Emulators](https://github.com/OnionUI/Onion/wiki/Emulators) It's for Step 3 of [https://github.com/OnionUI/Onion/wiki/Installation#step-3-copy-over-your-bios-and-rom-files](https://github.com/OnionUI/Onion/wiki/Installation#step-3-copy-over-your-bios-and-rom-files) This is WIP and may not be 100% correct. You can DM me on reddit if you have any inputs. [https://www.reddit.com/user/Frozutek/](https://www.reddit.com/user/Frozutek/)From [https://github.com/OnionUI/Onion/wiki/Emulators#rom-files](https://github.com/OnionUI/Onion/wiki/Emulators#rom-files) The roms on the included Miyoo Mini SD Card are a mixed bag which can lead to incompatibility with some emulators. It is highly recommended to source your own roms to get the most out of the device.
| **Original Miyoo SD Card** | **Onions OS SD Card** |
| \\Roms\\ARCADE\\cps1 | \\Roms\\CPS1 |
| \\Roms\\ARCADE\\cps2 | \\Roms\\CPS2 |
| \\Roms\\ARCADE\\cps3 | \\Roms\\CPS3 |
| \\Roms\\ARCADE\\pgm | \\Roms\\ARCADE |
| \\Roms\\ARCADE\\shoot | \\Roms\\ARCADE |
| \\Roms\\ATARI2600 | \\Roms\\ATARI |
| \\Roms\\ATARI7800 | \\Roms\\SEVENTYEIGHTHUNDRED |
| \\Roms\\FC | \\Roms\\FC |
| \\Roms\\GB | \\Roms\\GBC (I put it here because it's backwards compatible on GBC) |
| \\Roms\\GBC | \\Roms\\GBC |
| \\Roms\\GBA | \\Roms\\GBA |
| \\Roms\\MAME2003PLUS | \\Roms\\ARCADE |
| \\Roms\\MAME2010 | Don’t know yet |
| \\Roms\\MD | \\Roms\\MD |
| \\Roms\\MS | \\Roms\\MS |
| \\Roms\\NEOGEO | \\Roms\\NEOGEO |
| \\Roms\\NGP | \\Roms\\NGP |
| \\Roms\\PCE | \\Roms\\PCE |
| \\Roms\\PS | \\Roms\\PS |
| \\Roms\\SFC | \\Roms\\SFC (Note: Games worked after unzipping) |
| \\Roms\\WS | \\Roms\\WS |
renaming the copies from Miyoo to state0 and state0.png did not work for me on Onion OS so I started with state1 and state1.png in my examples.
Example below: ``` MiyooPath: \Roms\GBA\.gpsp_libretro **************************************************** Some Game Title (USA).0.png Some Game Title (USA).0.state Onion Path: \Saves\CurrentProfile\states\gpSP **************************************************** Some Game Title (USA).state1.png Some Game Title (USA).state1 ``` After doing this you can load the state you imported from the game w/ (Gameswitcher Button + Select Button) > Save States > State Slot (Choose slot 1). Then load state! # Miyoo Mini V3 Female Screen Connector Part ### Introduction So the reason for this wiki is for identifying the part my friend broke (pictured below) when trying to replace the buttons on the Miyoo Mini V3. This is the FFC/FPC connector that connects to the ribbon cable of the Miyoo Mini screen. [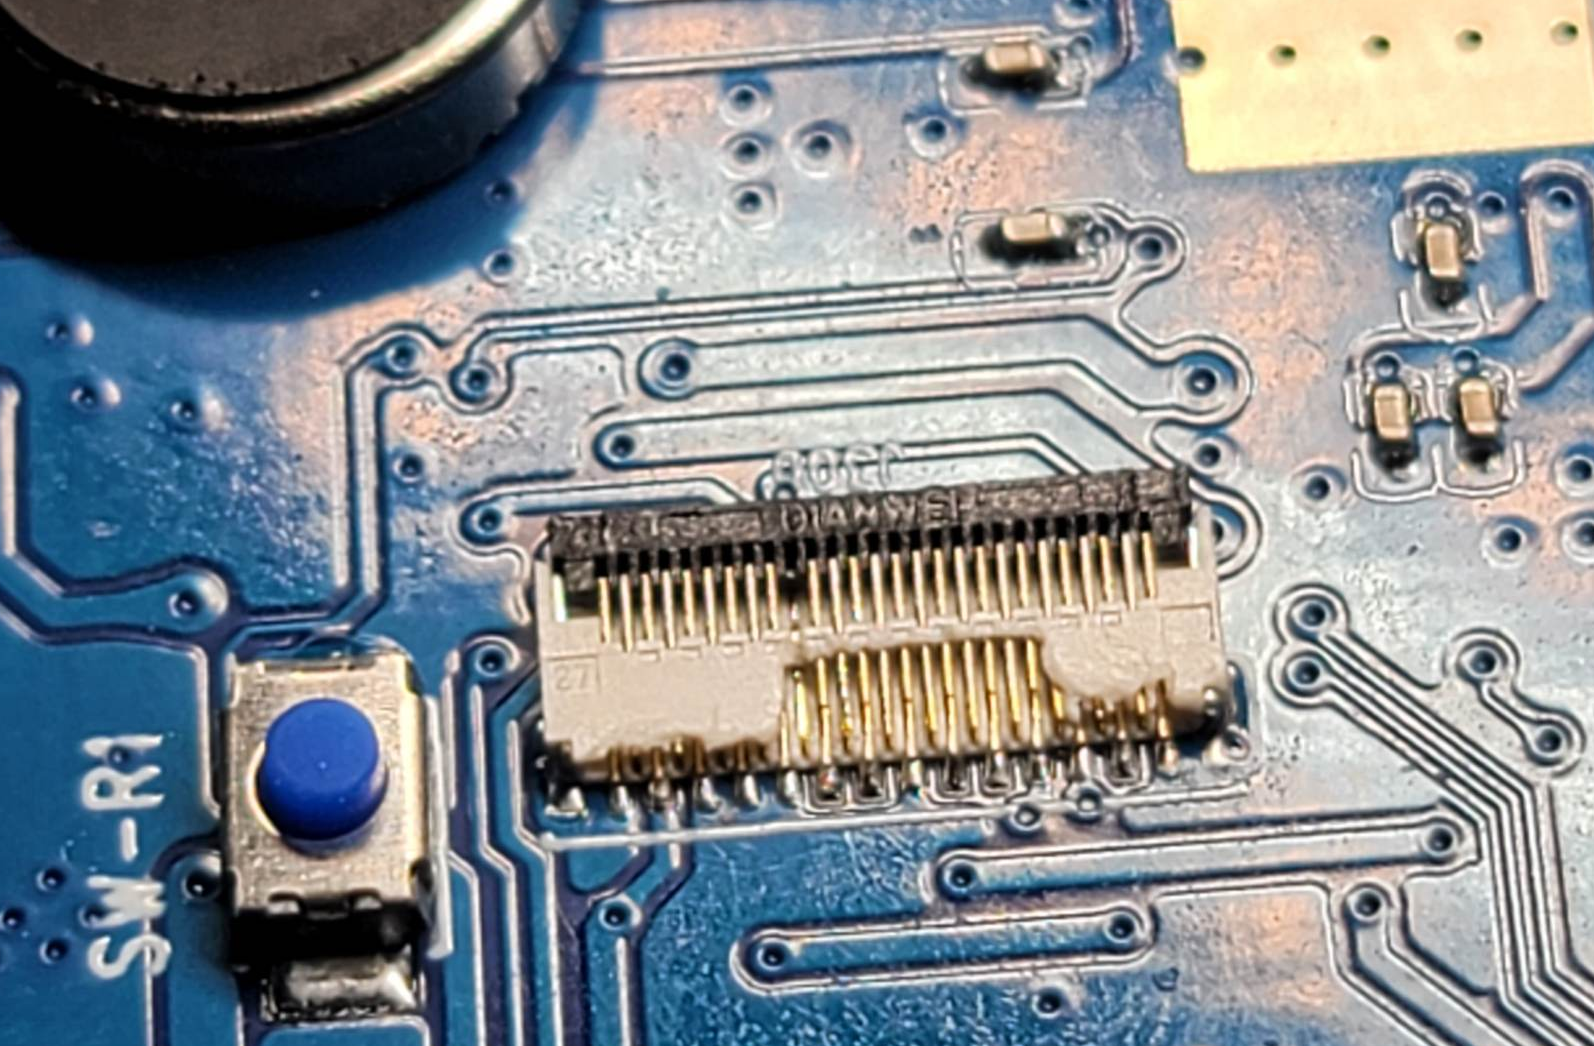](https://wiki.stoplagging.com/uploads/images/gallery/2023-01/image-1674375792056.png) Someone who has soldering experience or hot plate experience can attempt to replace the FFC/FPC connector. There's some tutorials on YouTube about soldering FFC/FPC connectors as well. ### Conclusion / Where to Buy the PartMy best guess/conclusion is that the FH35C is a good direct replacement for the FFC/FPC connector. Update 2023.01.31: I have confirmed that this is 100% the right part and it was extremely difficult to solder. My mom who is a professional solderer of 30 years took about an hour to replace this part. Taking out the old part was easy put putting in the replacement was the hard part.
**Aliexpress** FH35C-27S-0.3SH: [https://www.aliexpress.us/item/2251832661601648.html?gatewayAdapt=glo2usa4itemAdapt&\_randl\_shipto=US](https://www.aliexpress.us/item/2251832661601648.html?gatewayAdapt=glo2usa4itemAdapt&_randl_shipto=US) [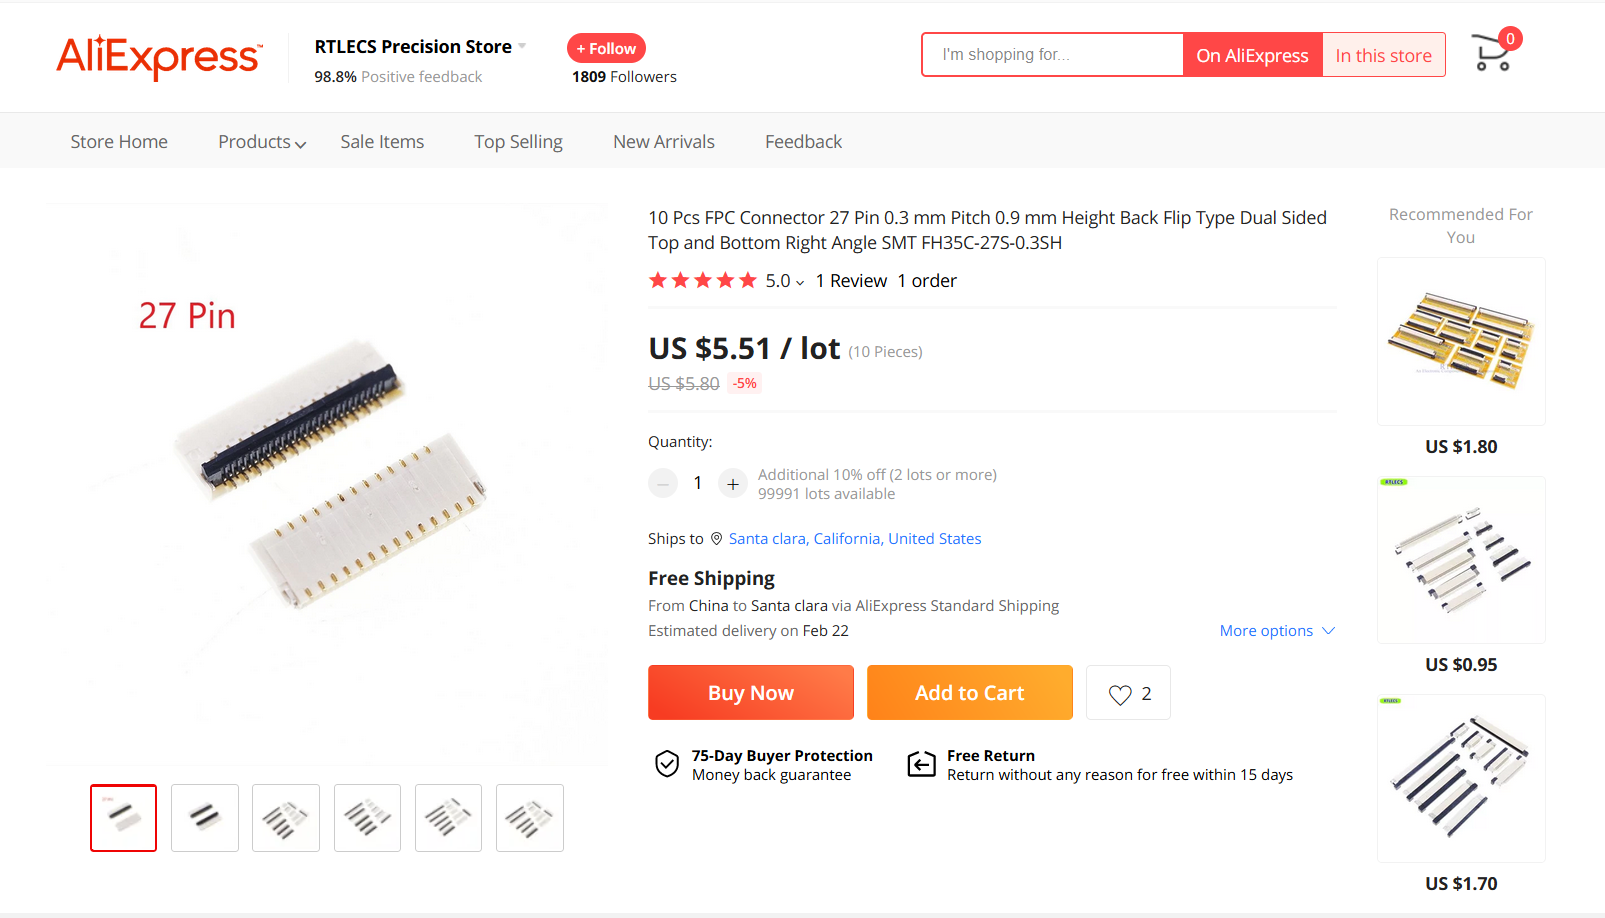](https://wiki.stoplagging.com/uploads/images/gallery/2023-01/image-1674376405137.png) **Mouser** FH35C-27S-0.3SHW(99):[ https://mou.sr/3Ws6JTt](https://mou.sr/3Ws6JTt?fbclid=IwAR27VYKrNA8giBNVs3jDhmSqdn04rpI14bvuwPheXm5R_cdU7IueIf45gxY) [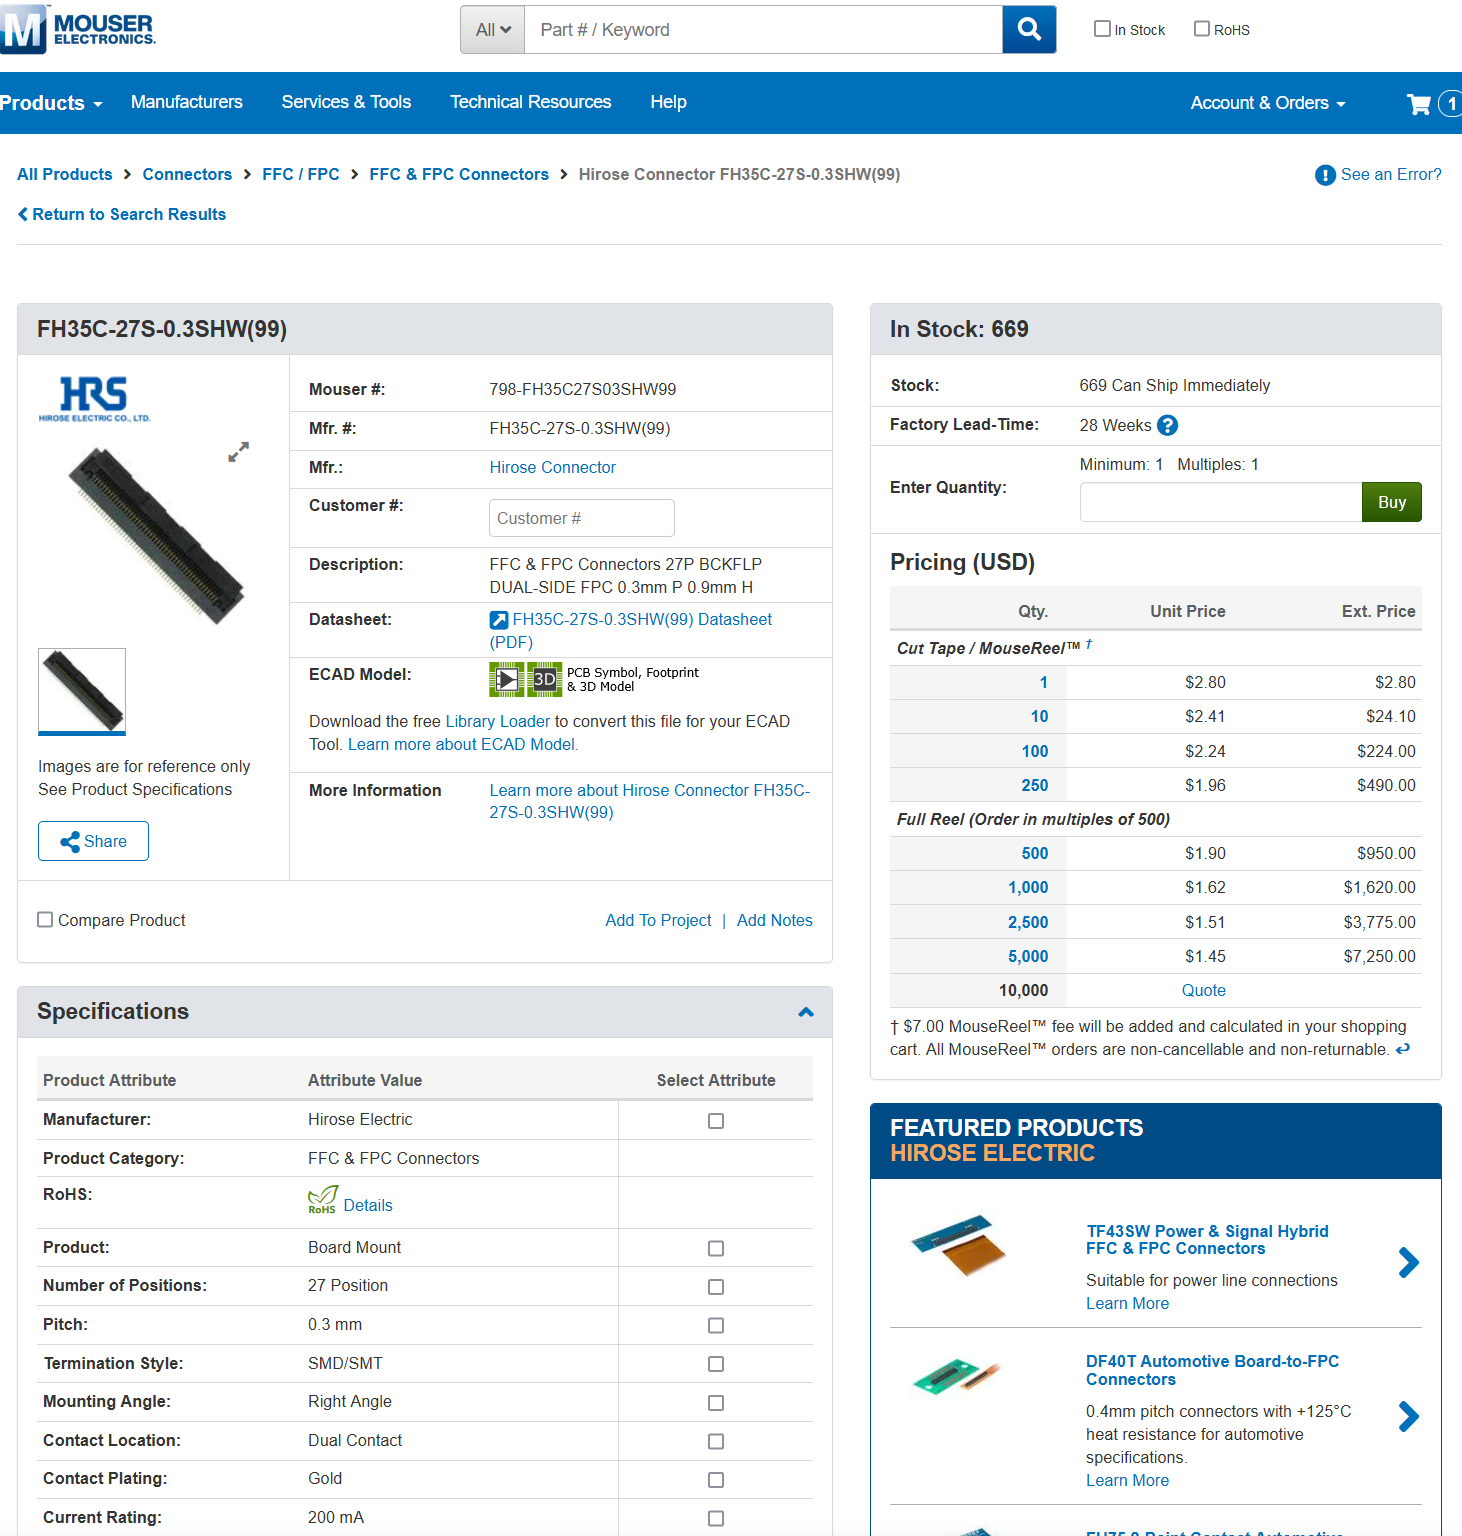](https://wiki.stoplagging.com/uploads/images/gallery/2023-01/image-1674377023661.png) ### How I arrived at the conclusion above As you can see here in the first photo above,the connector has DIANWEI and 27 printed on it. It also measures about 1mm high from the board facing you. I figured out it was by DIANWEI ELECTRONIC TECHNOLOGY CO.,LTD From the DIANWEI ELECTRONIC TECHNOLOGY CO.,LTD catalog I found on Google: [https://wiki.stoplagging.com/attachments/24](https://wiki.stoplagging.com/attachments/24) I was able to deduce it to be the 8.03A0.027200. or the 8.03A0.\*\*\*200 series. This series has two substitutes, the **HRS FH35C** or the **SCG BL143**. [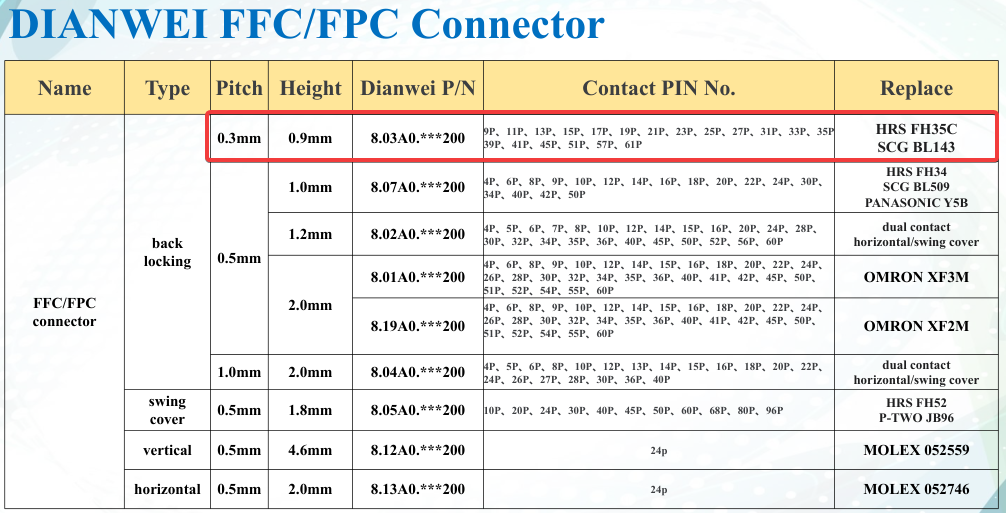](https://wiki.stoplagging.com/uploads/images/gallery/2023-01/image-1674376028663.png) This deduction was made from the height being close to 0.9mm and the number pins being 27P. The only other one that had 27P was the 2.0mm height which is double the size. The 8.03A0.027200 can also use HRS FH35C or SCG BL143 as substitutes. [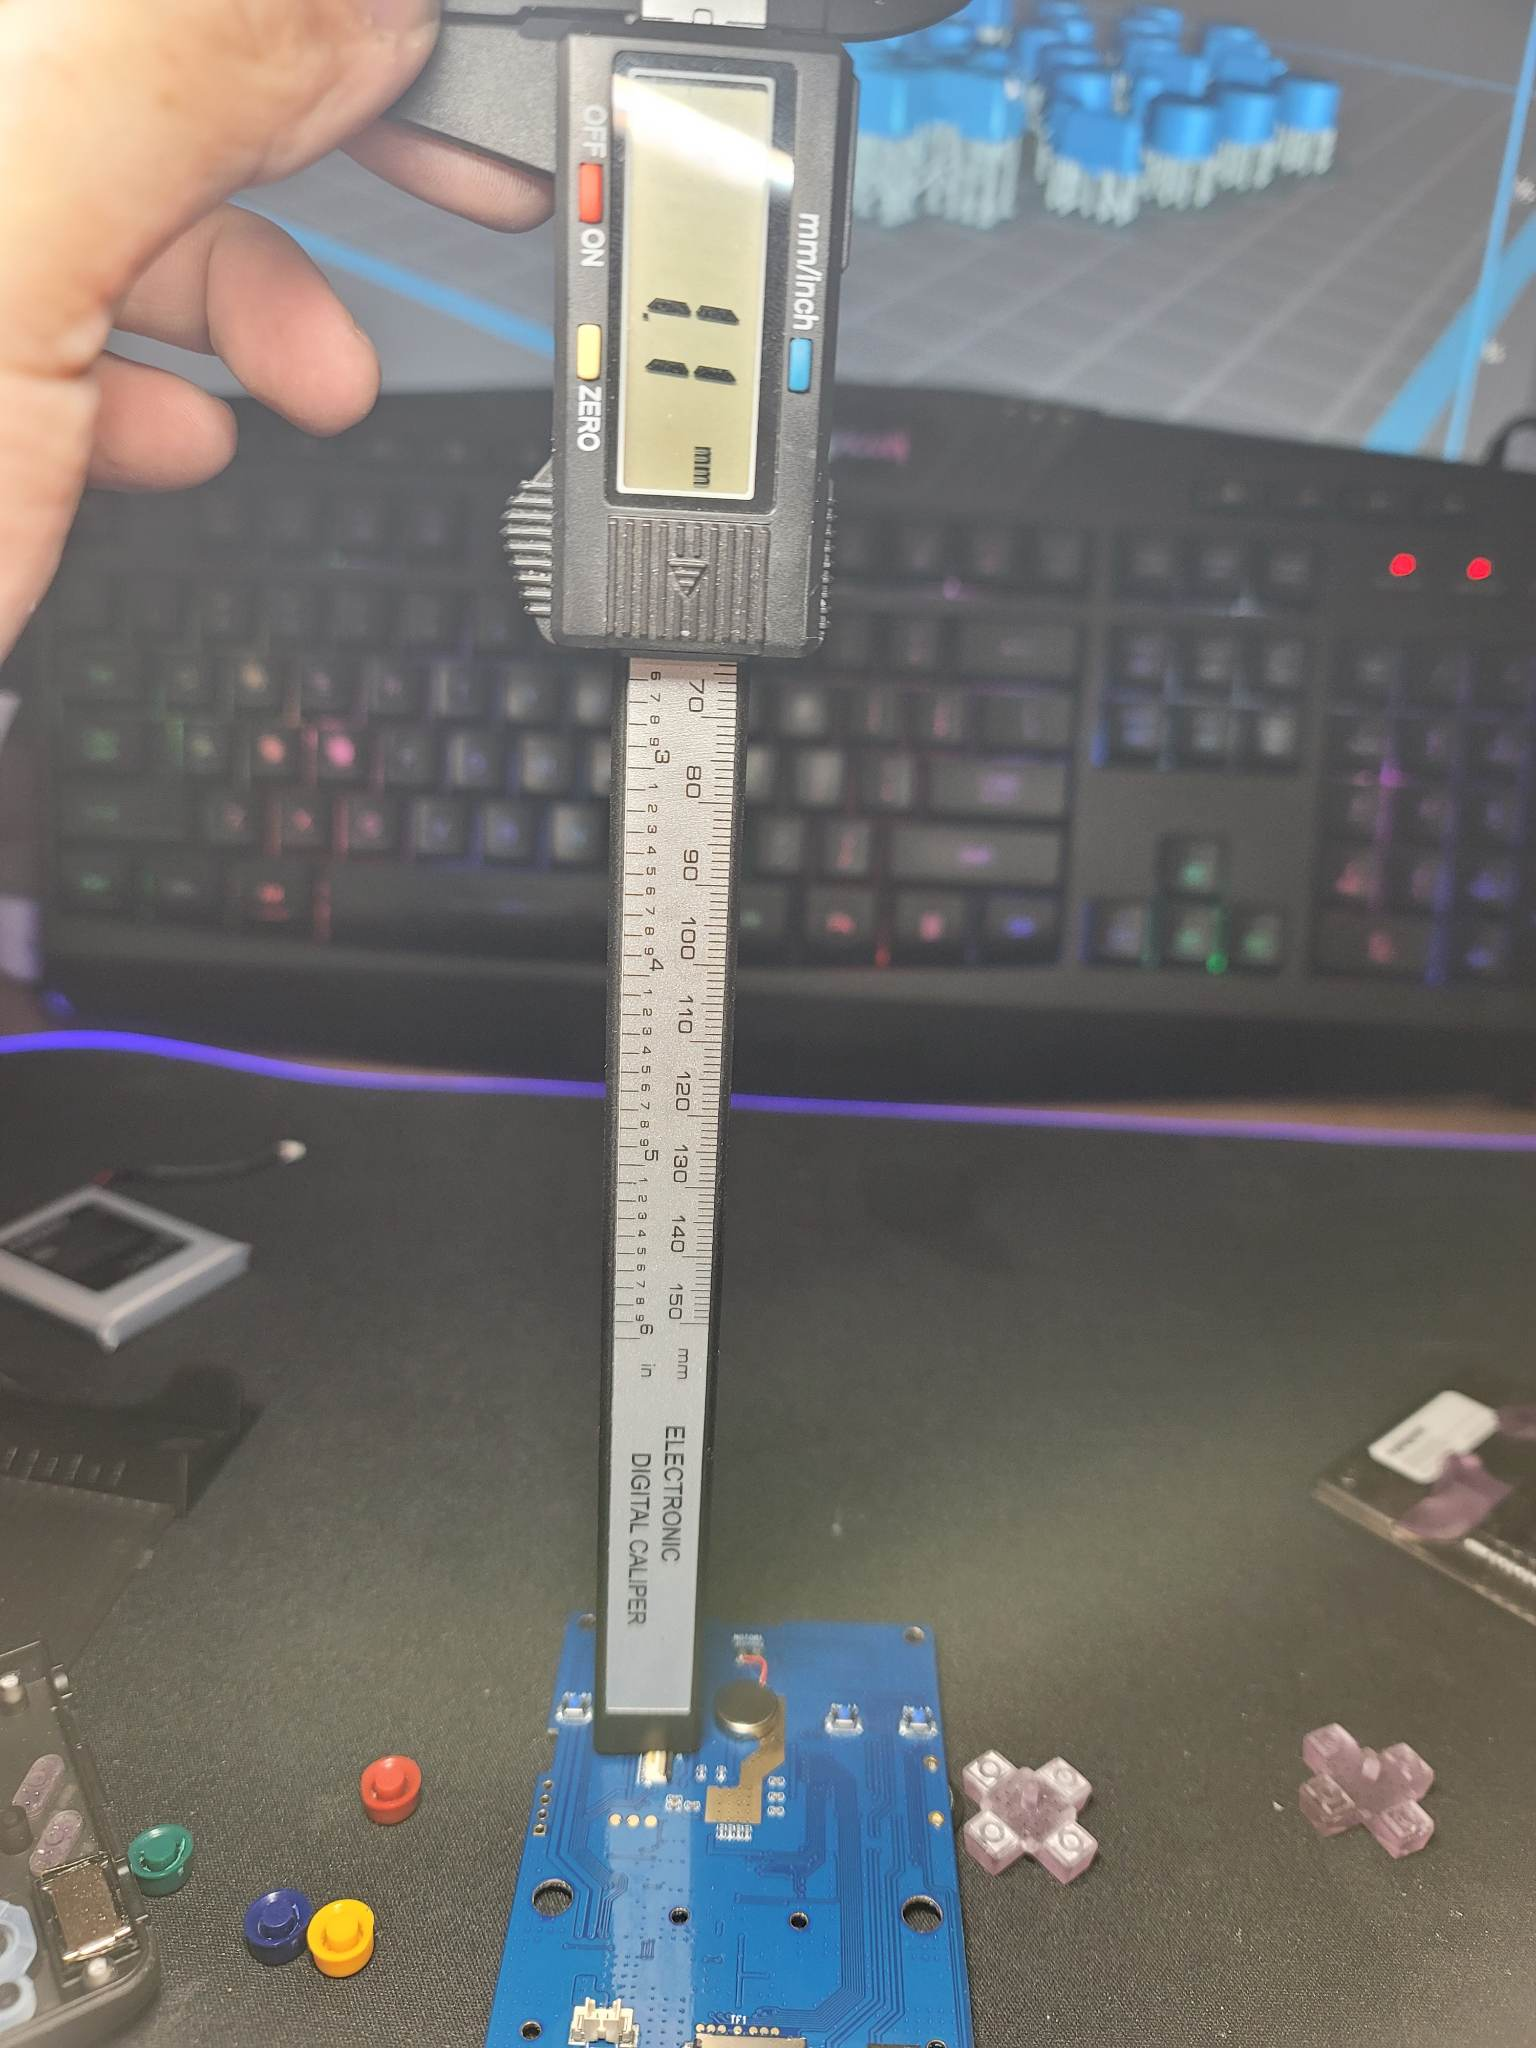](https://wiki.stoplagging.com/uploads/images/gallery/2023-01/image-1674376768309.png) [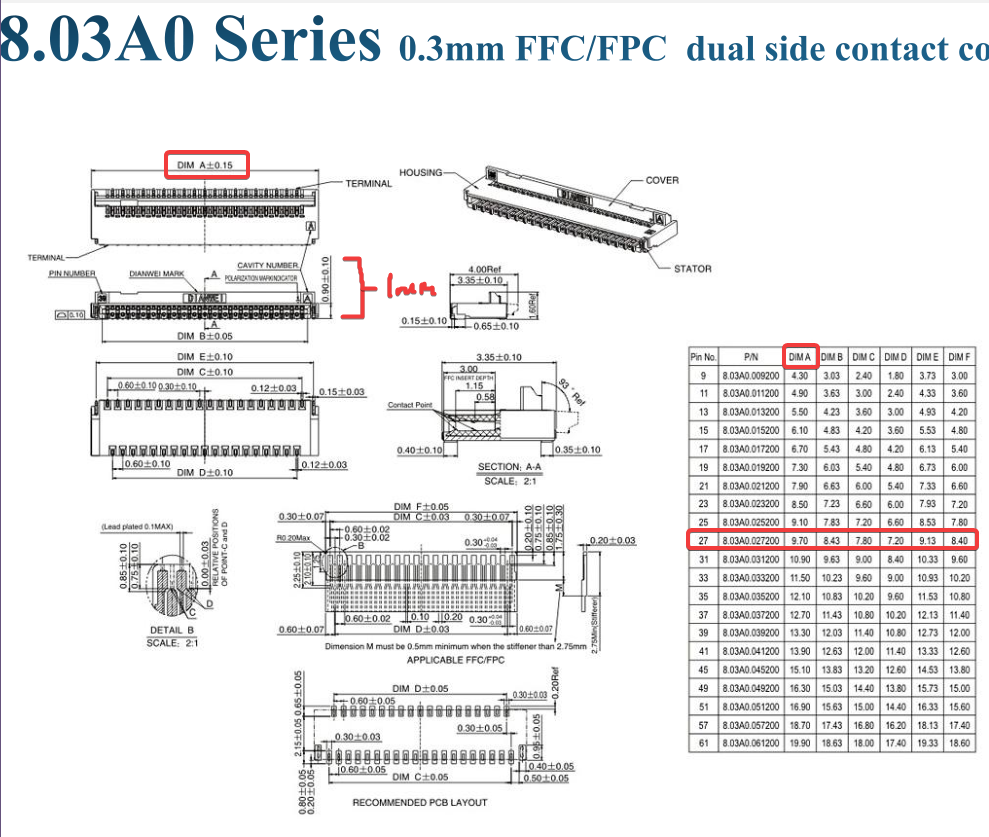](https://wiki.stoplagging.com/uploads/images/gallery/2023-01/image-1674376117715.png) From here we can also see that a 27 pin FFC/FPC connector is 9.70mm in length. This matches the FH35C Series from [https://www.hirose.com/product/series/FH35C](https://www.hirose.com/product/series/FH35C) As you can see the \[DIM A\] matches the Connector length for the various pin counts. That's how i found out the FH35C series is an appropriate replacement connector. [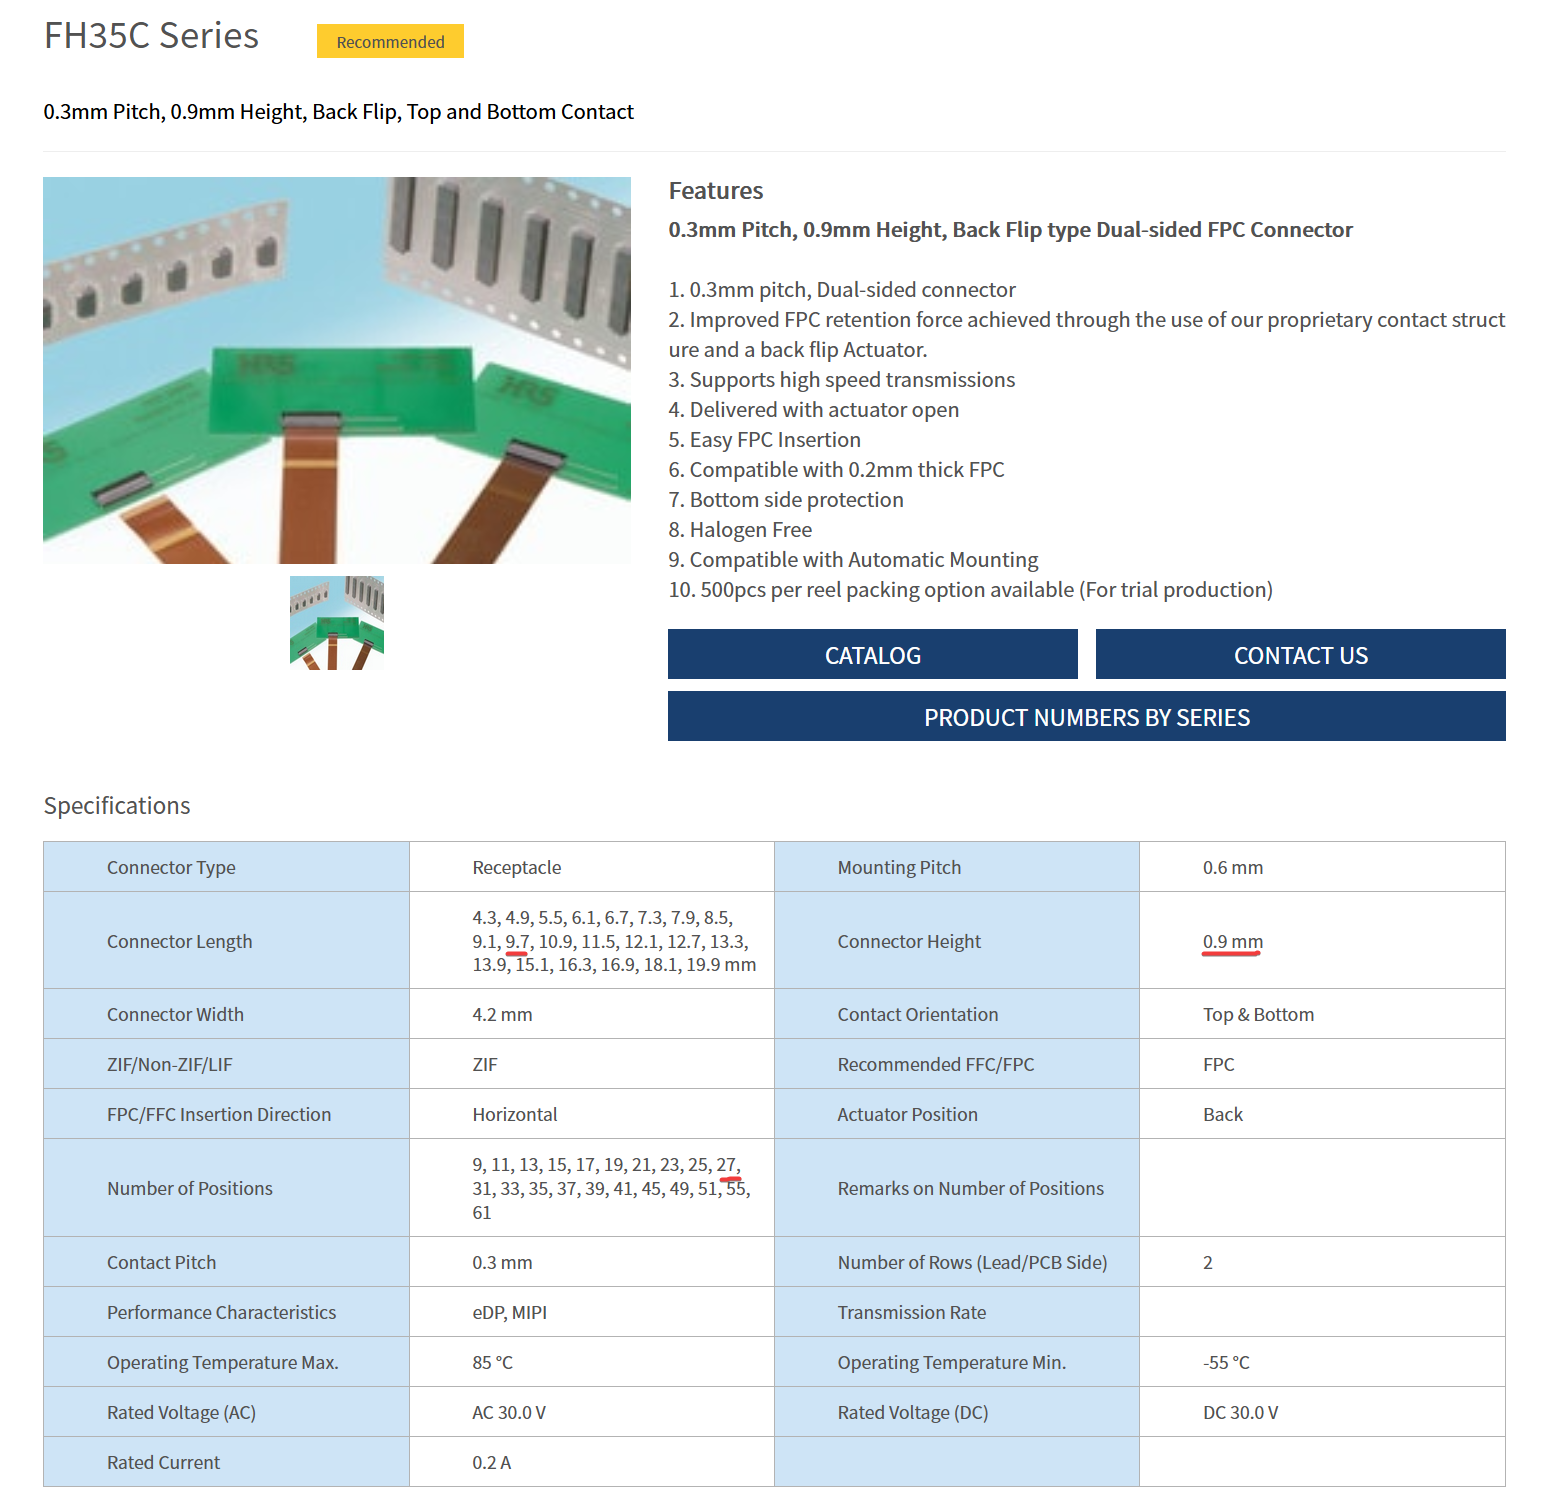](https://wiki.stoplagging.com/uploads/images/gallery/2023-01/image-1674376900041.png) # Senior Shinobi NVR Stack configuration when getting new Gateway / Firewall ### DNS Freenom DNS records updated to new public IP ### Ports Forwarded If on Xfi Gateway this has to be done on xfinity mobile app. This is unfortunately the case for new XFI gateways. 80/tcp, 443/tcp, and 51820/tcp have to be forwarded to the server and has to done under the same IP. Multiple ports can be added to the same IP in the XFi app so don't worry ### IP Reservation Reserved IPs are still configured on 10.0.0.1. Default login is admin //// password Assign these IPs to the Cameras ``` UIDCAM4 = 10.0.0.71 UIDCAM3 = 10.0.0.16 UIDCAM2 = 10.0.0.253 UIDCAM1 = 10.0.0.242 ``` ### Check Reolink Client App Make sure all FTP Surveillance is working and that all Cameras have a video feed. IP Addresses reserved must match.As of 2023.10.01 all 4 camera IPs are set as static IPs. On new comcast gateways they should retain the same internal IPs.
### Shinobi Web App Make sure each camera has the same reserved IPs. ### Bonus Fix client Wireguard config IP address range to 10.0.0.0/24 Update client Wireguard config to the new public IP address # x86 routers for Gigabit SQM with OpenWrt If you're here. It's because you want to get SQM for **1400Mbps+** and connections. The reason I'm saying 1400Mbps+ is because that is my current maximum provided by my ISP. The set up has potential for more than 1400Mbps. This is a write up based on an Intel N100 CPU mini PC I've tested. If your internet connection is between **160-630 Mbps** it is more economical for you to get a NanoPi R4SE and follow the [NanoPi guide](https://wiki.stoplagging.com/books/technical-guides/page/nanopi-r6s-r4s-for-gigabit-sqm-with-openwrt) instead. The NanoPi R6S is also cheaper and can do **1400Mbps+** as well, but keeps requiring constant CPU tweaks. For some reason it kept defaulting to the slower A55 cores instead of using the A76 cores every time I modify SQM settings. Now on to the physical setup. The diagram below demonstrates how you would install any x86 Mini PC as a router in your network stack. Building your home network infrastructure like this, is more reliable and better than consumer routers which try to combine the modem, routing, and wireless all in one. [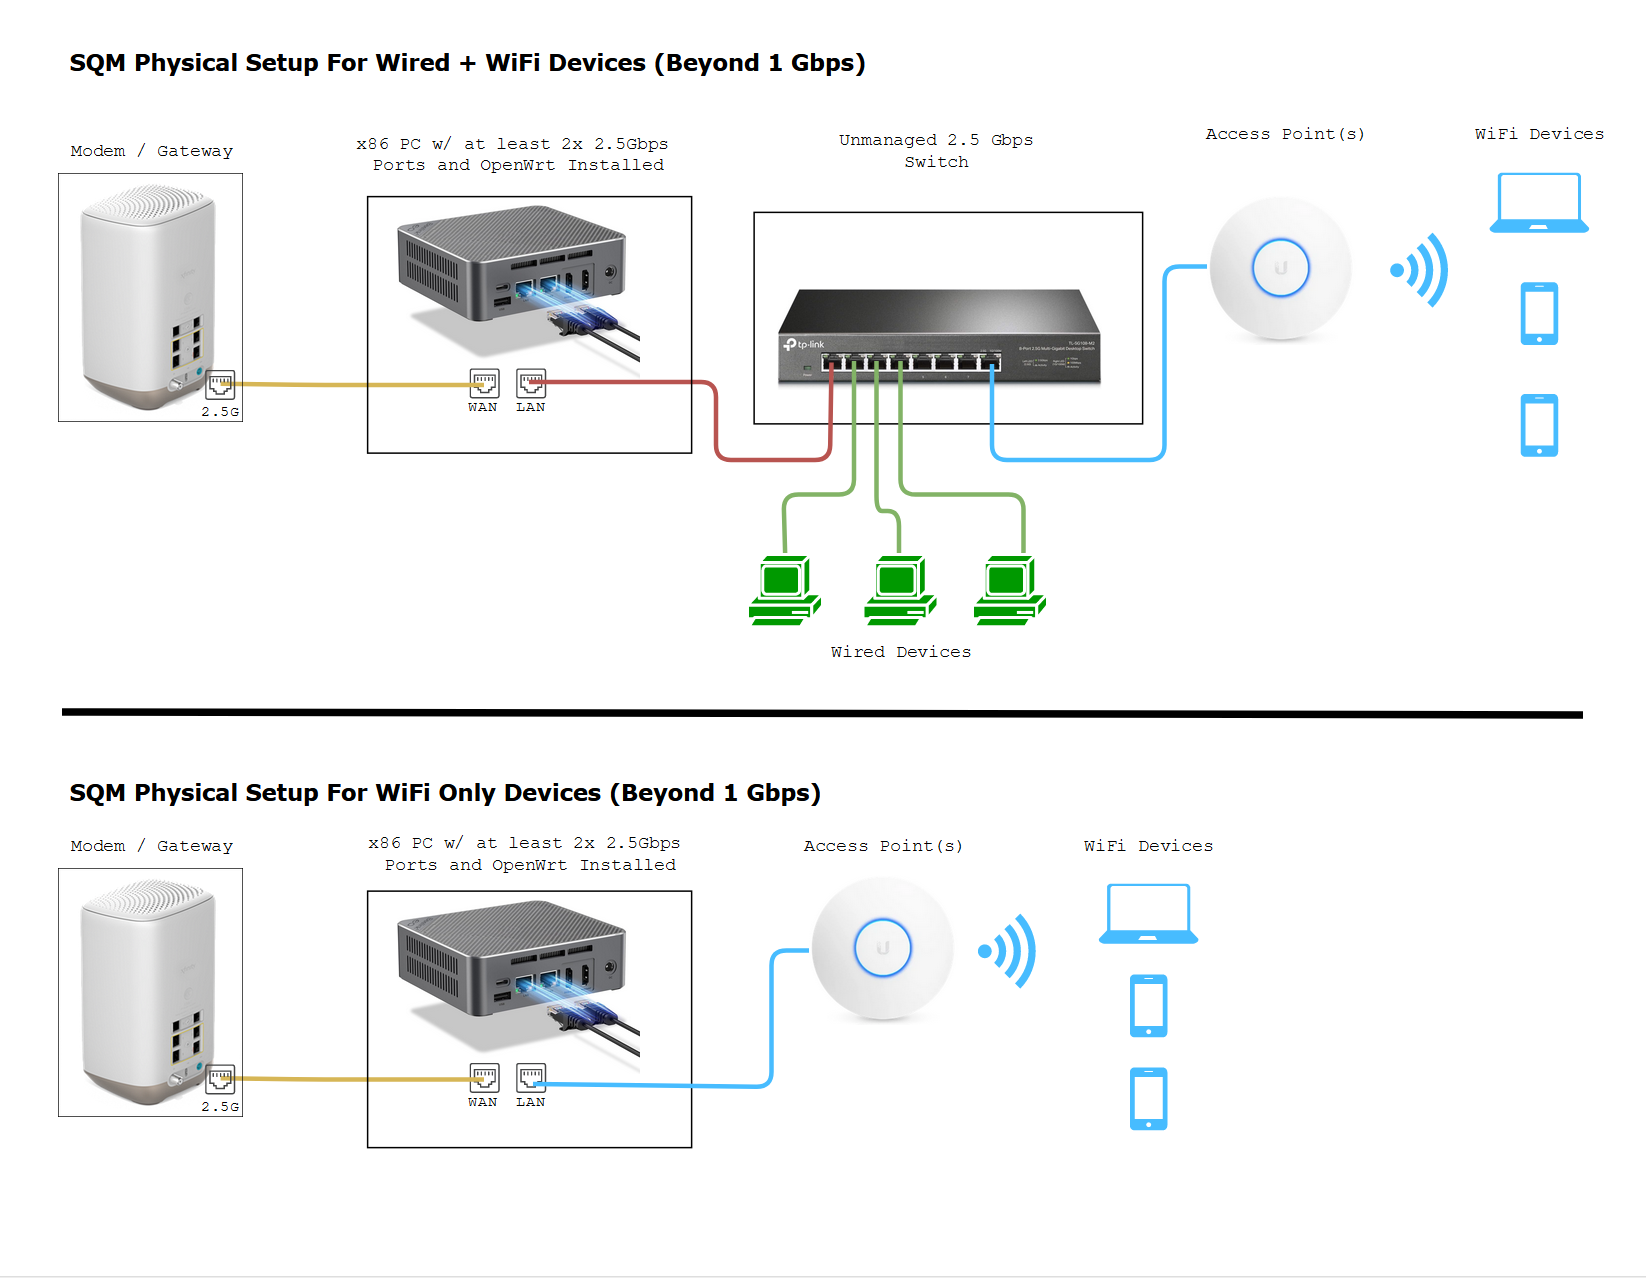](https://wiki.stoplagging.com/uploads/images/gallery/2024-01/firefox-tiglausvr0.png) Pictured Switch - [TP-Link 2.5Gbps 8 Port Multi-gigabit switch](https://www.amazon.com/TP-Link-TL-SG108-M2-Multi-Gigabit-Wall-Mount-Protection/dp/B08ZHZL5Q7/ref=sr_1_3?crid=2PTK1PYOPBEMC&keywords=2.5+gigabit+switch+tp-link&qid=1704589664&sprefix=2.5+gigabit+switch+tp-lin%252Caps%252C134&sr=8-3&_encoding=UTF8&tag=stopl02-20&linkCode=ur2&linkId=04325de997c423bf7fca03bbc72a9158&camp=1789&creative=9325) **(Amazon Referral Link)** I earn a small commission on these links thank you! Pictured Access Point - [Ubiquiti Unifi 6 Pro](https://store.ui.com/us/en/pro/category/wifi-flagship/products/u6-pro) (**Official Link)** Note: If Ubiquiti is out of stock you or if you don't like them, I heard that the [TP-Link EAP670](https://www.amazon.com/TP-Link-EAP670-Wireless-Seamless-Integrated/dp/B09ZV19DBP/ref=sr_1_4?crid=1M4Y8LX621QPT&keywords=tp-link+omada+access+point&qid=1704591674&sprefix=tp-link+omada+access+poin%252Caps%252C161&sr=8-4&_encoding=UTF8&tag=stopl02-20&linkCode=ur2&linkId=1d304da599013ae323d3ed5495bd3061&camp=1789&creative=9325) **(Amazon Referral Link)** from their Omada lines work just as great. A reader of mine prefers Omada over the Ubiquiti stuff. I just have never tried it myself so I can't say much. Pictured OpenWrt Device - [BeeLink EQ12 Intel N100 Mini-PC](https://www.amazon.com/gp/product/B0C339KVH9/ref=ox_sc_saved_title_1?smid=APV34ZV660JMX&psc=1&_encoding=UTF8&tag=stopl02-20&linkCode=ur2&linkId=70bf8f30fb1600d04e78bdc0341bda2a&camp=1789&creative=9325) **(Amazon Referral Link)**. If you're cheap and don't mind waiting you get an N100 x86 miniPC from Aliexpress. I had good experience with the one on the [WooYi Storefront](https://www.aliexpress.us/item/3256805850545059.html?spm=a2g0o.order_list.order_list_main.5.32b81802nplCsn&gatewayAdapt=glo2usa). If you want a beefier PC that's probably overkill the [AceMagician ](https://amzn.to/3TLYnHM)**(Amazon Referral Link)** with the AMD Ryzen 5800U or the [Beelink EQR6](https://amzn.to/3ZFqegC) **(Amazon Referral Link)** would work. The over point is to make sure you get an x86 PC with at least 2, 1Gbps RJ-45 Ethernet ports.**What is bufferbloat and why do we not want it?** It is lag or ping spikes in video games or zoom calls that is caused when you or someone else uses up all your bandwidth. It could be torrenting, 4k streaming, bulk downloads, or even a speedtest. SQM algorithms (fq\_codel or cake) which are available on OpenWrt, can completely mitigate these pings and ensures low latency even under full load. Overall, you do sacrifice a little max speed 5-10% for guaranteed low latencies.
#### Hardware Requirements The minimum requirement for choosing one of these x86 based PCs is as follows 1\. Make sure it has at least **2x 1 Gbps Ethernet ports or better**. Intel Ethernet ports are generally preferred over Realtek ports but Realtek ports will do. You might want to consider 2.5 Gbps if your ISP (Internet Service Provider) has the capability. 2\. You also want to make sure it has a CPU Mark of 5000 or more. And a strong single core performance of 1200+. You can check here: [https://www.cpubenchmark.net/cpu\_list.php](https://www.cpubenchmark.net/cpu_list.php) 3\. Preferably it would be a low power device that uses < 25 Watts. ### Intel Alder Lake N100 12th Generation Based Mini PCs #### Performance of N100 On my 1400 Mbps connection I was able to run cake SQM at 1350Mbps with up to 40% CPU Usage on a single CPU core so there's a lot of room for more Mbps! [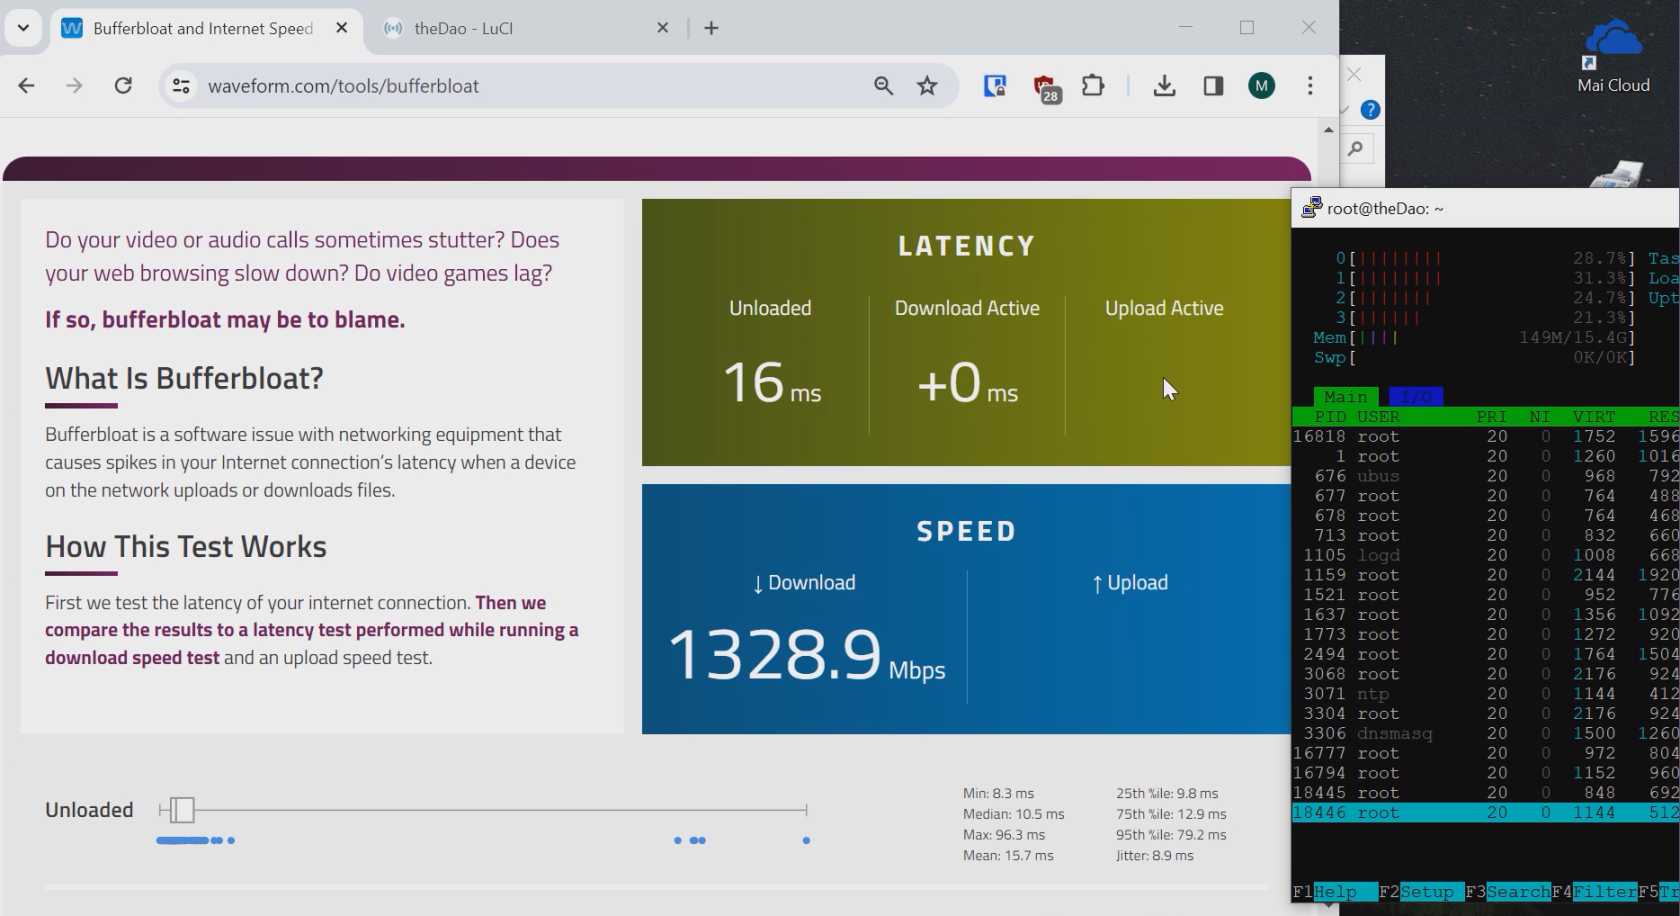](https://wiki.stoplagging.com/uploads/images/gallery/2024-01/image.png) #### Installing OpenWrt As for installation of software. OpenWrt has an official written guide here: [https://openwrt.org/docs/guide-user/installation/openwrt\_x86](https://openwrt.org/docs/guide-user/installation/openwrt_x86) If you're lost on what to do no worries I can give some pointers. I typically choose the generic-squashfs-combined-efi.img.gz image 1. I normally would take out the nVME SSD of my miniPC to an external enclosure. 2. Plug it into my primary PC. 3. Then flash the official image (using win32diskimager or balenaetcher for windows) it to my Router PC's nVME SSD inside the enclosure. 4. Then I would take the nVME back out of the enclosure and install it back in the miniPC. 5. That's pretty much it! OpenWrt should boot from there. The default ports for WAN and LAN may incorrect such as ETH0 being LAN and ETH1 being WAN but we can fix that. **Optional (Swapping ETH0 to WAN and ETH1 to LAN)**: This is done in Network > Interfaces -> Devices Tab -> Then hitting configure under the device called "br-lan"/ [](https://wiki.stoplagging.com/uploads/images/gallery/2024-01/9gLimage.png) Attach eth1 as the bridge port. You can also attach eth2 eth3 if you have more ports, just make sure you detach eth0. Then go back to Network > Interfaces. Edit "wan" and "wan6" so that they use eth0 instead of eth1. Then save and apply. Plug your machine to ETH1 (or ETH2 ETH3 if you have those.... and Modem into ETH0. **Optional (Expand rootfs to use all SSD size) :** Now the problem with all the openWrt images is that the root partition is small by defualt. The easiest thing you can do to expand this size is to boot a live ubuntu usb disk. Run gparted and expand the rootfs partition so you can utilize the full size of your SSD. After OpenWrt is setup and running you just need to enable SQM via the [official openWrt guide](https://openwrt.org/docs/guide-user/network/traffic-shaping/sqm) or my [guide.](https://www.stoplagging.com/openwrt-method-fq_codel-cake/) Either way feel free to improve it further with the [advanced cake config section of this page](https://wiki.stoplagging.com/books/technical-guides/page/x86-routers-for-gigabit-sqm-with-openwrt#bkmrk-1.4-advanced-cake-co) #### Gotchas If you're not getting your beyond Gigabit speeds make sure you're using CAT6 or higher Ethernet cables and make sure the devices like the laptop you're using also have 2.5 Gbps ports. In the diagram, I made sure that the example router, switch, and access point all had 2.5 Gbps ports! ### What Access Point to Get? I keep hearing raving reviews about the Ubiquiti APs and use one myself. I have extremely stable WiFi with these and never have to reboot them. Ubiquiti also advertises up to 200 concurrent users as well! If you have a recommendation better than these I'd like to know. [Ubiquiti Unifi 6 Pro](https://store.ui.com/us/en/pro/category/wifi-flagship/products/u6-pro) (**Official Link)** If you plan on only having one Ubiquti AP I recommend [installing via the phone](https://lazyadmin.nl/home-network/setup-unifi-ap-without-controller/) so you don't have to bother with more complicated things like AP Controllers. If you're on a budget and can't buy a dedicated AP. You **can try turning your old router** into an **access point** by putting it into AP mode instead of routing mode. This is important because you should be letting the OpenWrt device do the routing to prevent bufferbloat not your old router. Another option you could try that I've heard are good are the [TP-Link EAP670](https://www.amazon.com/TP-Link-EAP670-Wireless-Seamless-Integrated/dp/B09ZV19DBP/ref=sr_1_4?crid=1M4Y8LX621QPT&keywords=tp-link+omada+access+point&qid=1704591674&sprefix=tp-link+omada+access+poin%252Caps%252C161&sr=8-4&_encoding=UTF8&tag=stopl02-20&linkCode=ur2&linkId=1d304da599013ae323d3ed5495bd3061&camp=1789&creative=9325) **(Amazon Referral Link)**. I have no real world experience with these as I don't own any, but I heard they are solid products in the /r/homenetworking community. ##### Facts about WiFi If you need more coverage you should get more APs not one single AP with a bunch of antennas, because those are marketing gimmicks. WiFi has limited range due to the physics of their frequency bands. 5Ghz can handle more bandwidth, but will usually be about half the range of 2.4Ghz. ### Advanced Cake Configuration This section is for my own reference and these were recommended by the official docs: [https://openwrt.org/docs/guide-user/network/traffic-shaping/sqm-details#sqmqueue\_discipline\_tab](https://openwrt.org/docs/guide-user/network/traffic-shaping/sqm-details#sqmqueue_discipline_tab) It's not necessary to do this but if you want even further ping stability under load it might be worthwhile! Under the Queue Discipline tab of SQM. Enable the checkmark for advanced configuration and save& apply. This turns on squash\_dscp, squash\_ingress, ECN on ingress and NOECN on egress. Leave them as defaults as they are good the way they are. (If you have symmetrical fiber then ECN can be enabled on egress. Next checkmark and enable "Dangerous Configuration" which is below the "Advanced Configuration" section. We are going to disable triple-isolate and enable per host isolation... Here's a short explanation. To quote the docs, by default, cake will use triple-isolate: “which will first make sure that no internal or internal host will hog too much bandwidth and then will still guarantee for fairness for each host. In that mode, Cake mostly does the right thing. It would ensure that no single stream and no single host could hog all the capacity of the WAN link. However, it can’t prevent a BitTorrent client – with multiple connections – from monopolizing most of the capacity.” You can enable per host isolation, which will identify all source/destination information. To enable that, Add the following to the “Advanced option strings” (in the Interfaces → SQM-QoS page; Queue Discipline tab, look for the Dangerous Configuration options): For queueing disciplines handling incoming packets from the internet (internet-ingress): nat dual-dsthost ingress For queueing disciplines handling outgoing packets to the internet (internet-egress): nat dual-srchost For me that means Qdisc options (ingress) I wrote in "nat dual-dsthost ingress" while for Qdisc options (egress) I wrote in "nat dual-srchost" ### Optional: Docker on x86 This section is for those of you who run docker containers. For x86 machines you'll need to run the following commands in order for docker-compose to work and wg-easy docker container to work. For some reason the default opkg install docker-compose does not seem to work, so the solution is below. ``` The first command line: opkg remove docker luci-app-dockerman docker-compose dockerd --autoremove --force-remove Then command line: opkg install docker luci-app-dockerman docker-compose dockerd --force-maintainer opkg install luci-proto-wireguard opkg install wireguard-tools ``` ### Contact If you need help or consultation please join my rocket.chat server at [https://chat.stoplagging.com/invite/zaMu6X](https://chat.stoplagging.com/invite/zaMu6X) you can message me @Starfroz by looking me up under the globe icon after registering and logging in. [](https://wiki.stoplagging.com/uploads/images/gallery/2021-01/image-1609968043493.png)