Technical Guides
- KeePass Password Manager Tutorial
- Wireguard Ubuntu Deployment
- NanoPi R6S R4S for Gigabit SQM With OpenWrt
- Miyoo Mini V3 20221216 or 20221224 Firmware Specific Guide for Onion OS
- Miyoo Mini V3 Female Screen Connector Part
- Senior Shinobi NVR Stack configuration when getting new Gateway / Firewall
- x86 routers for Gigabit SQM with OpenWrt
KeePass Password Manager Tutorial
Introduction
I don't trust online password managers because they are closed source and companies have been hacked in the past. If you look up "lastpass breached" in Google you can see my point. Keepass is open source and offline. Why put your trust in a company when you can create and access the database yourself?
An honorable mention is bitwarden. They are also open-source and you have the option of hosting your own bitwarden server at home as an option. If you want to pay and are willing to trust a company and have your passwords encrypted on their cloud they would be your best bet.
Downloading Keepass
https://keepass.info/download.html
Get the Installer for Windows (2.45) aka KeePass-2.45-Setup.exe. After you get it install Keepass.
Recommended plugins (.plgx) to download:
Keepass has a variety of useful plugins listed here: https://keepass.info/plugins.html
I recommend the following below for now. Plugins always have a .plgx file extension.
- WebAutoType-v6.3.0.zip: https://sourceforge.net/projects/webautotype/files/
- YetAnotherFaviconDownloader.plgx: https://github.com/navossoc/KeePass-Yet-Another-Favicon-Downloader/releases
After you downloaded the necessary .plgx plugins. Copy or move them into the Plugins folder at C:\Program Files (x86)\KeePass Password Safe 2\Plugins.
1.1.1 Master Password
To start off you will be creating a master password which is the masterkey to access all your other passwords. This password should be long, easy remember, but difficult for a computer to guess. Please refer to the image below to see what I mean.

You can test theoretical passwords to see how strong they are here: https://howsecureismypassword.net/
These concepts are important to security so if you don't want to get pwned follow the advice above. Do not lose or forget your master password otherwise you will not be able to access your Keepass database ever again.
1.1.2 Creating your first .kdbx database
There are two ways to do this.
Option 1: Create a .kdbx file only meaning you only need your master password to unlock the database.
Option 2: Create a .kdbx file + a .key file. When you do this you need your master password + the .key file in order to unlock the database.
Typically you can choose Option 1 if you're confident in your master password. This is the easiest and simplest option.
I personally opted for Option 2. I store my .kdbx database in the cloud such as, Google Drive or Dropbox. I keep duplicates of my .key files locally (on my pc, on a usb stick, on a remote computer). That way if both my Google Drive and master password are compromised I am still safe because the hacker still needs the .key file to unlock it.
No matter the method do not lose your .kdbx and/or .key file!!!
If you lose these files your passwords are gone. Make copies and backups of your databases! Besides your main computer save it on your phone, the cloud, a flash drive, or etc.
Video 1a: Option 1 creating .kdbx only
Please note where you saved the .kdbx file...
Video 2a: Option 1 opening database w/ password
Video 1b: Option 2 Creating .kdbx + .key file
Please note where you saved the .kdbx and .key files...
Video 2b: Option 2 Opening database w/ password + .key file
1.1.2 Adding your first password entry
Right-click anywhere near the big box and click on "Add Entry..." The shortcut to add an entry is also CTRL+ i if that is faster for you.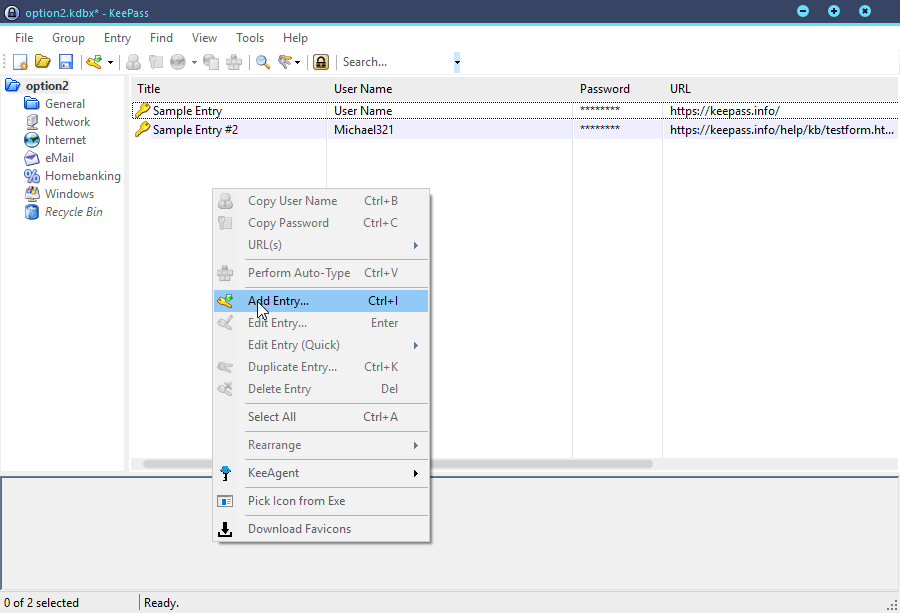
Give your entry a title. Fill out the username and login URL whenever possible. If you don't have a login URL or website URL to use then you can leave it blank. As you can see a password is already auto generated for you. You may use the generated password or manually enter in your own. And finally add any notes you need for reference.
In the video below I demonstrate how to play around with the password generator. Remember to Save when done. If you forget, don't worry it will ask you if you would like to save the database when you try to close.
1.1.3 Using your password manager to login (Auto-Typing)
Double-click on the URL next to the entry you want, to load the login page from your default browser. Alternatively, right click the URL and choose your preferred browser. (This is the reason why you should enter in your URL entries).

There are 3 ways to sign in. First make sure the cursor is blinking in the username field. Then you have 3 ways to login.
- Right-click and click on Perform Auto Type. Alternatively, press CTRL+V on keepass.
- Double-click on the username on to copy it. Then paste manually. Double-click on the password to copy. Then paste it manually. Note: copies stay in your clipboard for 12 seconds there's a bar that shows you how much time you have left.
- The most convenient method. If you installed the WebAutoType plugin and had the URL entry filled out. Simply press "CTRL+ALT+A" on the site you were trying to login.
A video below explains these 3 methods.
1.1.4 Modifying Auto-Type
Some websites have a different auto-typing sequence then the default of {USERNAME}{TAB}{PASSWORD}{ENTER}.
One variation you can try is {USERNAME}{ENTER}{DELAY 2000}{PASSWORD}{ENTER}
Demonstration of this variation in the video below.
Other variations maybe {USERNAME}{TAB}{TAB}{TAB}{PASSWORD}{ENTER} it is situational. Modify this sequence to your needs.
Congratulations you've mastered the basics!
2.1 Beyond the Basics and Customization!
2.1.1 Attaching a File
You can securely attach files to the database and keep it protected behind your master key!
This is basically done by creating / editing an entry and going to the advanced tab as shown below. You can store the file to your database then delete the original file. To retrieve it go back to your entry and the advanced tab. Then click on save and choose where to save it.
2.1.2 Groups and Recycle Bin
You can organize your database with groups! As for the recycle bin how it works is any entry you delete will end up in the recycle bin. It is only truly deleted when you delete it from the recycle bin. If you want to view all groups at the same time just type an empty entry in the search bar. Demonstration video below.
2.1.3 Password History
Keepass keeps a password history up to 10 revisions by default (you can change this). This video below demonstrates changing your password and retrieving your old passwords in case something went wrong.
2.1.4 Custom Icons
Lastly if you have the YetAnotherFaviconDownloader plugin you can customize your keepass icons! This only works on entries with URLs.
2.1.5 Advanced Auto SSH with Putty
WIP. Requires KeeAgent & Putty.
Temporary Tutorial Starts at 25m10s: https://www.youtube.com/watch?v=e6G8zHZlhv8&t=&t=25m10s
2.1.6 Cool Plugins
- ReadablePassphrase.1.2.1.plgx: https://github.com/ligos/readablepassphrasegenerator/releases
- Generates passwords like the correct horse battery staple principle mentioned in the beginning!
3.1 Mobile Apps
Don't know much for Apple iOS but heard StrongBox was good.
For Android, you can choose between "KeePassDX" or "Keepass2Android Offline" from the play store. KeePassDX has a nicer UI, but I only have experience with Keepass2Android Offline so there will only be a tutorial for that one.
Keepass2Android Offline Quick Tutorial
Some phones have advanced features where some apps or browsers ask you if you want to use keepass to sign in which is very convenient and much faster if they ask you this accept it! Some also have fingerprint unlock as an option as well for convenience so you may accept that as well.
If your phone doesn't have these advanced features there are still one way you can "Auto-Type."
1. Search for entry you want to login to.
2. Go back to the login page or tap on URL to open browser to get there.
3. Swipe down to see notifications. Tap on "Your entry. Entry is available through KP2A Keyboard".
4. Choose the Keepass2Android Offline keyboard.
5. Don't worry this is temporary and your default keyboard will revert back when you lock your database.
6. Go back to page you are trying to login.
7. Tap User & Tap Password on the mini keyboard below. Then to switch back to your original keyboard press the lockpad on the bottom right.
8. Instead of doing step 3 you could also copied user / pass from the notification bar (less secure).
Video of steps 1-8 below.
4.1 Other KeePass Variants
This tutorial only covered Keepass for Windows, because this is what I know... KeepassXC is the nicer looking one with cross-platform support you might miss out on the CTRL+ALT+A for autotype mentioned in 1.1.3 because it's powered by a Keepass plugin.
/u/SeerLite on reddit also gave a mention of https://keeweb.info/ and primarily uses that. I have no experience with it so I don't have much say.
5.1 Final Thoughts
Backup your damn database (.kdbx) file. Backup your .key file too if you created one!
Follow the 3-2-1 rule to prevent data loss.
Have 3 backups.
2 local (like desktop and phone).
1 Remote (Google Cloud / Dropbox).
Wireguard Ubuntu Deployment
Installation
sudo add-apt-repository ppa:wireguard/wireguard ### Not needed if you're using Ubuntu 20.04 or later
sudo apt install wireguardEnabling IP Forwarding
sudo echo "net.ipv4.ip_forward = 1" >> /etc/sysctl.conf
sudo echo "net.ipv4.conf.all.proxy_arp = 1" >> /etc/sysctl.conf
sudo sysctl -p /etc/sysctl.confThis equivalent to commenting the following 2 lines below in /etc/sysctl.conf file and then running sudo sysctl -p
net.ipv4.ip_forward = 1
net.ipv4.conf.all.proxy_arp = 1Starting Wireguard & Making it a System Service
This is done so Wireguard always starts on system reboot
sudo systemctl enable wg-quick@wg0Opening Ports
If you're using UFW for your firewall open up the necessary ports for Wireguard. 51820 is the standard Wireguard port but feel free to use a non-standard port.
sudo ufw allow 22/tcp
sudo ufw allow 51820/udp
sudo ufw enable
sudo ufw status verboseServer Configuration
Create a configuration file in /etc/wireguard/wg0.conf. An example configuration is below. If you need a private public key pair you can generate one in tunsafe (windows wireguard client).
[Interface]
Address = 10.xx.xx.1/24
PostUp = iptables -A FORWARD -i wg0 -j ACCEPT; iptables -t nat -A POSTROUTING -o eth0 -j MASQUERADE; ip6tables -A FORWARD -i wg0 -j ACCEPT; ip6tables -t nat -A POSTROUTING -o eth0 -j MASQUERADE
PostDown = iptables -D FORWARD -i wg0 -j ACCEPT; iptables -t nat -D POSTROUTING -o eth0 -j MASQUERADE; ip6tables -D FORWARD -i wg0 -j ACCEPT; ip6tables -t nat -D POSTROUTING -o eth0 -j MASQUERADE
ListenPort = 51820
PrivateKey = <Server's Private Key Here>
SaveConfig = true
[Peer]
PublicKey = <Client's Public Key Here>
AllowedIPs = 10.xx.xx.2/32
[Peer]
PublicKey = <Client's Public Key Heree>
AllowedIPs = 10.xx.xx.3/32Server Config Explanation for [Interface]
Be aware that these iptables entries in PostUp & PostDown are for a given interface. Make sure that your VM’s interface is captured on here you can check with ip a. In this above config example if you scroll right, you can see that the VM’s interface is eth0. Additionally, and worth noting, also make sure that your wireguard interface also matches the reference on the iptables entry. In this above config example, the wireguard interface is wg0.
For Address = 10.xx.xx.xx/xx create and choose an arbitrary “Private IP address” different from other subnets on this VM’s network to avoid IP conflict. Also specify the IP range you’re going to use like /24 or /20 etc. You can use a program line tunsafe (Windows) to generate these keys or you can use line 14+15 here.
SaveConfig = true / false. This setting when set to "true" will automatically save the current live config in standard format into your wg0.conf file whenever wireguard service is turned off. Because it is in standard format any comments you made to the wg0.conf file while be gone. Set this to false if you don't want this to happen. Set this to true if you'd like to add clients while the server is live without turning it off.
Server Config Explanation for [Peer]
For peer just keep incrementing your arbitrary IP address by one & use /32 because it is one IP. Then enter in their public key.
Finally start your wireguard service with...
sudo systemctl start wg-quick@wg0 ### to start wireguard server
sudo systemctl status wg-quick@wg0 ### to check wireguard server status
wg show ### alternative way to check wireguard server statusAdding Clients to Server
Use Method#1 if you're new. Method #2 and #3 are advanced.
Method #1: Editing After Turning Wireguard Off
sudo systemctl stop wg-quick@wg0
# Edit your /etc/wireguard/wg0.conf file and add the peers you need there
sudo systemctl start wg-quick@wg0Method #2: While Wireguard Is Live (wg-quick save wg0)
Also requires SaveConfig = true in your config.
sudo wg set wg0 peer <Client Public Key> allowed-ips 10.X.X.X/32
sudo wg show
sudo systemctl restart wg-quick@wg0
route 10.X.X.X/32 wg0The difference with using a wg-quick save is that you have to do the 4th command of route add which is easy to fat finger and screw things up.
Method #3: While Wireguard Is Live (Restarting Interface)
This method requires SaveConfig = true in your config.
Adding a peer (Changes not saved yet)
sudo wg set wg0 peer <Client Public Key> allowed-ips 10.X.X.X/32Check if new peer's public key and ip shows up with
sudo wgFinally do a
sudo systemctl restart wg-quick@wg0Generating Client Configurations For Users
Example configuration. Please read the gotchas for each OS.
[Interface]
PrivateKey = < Client Private Key Here >
Address = 10.X.X.0/24
DNS = 8.8.8.8
[Peer]
PublicKey = < Server Public Key Here >
AllowedIPs = 0.0.0.0/0, ::/0
Endpoint = ServerPublicIPAdress:51820
PersistentKeepalive = 25A couple of gotchas to note.
In Linux, the Address = line needs to end in /32.
In Mac OS & Windows the Address = lines needs to end in /24 or the subnet assigned.
Also in Linux the DNS = line cannot be there it has to be erased.
In Mac OS the DNS = line needs to be there otherwise client cannot browse Internet.
In Windows Tunsafe the DNS = line is optional. In Windows Wireguard the DNS = line is required.
Optional Configurations
Isolating Wireguard Clients From Each Other
This can be achieved with the following IP Tables command below assuming your wireguard interface is "wg0"
iptables -I FORWARD -i wg0 -o wg0 -j REJECTCommand References
sysctl net.ipv4.ip_forward ### Verifies if IP Forward is working
sudo systemctl enable wg-quick@wg0 ### Makes Wireguard auto-start on boot
sudo systemctl start wg-quick@wg0 #Turn on Wireguard Interface
sudo systemctl stop wg-quick@wg0 #Turn off Wireguard Interface
sudo wg show #Check if VPN tunnel is running
#command to remove client (peer)
wg set wg0 peer peer_pubkey remove
#Don't know if this command is needed after wg-quick save or removal of client
wg addconf wgnet0 <(wg-quick strip wgnet0)
### Generating Key Pairs ###
umask 077
wg genkey | tee privatekey | wg pubkey > publickey
# Key pairs are saved in same path you typed this command in
### End Generating Key Pairs ###NanoPi R6S R4S for Gigabit SQM With OpenWrt
I made a new significant discovery on 2024.01.07 that makes the NanoPi R6S capable of pushing past 1400+ Mbps with cake on!!! Hooray! See here. On 2024.01.11 I discovered the same for the NanoPi R4S which is now able to push up to 800 Mbps with cake SQM.
As of 2025.02.15 The NanoPi R6S is official supported by OpenWrt. Performance tweaks are no longer necessary! See https://github.com/StarWhiz/NanoPi-R6S-CPU-Optimization-for-Gigabit-SQM/tree/main/How%20To%20Flash%20Official%20OpenWrt%20To%20R6S%20eMMC on how to flash!
Pictured Gigabit Switch: TP-Link 8-Port Gigabit Ethernet Switch (Amazon Referral Link)
Pictured Access Point - Ubiquiti Unifi 6 Pro (Official Link) Note: If Ubiquiti is out of stock you or if you don't like them, I heard that the TP-Link EAP670 (Amazon Referral Link) from their Omada lines work just as great. I just have never tried TP-Link EAPs myself as I've been using Ubiquiti APs.
Note: The Unifi 6's don't include power. So you need to buy the (30W aka 802.3at or PoE+) Injector to power it as shown in the picture. Alternative you can get a switch that supports PoE+, 802.3at, 30W).
Pictured OpenWrt Device: NanoPi R4SE (Official Link). As for the power supply I'd recommend the CanaKit Raspberry Pi power supply (Amazon Referral Link) over the one FriendlyElec provides. As of 2025.03.24 I heard 5V4A power adapter is needed now and have no recommendations at this time. The SE version has eMMC which means you can run off the devices storage instead of running on the MicroSD like it's predecessor the R4S. Cake SQM limit is at about 630Mbps
The new one is the NanoPi R6S (Official Link) which has a better CPU, the RK3588S. You may need to source your own 18W PD and USB-C to USB-C PD Cable. It has 2x 2.5Gbps ports and 1 Gbps port. The alternative, NanoPi R6C (Official Link) costs less and has the same CPU however it only has 1x 2.5 Gbps port. Both can do cake SQM at 1400+Mbps.
Note: The NanoPis from Amazon are not from official sources. FriendlyElec would be direct from manufacturer.
R4SE - Can do cake SQM up to 800 Mbps (w/ performance tweak). Also has official OpenWrt software available.
R6S - Can do cake SQM up to 1500 Mbps (w/ performance tweak). Only has official FriendlyWrt software for now.
If you're interested in using cake SQM on an x86 machine please refer to this page instead: https://wiki.stoplagging.com/books/technical-guides/page/sqm-for-beyond-1-gbps-lines-with-openwrt
1.1 Introduction and Why?
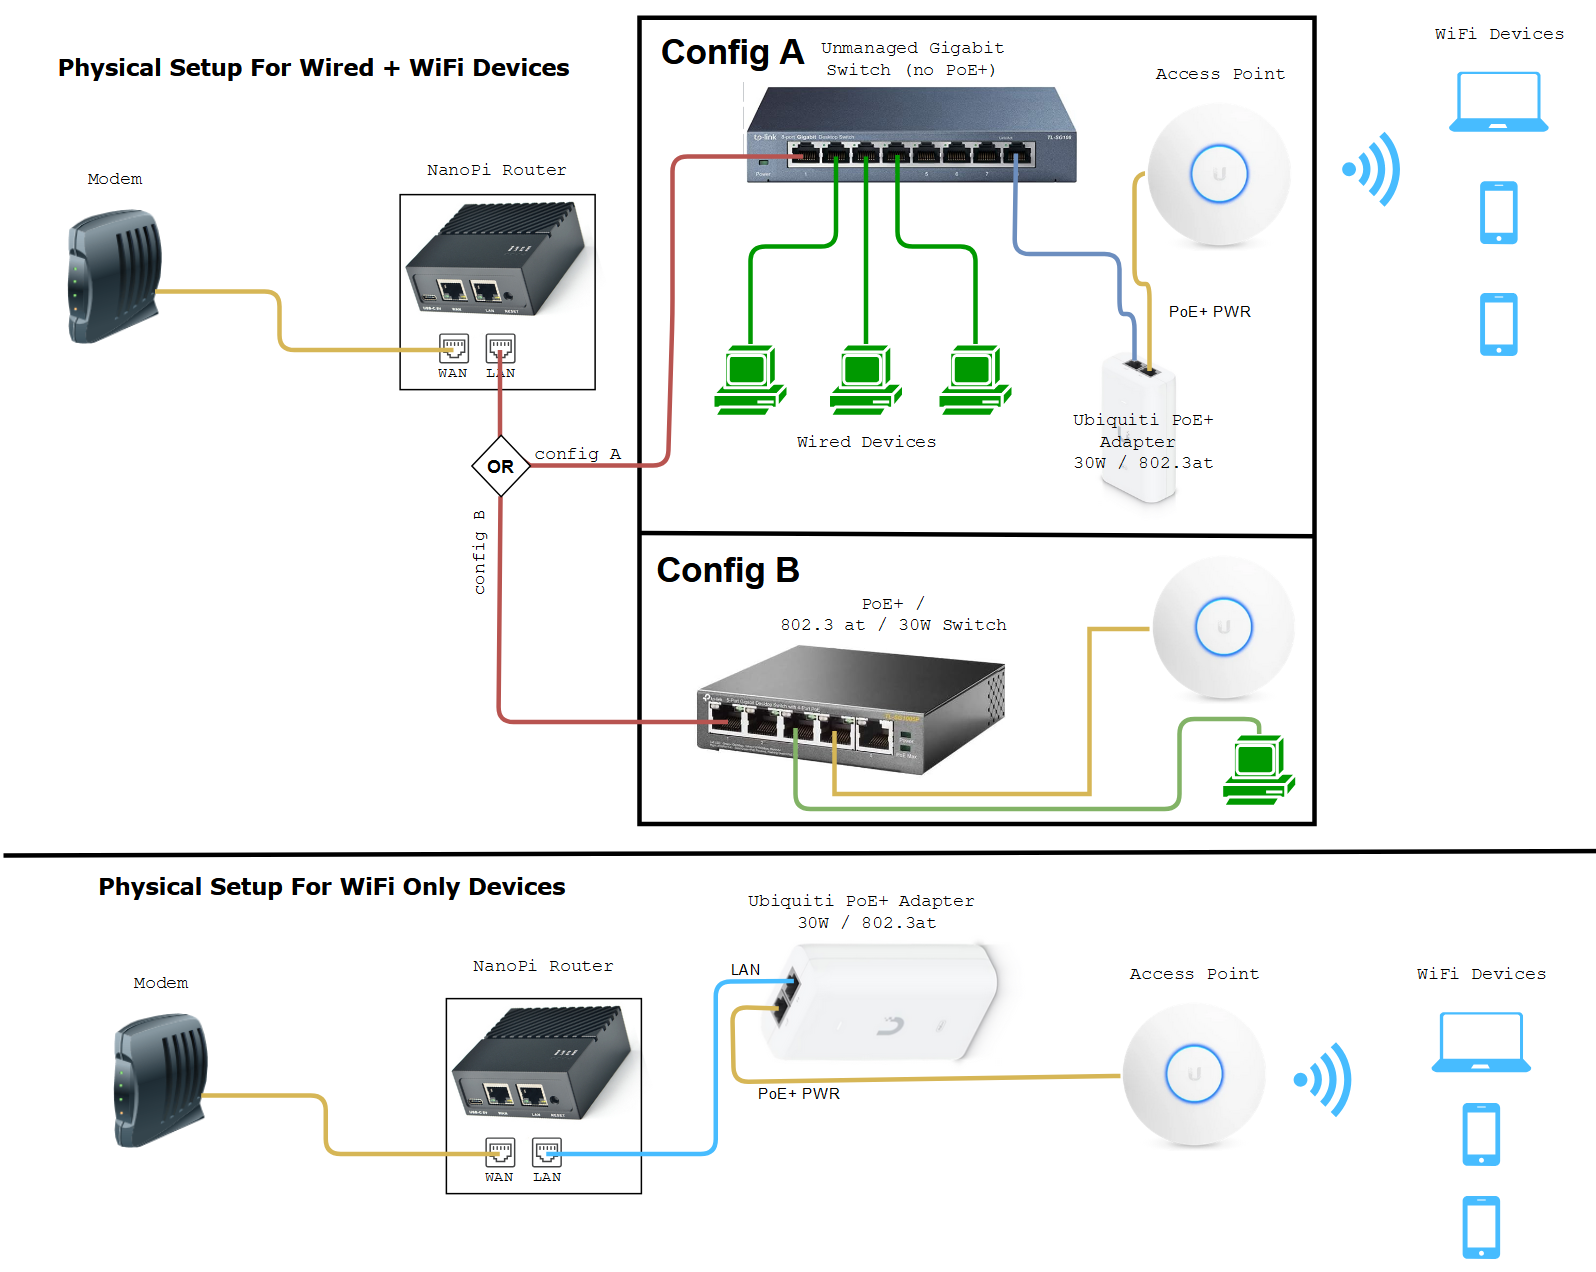
The diagram above demonstrates how you would install a more powerful ARM PC, the nanoPi as a router into your network. Building your home network infrastructure like this, is more reliable and better than consumer routers which try to put the modem, routing, and wireless all in one.
The reason why we would want to do this is so we can stop bufferbloat at higher bandwidths with SQM (Smart Queue Management) turned on. Currently consumer routers usually can't push past 350 Mbps with cake or fq_codel SQM they are limited by their CPU power. Most consumer routers have underpowered CPUs so that's why the NanoPis are a solid choice. They are low power usage, small and have solid CPU that can handle cake at 800 Mbps (R4SE) and 1400+ Mbps (R6S w/ CPU fixes)
What is Bufferbloat and why stop it?
It is lag or ping spikes in video games or zoom calls that is caused when you or someone else uses up all your bandwidth. It could be torrenting, 4k streaming, bulk downloads, or even a speedtest. SQM algorithms (fq_codel or cake) which are available on OpenWrt, can completely mitigate these pings and ensures low latency even under full load. Overall, you do sacrifice a little max speed 5-10% for guaranteed low latencies.
NanoPi R4S / R4SE Performance
By default, the FriendlyWrt firmware on R4S doesn't optimally single out the use of it's faster A72 cores for Queues. This causes the cap to be around 630 Mbps.
Do the performance tweak here and the improvement for cake SQM jumps from 630 Mbps up to 800 Mbps afterwards.
Note: Don't copy me here and set max bandwidth as 920000 Mbps I was just testing the limits. You should be setting 90-95% of you max bandwidth for best performance! The video is just to demonstrate it's possible to do up to 800 Mbps cake.
NanoPi R6S Performance
By default, the FriendlyWrt firmware on R6S doesn't optimally single out the use of it's faster A76 cores for Queues. This causes the cap to be around 800 Mbps.
Do the performance tweak here and the improvement for cake SQM jumps from 800 Mbps to 1400+ Mbps afterwards.
NanoPi Software Installation
Installation is easy. You just need to flash a microSD card with friendlyWrt. They have a tutorial here for R4SE: https://wiki.friendlyelec.com/wiki/index.php/NanoPi_R4S#Install_OS
And a tutorial here for R6S: https://wiki.friendlyelec.com/wiki/index.php/NanoPi_R6S#Install_OS_to_eMMC
All you have to do to install is...
1. Plug in a microSD card to your computer.
2. Download the appropriate image (usually the eflasher) from the FriendlyWrt wiki
3. Get win32diskimager and launch it.
4. On win32diskimager select your image file that you downloaded and select your microSD drive letter. Then flash!
5. After flashing is done eject microSD and unplug.
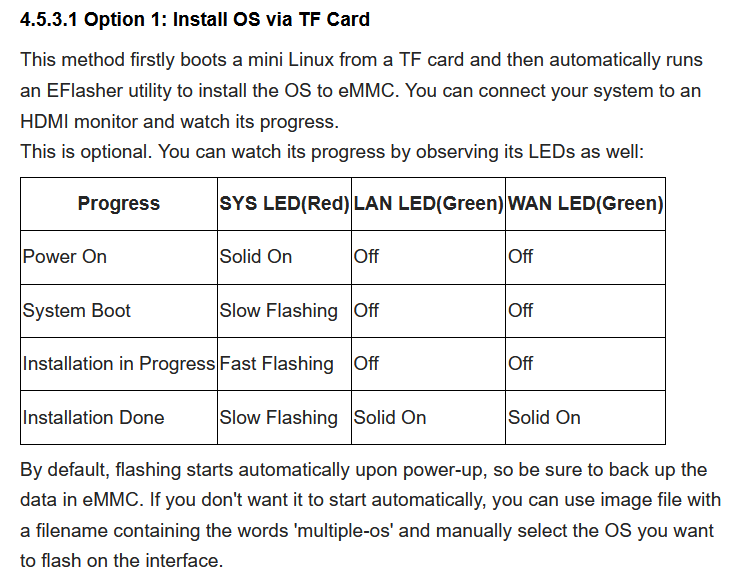
6. Plug in microSD into your NanoPi and wait for it to flash (LEDs pictured below for reference)
7. Hook up WAN to your modem. Hook up LAN to either your switch which connects to a computer or hook up LAN directly to your computer.
8. Power on. Wait about 3 minutes.
9. On the computer that is connected to the switch or NanoPi's LAN port. Go to web browser and enter in http://192.168.2.1 to access your router
That's it! All that is left is to configure SQM with fq_codel as shown . There's no need to install luci-app-sqm because the FriendlyWrt image has everything already! You just need to enable SQM via the official openWrt guide or my guide.
Either way feel free to improve it further with the advanced cake config section of this page
If you want to fine tune cake further you can see the section below this page: https://wiki.stoplagging.com/books/technical-guides/page/sqm-for-up-to-800-mbps-lines-with-openwrt#bkmrk-1.4-advanced-cake-co
1.3 What Access Point to Get?
I keep hearing raving reviews about the Ubiquiti APs and use one myself. I have extremely stable WiFi with these and never have to reboot them. Ubiquiti also advertises up to 200 concurrent users as well! If you have a recommendation better than these I'd like to know.
Ubiquiti Unifi 6 Pro (Official Link)
If you plan on only having one Ubiquti AP I recommend installing via the phone so you don't have to bother with more complicated things like AP Controllers.
If you're on a budget and can't buy a dedicated AP. You can try turning your old router into an access point by putting it into AP mode instead of routing mode. This is important because you should be letting the OpenWrt device do the routing to prevent bufferbloat not your old router.
Another option you could try that I've heard are good are the TP-Link EAP670 (Amazon Referral Link). I have no real world experience with these as I don't own any, but I heard they are solid products in the /r/homenetworking community.
Facts about WiFi
If you need more coverage you should get more APs not one single AP with a bunch of antennas, because those are marketing gimmicks.
WiFi has limited range due to the physics of their frequency bands.
5Ghz can handle more bandwidth, but will usually be about half the range of 2.4Ghz.
1.4 Advanced Cake Configuration
This section is for my own reference and these were recommended by the official docs: https://openwrt.org/docs/guide-user/network/traffic-shaping/sqm-details#sqmqueue_discipline_tab
It's not necessary to do this but if you want even further ping stability under load it might be worthwhile!
Under the Queue Discipline tab of SQM.
Enable the checkmark for advanced configuration and save& apply.
This turns on squash_dscp, squash_ingress, ECN on ingress and NOECN on egress. Leave them as defaults as they are good the way they are. (If you have symmetrical fiber then ECN can be enabled on egress.
Next checkmark and enable "Dangerous Configuration" which is below the "Advanced Configuration" section. We are going to disable triple-isolate and enable per host isolation... Here's a short explanation.
To quote the docs, by default, cake will use triple-isolate: “which will first make sure that no internal or internal host will hog too much bandwidth and then will still guarantee for fairness for each host. In that mode, Cake mostly does the right thing. It would ensure that no single stream and no single host could hog all the capacity of the WAN link. However, it can’t prevent a BitTorrent client – with multiple connections – from monopolizing most of the capacity.” You can enable per host isolation, which will identify all source/destination information.
To enable that, Add the following to the “Advanced option strings” (in the Interfaces → SQM-QoS page; Queue Discipline tab, look for the Dangerous Configuration options):
For queueing disciplines handling incoming packets from the internet (internet-ingress): nat dual-dsthost ingress
For queueing disciplines handling outgoing packets to the internet (internet-egress): nat dual-srchost
For me that means Qdisc options (ingress) I wrote in "nat dual-dsthost ingress" while for
Qdisc options (egress) I wrote in "nat dual-srchost"
1.5 Performance Tweaks for R4S and R6S
As of 2025.02.15 The NanoPi R6S is official supported by OpenWrt! Performance tweaks are no longer necessary! See https://github.com/StarWhiz/NanoPi-R6S-CPU-Optimization-for-Gigabit-SQM/tree/main/How%20To%20Flash%20Official%20OpenWrt%20To%20R6S%20eMMC on how to flash!
- https://github.com/StarWhiz/NanoPi-R6S-CPU-Optimization-for-Gigabit-SQM/tree/main for NanoPi R6S
- Performance improvement for cake SQM jumps from 800 Mbps to 1400+ Mbps afterwards
- https://github.com/StarWhiz/NanoPi-R6S-CPU-Optimization-for-Gigabit-SQM/tree/main/R4S%20CPU%20Optimization for NanoPi R4S
- Performance improvement for cake SQM jumps from 630 Mbps up to 800 Mbps afterwards.
Deprecated way to fix this
## Step1: Get CPU Frequencies to confirm that cores 4, 5, 6, and 7 are the faster cores. CPU0 starts from the top.
cat /sys/devices/system/cpu/cpu*/cpufreq/cpuinfo_max_freq
## Step2: Get IRQ ##s (In my example below they are 31 for eth0 and 88 for eth1 yours may be different)
grep eth /proc/interrupts
## My output of Step2 yours may be different
grep eth /proc/interrupts
74: 0 0 0 0 0 0 0 0 GICv3 266 Level eth0
75: 0 0 0 0 0 0 0 0 GICv3 265 Level eth0
128: 0 0 61981 0 0 0 0 2335426 ITS-MSI 570949632 Edge eth1-0
144: 0 0 1236903 0 0 0 0 0 ITS-MSI 570949648 Edge eth1-16
146: 0 0 0 0 0 0 0 0 ITS-MSI 570949650 Edge eth1-18
149: 0 0 0 0 5 0 0 3 ITS-MSI 570949653 Edge eth1-21
160: 0 0 0 148716 4732058 0 0 0 ITS-MSI 428343296 Edge eth2-0
176: 0 0 0 1559148 0 0 0 0 ITS-MSI 428343312 Edge eth2-16
178: 0 0 0 0 0 0 0 0 ITS-MSI 428343314 Edge eth2-18
181: 0 0 0 0 0 0 0 7 ITS-MSI 428343317 Edge eth2-21
## What is your IRQ ##?
By default eth2-0 is the WAN port and eth1-0 is the 2.5gbps LAN port on the R6S. So the lines of interest are below:
160: 0 0 0 148716 4732058 0 0 0 ITS-MSI 428343296 Edge eth2-0
128: 0 0 61981 0 0 0 0 2335426 ITS-MSI 570949632 Edge eth1-0
Your IRQ number might be different from mine whcih is 160 for 2.5 Gbps WAN and 128 for 2.5Gbps LAN
## Optional Step: List CPU Cores Assigned to Current IRQs
cat /proc/irq/160/smp_affinity
cat /proc/irq/128/smp_affinity
## Optional Step: List CPU Cores Assigned Current Queues
cat /sys/class/net/eth0/queues/rx-0/rps_cpus
cat /sys/class/net/eth1/queues/rx-0/rps_cpus
The optional steps above are to see what the values are currently. Nowe we will change them!
## Step3: The Performance Tweaks. The idea here is to put IRQ cpu affinities on Faster A76 Cores.
And assign all CPU cores to the queues.
#ETH0 irq on core 4,5 (a76 core) replace 160 with your actual IRQ number for WAN
echo -n 30 > /proc/irq/160/smp_affinity
#ETH1 irq on core 6,7 (a76 core) replace 128 with your actual IRQ number for WAN
echo -n c0 > /proc/irq/128/smp_affinity
#ETH0 queues on all CPU cores
echo -n ff > /sys/class/net/eth0/queues/rx-0/rps_cpus
#ETH1 queues on all CPU cores
echo -n ff > /sys/class/net/eth1/queues/rx-0/rps_cpus
#ETH2 queues on all CPU cores
echo -n ff > /sys/class/net/eth1/queues/rx-0/rps_cpusIf you restart Smart Queue Management or change SQM settings, it will reset the CPU affinity and you will need to re-apply the performance tweaks again. I recommend doing it the new way
Optional understanding of CPU Affinity
This section below is optional and is for my understanding of how the hex value selects certain CPU cores.
## Performance Tweaks Quick Reference R6S
Binary = hex ## = cpu core
00000001 = hex 1 = cpu core 0 (A55) selected
00000010 = hex 2 = cpu core 1 (A55) selected
00000100 = hex 4 = cpu core 2 (A55) selected
00001000 = hex 8 = cpu core 3 (A55) selected
00010000 = hex 10 = cpu core 4 (A76) selected
00100000 = hex 20 = cpu core 5 (A76) selected
01000000 = hex 40 = cpu core 6 (A76) selected
10000000 = hex 80 = cpu core 7 (A76) selected
## Examples (Note CPU0 starts on the right. CPU7 ends on the left. Read from right to left)
00001111 = hex 0f = cpu cores 0, 1, 2 and 3 selected
11111111 = hex ff = all cpu cores selected
11110000 = hex f0 = cpu cores 4, 5, 6, 7 selected
00110000 = hex 30 = cpu cores 4, 5 selected
11000000 = hex c0 = cpu cores 6, 7 selected
Just use binary and covert it to hex, 1 = select that cpu core and 0 = unselect that cpu core.1.6 Contact
If you need help or consultation please join my rocket.chat server at https://chat.stoplagging.com/invite/zaMu6X you can message me @Starfroz by looking me up under the globe icon after registering and logging in.

External Resources for Nano Pi R4S
R4S Benchmarks by Van Tech Corner on Youtube: https://www.youtube.com/watch?v=t5xuTy1xn64
R6S Benchmarks by Van Tech Corner on Youtube: https://www.youtube.com/watch?v=2bCf8Xchrfc
R4S Performance Tweaking: https://forum.openwrt.org/t/nanopi-r4s-rk3399-4g-is-a-great-new-openwrt-device/79143/406
Miyoo Mini V3 20221216 or 20221224 Firmware Specific Guide for Onion OS
This wiki comes with 20221216 or 20221224 firmware specific instructions for the Miyoo Mini V3 journey that I personally went thru.
Backup your official Miyoo SD Card
It's not mentioned on the OnionOS GitHub Installation Guide, but you should back up your official Miyoo SD Card. I just copied all the contents to my PC. It contains BIOS files and the ROMs. The BIOS being more important.
If you want to be extra safe you can make an image of the stock Miyoo MicroSD Card w/ a program called WIN32DiskImager on Windows.
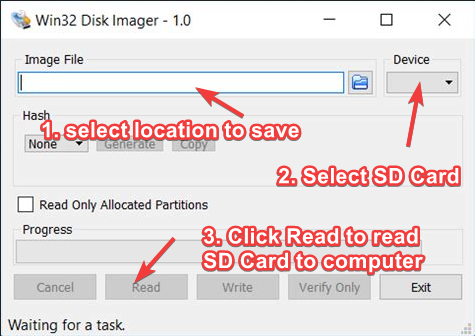
On WIN32DiskImager I plugged in the Official SD Card into my Windows computer. Selected a location to save to. Then clicked "Read" to read the SD card image into my computer.
A. How to Use Higher Capacity MicroSD Cards on Miyoo V3
Skip this step if you're not using a microSD card bigger than 32GB. If you have a card higher than 32GB you'll have to format your higher capacity card in FAT32. I did this with Rufus in Windows. Video below shows you how to format.
B. Follow Onion OS Official Documentation
I followed the "Installing (on an empty SD card)" instructions since I wanted to use my bigger 256GB Samsung MicroSD card.
Official Onion OS GitHub Repository: https://github.com/OnionUI/Onion/wiki/Installation
Only install Onion OS v.4.0.4 or later for firmware versions starting with 20221216 or 20221224. If you don't you may encounter soft brick and have to recover w/ I2C methods. As long as you downloaded 4.0.4 or later you should be safe.
You can reference this section if you are having trouble w/ the folder mappings in Step 3 of the official doc.
C. Upgrade Firmware from 20221216/2022124 to Hotfix Firmware
I was able to proceed w/ this step after "Step 2: Copy the installation files and boot up your device to begin the installation", but you can also do it after Step 3.
This is an important upgrade for our specific units running firmware 20221216XXXX or 20221224XXXX. Do not use this upgrade from any other firmware versions.
Why it is important?
* Reduces the startup time from 20s to 12s.
* Allows system settings to persist after reboot (this is only an issue on 20221216).
As of December 2022 Miyoo was no longer able to source the internal flash chip they were using so they sourced a new chip very similar in functionality, but they didn't immediately receive the additional drivers needed to enable full write functionality with this new chip. This is why the hotfix is solves the two issues above. Learn more here.
If you want to follow the discussion thread it is here: https://www.reddit.com/r/MiyooMini/comments/104qbak/community_firmware_patch_for_new_devices/?sort=new
The actual firmware is downloaded here (make sure you dl the zip called "Firmware patch 20230104 (only for new devices).zip" not the other ones): https://drive.google.com/drive/folders/1OvmkKEtSMEWv1RY8LPsbDk0ylWzOg_7j?usp=sharing
Official Instructions Below
Notes: Don't be like me and use a USB-C to USB-C cable w/ PD. It only worked w/ a USB-A to USB- C Cable. It's important that you follow all the steps, but especially "Step #3 Delete the firmware file".
Step 1 - Transfer the file
--------------------------
Copy the firmware image (miyoo283_fw.img) to the root of the SD card.
Step 2 - Flash the firmware
---------------------------
IMPORTANT: Do not power off device when upgrade starts
1. Make sure the device is off.
2. Insert the SD card into the device.
3. Insert the charging cable.
- Do not press the POWER button.
- It will power on and do the firmware upgrade automatically.
4. Wait for the upgrade to finish (about 2 minutes).
5. Unplug the charging cable when the charging screen appears.
- Some devices will show "FINAL GATE / UNLOCKED", this is just a themed charging screen.
- If you wait too long the screen will be off, it is still save to unplug then.
- After removing the cable, wait for the device to power off.
Step 3 - Delete the firmware file
---------------------------------
IMPORTANT: Delete the firmware file from the SD card after the upgrade!
Notes on charging
-----------------
Use a known good USB-A to C charger.Now you should be done with your Miyoo. The rest of the topics below are optional.
Optional: Miyoo to OnionOS Rom Folder Mappings
This mapping list was determined from this source: https://github.com/OnionUI/Onion/wiki/Emulators
It's for Step 3 of https://github.com/OnionUI/Onion/wiki/Installation#step-3-copy-over-your-bios-and-rom-files
This is WIP and may not be 100% correct. You can DM me on reddit if you have any inputs. https://www.reddit.com/user/Frozutek/
From https://github.com/OnionUI/Onion/wiki/Emulators#rom-files
The roms on the included Miyoo Mini SD Card are a mixed bag which can lead to incompatibility with some emulators. It is highly recommended to source your own roms to get the most out of the device.
|
Original Miyoo SD Card |
Onions OS SD Card |
|
\Roms\ARCADE\cps1 |
\Roms\CPS1 |
|
\Roms\ARCADE\cps2 |
\Roms\CPS2 |
|
\Roms\ARCADE\cps3 |
\Roms\CPS3 |
|
\Roms\ARCADE\pgm |
\Roms\ARCADE |
|
\Roms\ARCADE\shoot |
\Roms\ARCADE |
|
\Roms\ATARI2600 |
\Roms\ATARI |
|
\Roms\ATARI7800 |
\Roms\SEVENTYEIGHTHUNDRED |
|
\Roms\FC |
\Roms\FC |
|
\Roms\GB |
\Roms\GBC (I put it here because it's backwards compatible on GBC) |
|
\Roms\GBC |
\Roms\GBC |
|
\Roms\GBA |
\Roms\GBA |
|
\Roms\MAME2003PLUS |
\Roms\ARCADE |
|
\Roms\MAME2010 |
Don’t know yet |
|
\Roms\MD |
\Roms\MD |
|
\Roms\MS |
\Roms\MS |
|
\Roms\NEOGEO |
\Roms\NEOGEO |
|
\Roms\NGP |
\Roms\NGP |
|
\Roms\PCE |
\Roms\PCE |
|
\Roms\PS |
\Roms\PS |
|
\Roms\SFC |
\Roms\SFC (Note: Games worked after unzipping) |
|
\Roms\WS |
\Roms\WS |
Optional References / Resources Below
Onion Manual Displayed During Install

GitHub Docs (For More Help)
https://github.com/OnionUI/Onion/wiki
For those w/ 3D printers
1. Better Shoulder Buttons (Resin Printer Only)
STL Files: https://www.thingiverse.com/thing:5422756
Install Guide: https://vinitleedoes.notion.site/Better-Buttons-Installation-Guide-63e9eb7d93b2453a8c98bdce345ff37f
Discussion Thread: https://old.reddit.com/r/MiyooMini/comments/voi09o/i_designed_better_shoulder_buttons_new_version/
2. Screen Protector (Any 3D Printer)
STL Files: https://www.printables.com/model/240152-miyoo-mini-minimal-flippable-screen-protector
3. Ergonomic Grip
I recommend the MK2 which has retaining tabs on the front. Feels significantly great for use at home when you aren't on the go!
STL Files: https://www.thingiverse.com/thing:5463606/files
4. Better Grip Case V2
STL Files: https://www.printables.com/model/297997-miyoo-mini-better-gripcase-ver-2
GBA Save State Importing from Miyoo to Onion
Naming convention and paths are different on Miyoo and Onion. Just start by copying from Miyoo to Onion. Then rename the copies with *.state1 and *.state1.png.
renaming the copies from Miyoo to state0 and state0.png did not work for me on Onion OS so I started with state1 and state1.png in my examples.
Example below:
MiyooPath: \Roms\GBA\.gpsp_libretro
****************************************************
Some Game Title (USA).0.png
Some Game Title (USA).0.state
Onion Path: \Saves\CurrentProfile\states\gpSP
****************************************************
Some Game Title (USA).state1.png
Some Game Title (USA).state1After doing this you can load the state you imported from the game w/ (Gameswitcher Button + Select Button) > Save States > State Slot (Choose slot 1). Then load state!
Miyoo Mini V3 Female Screen Connector Part
Introduction
So the reason for this wiki is for identifying the part my friend broke (pictured below) when trying to replace the buttons on the Miyoo Mini V3. This is the FFC/FPC connector that connects to the ribbon cable of the Miyoo Mini screen.
Someone who has soldering experience or hot plate experience can attempt to replace the FFC/FPC connector. There's some tutorials on YouTube about soldering FFC/FPC connectors as well.
Conclusion / Where to Buy the Part
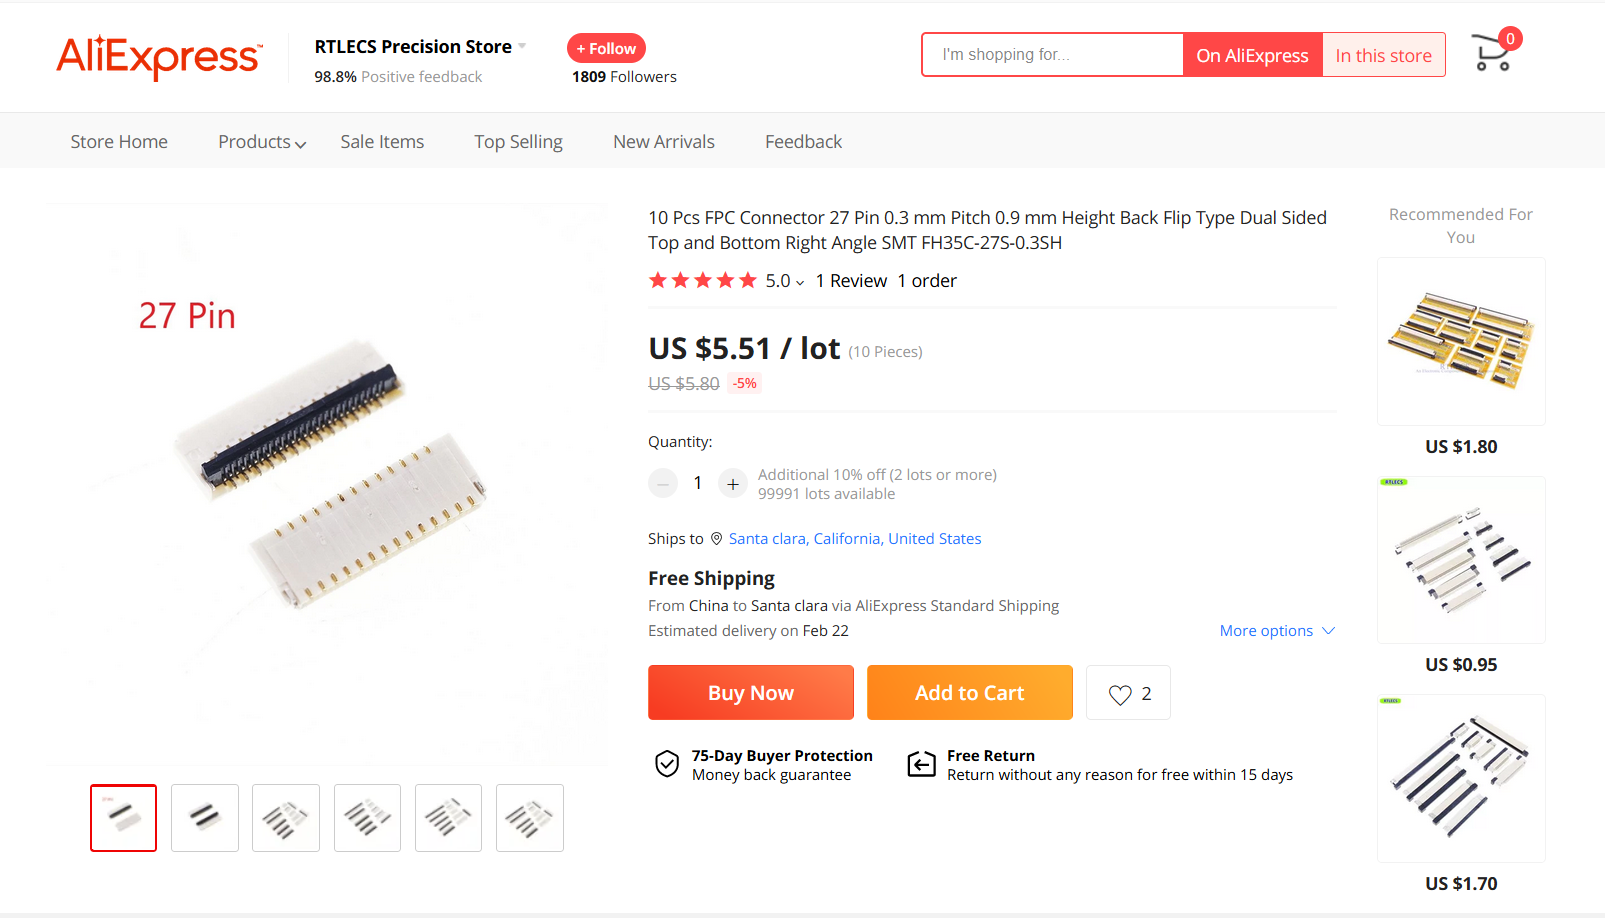
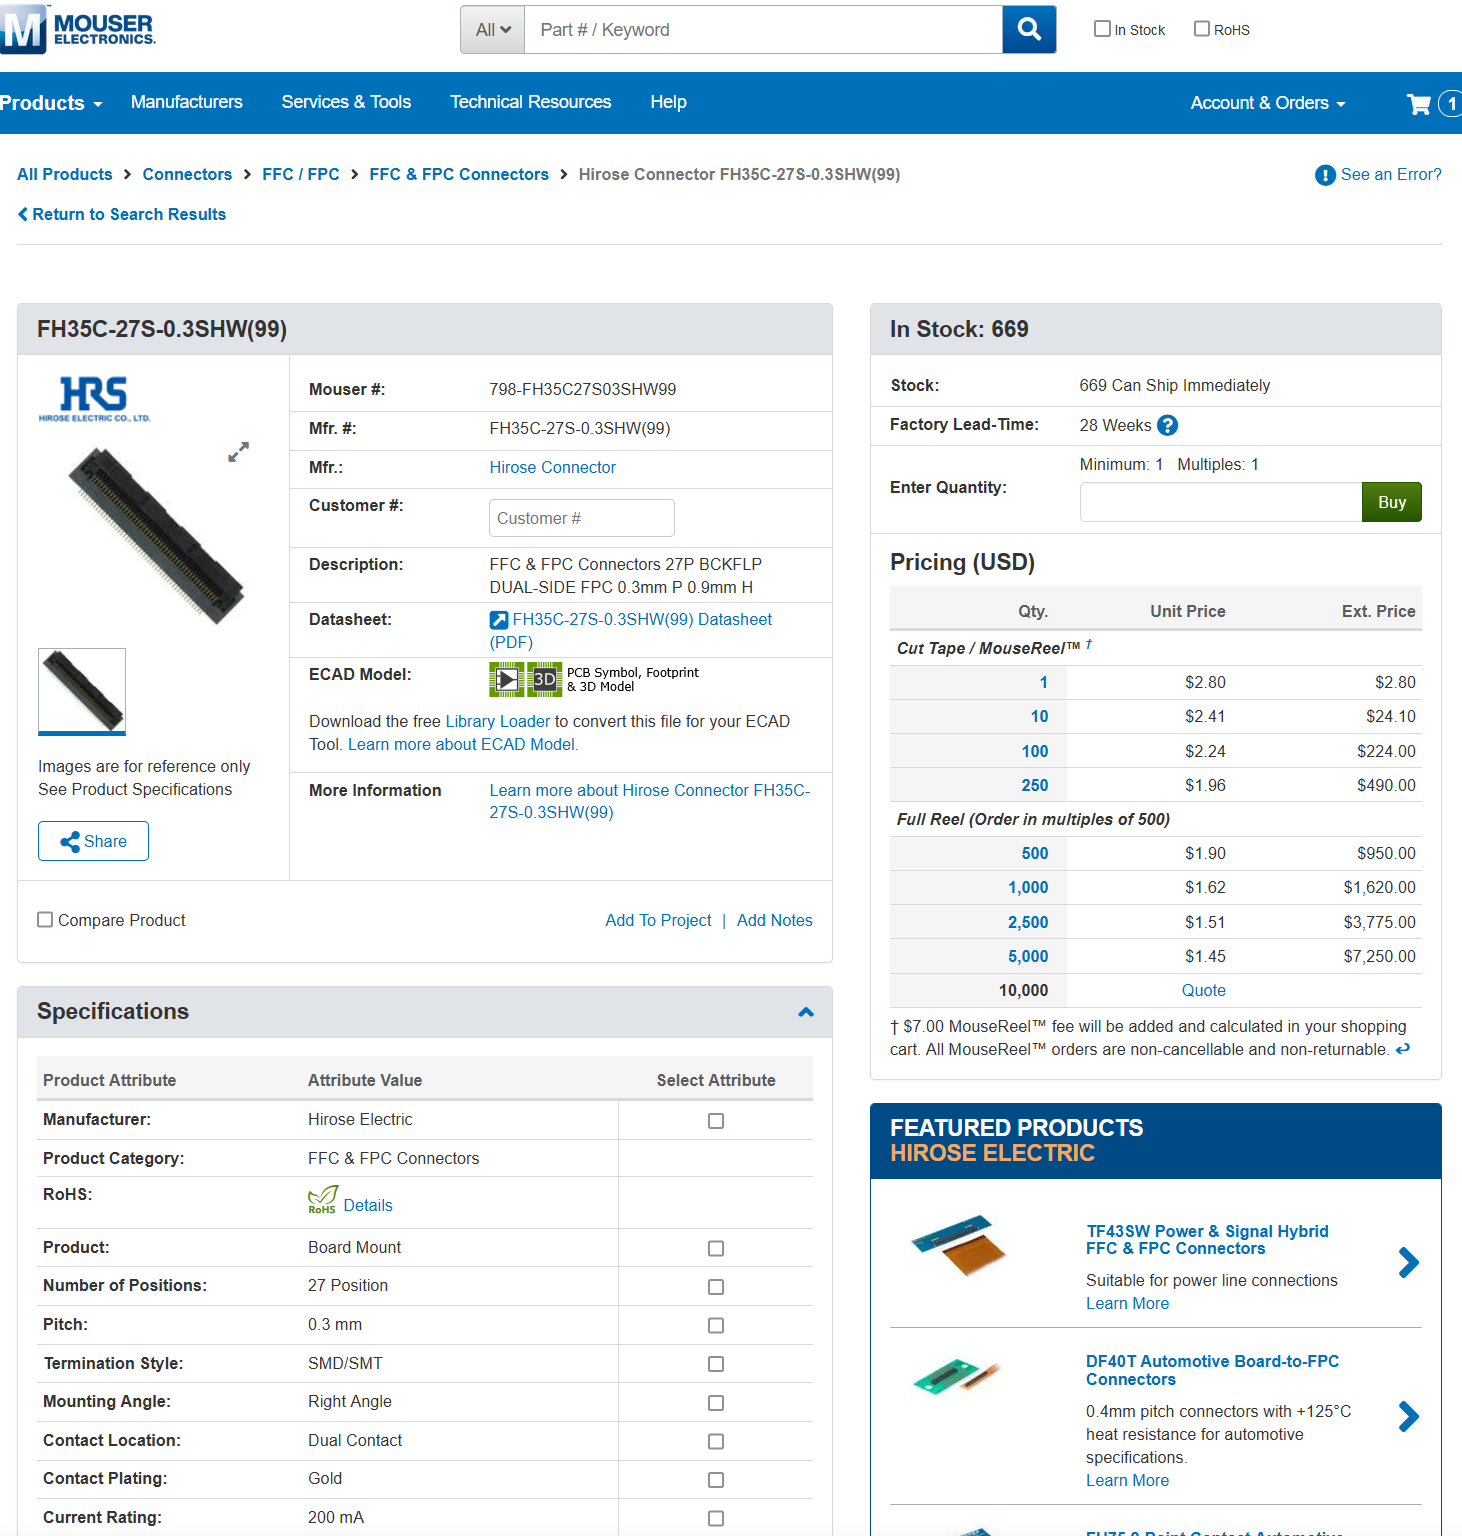
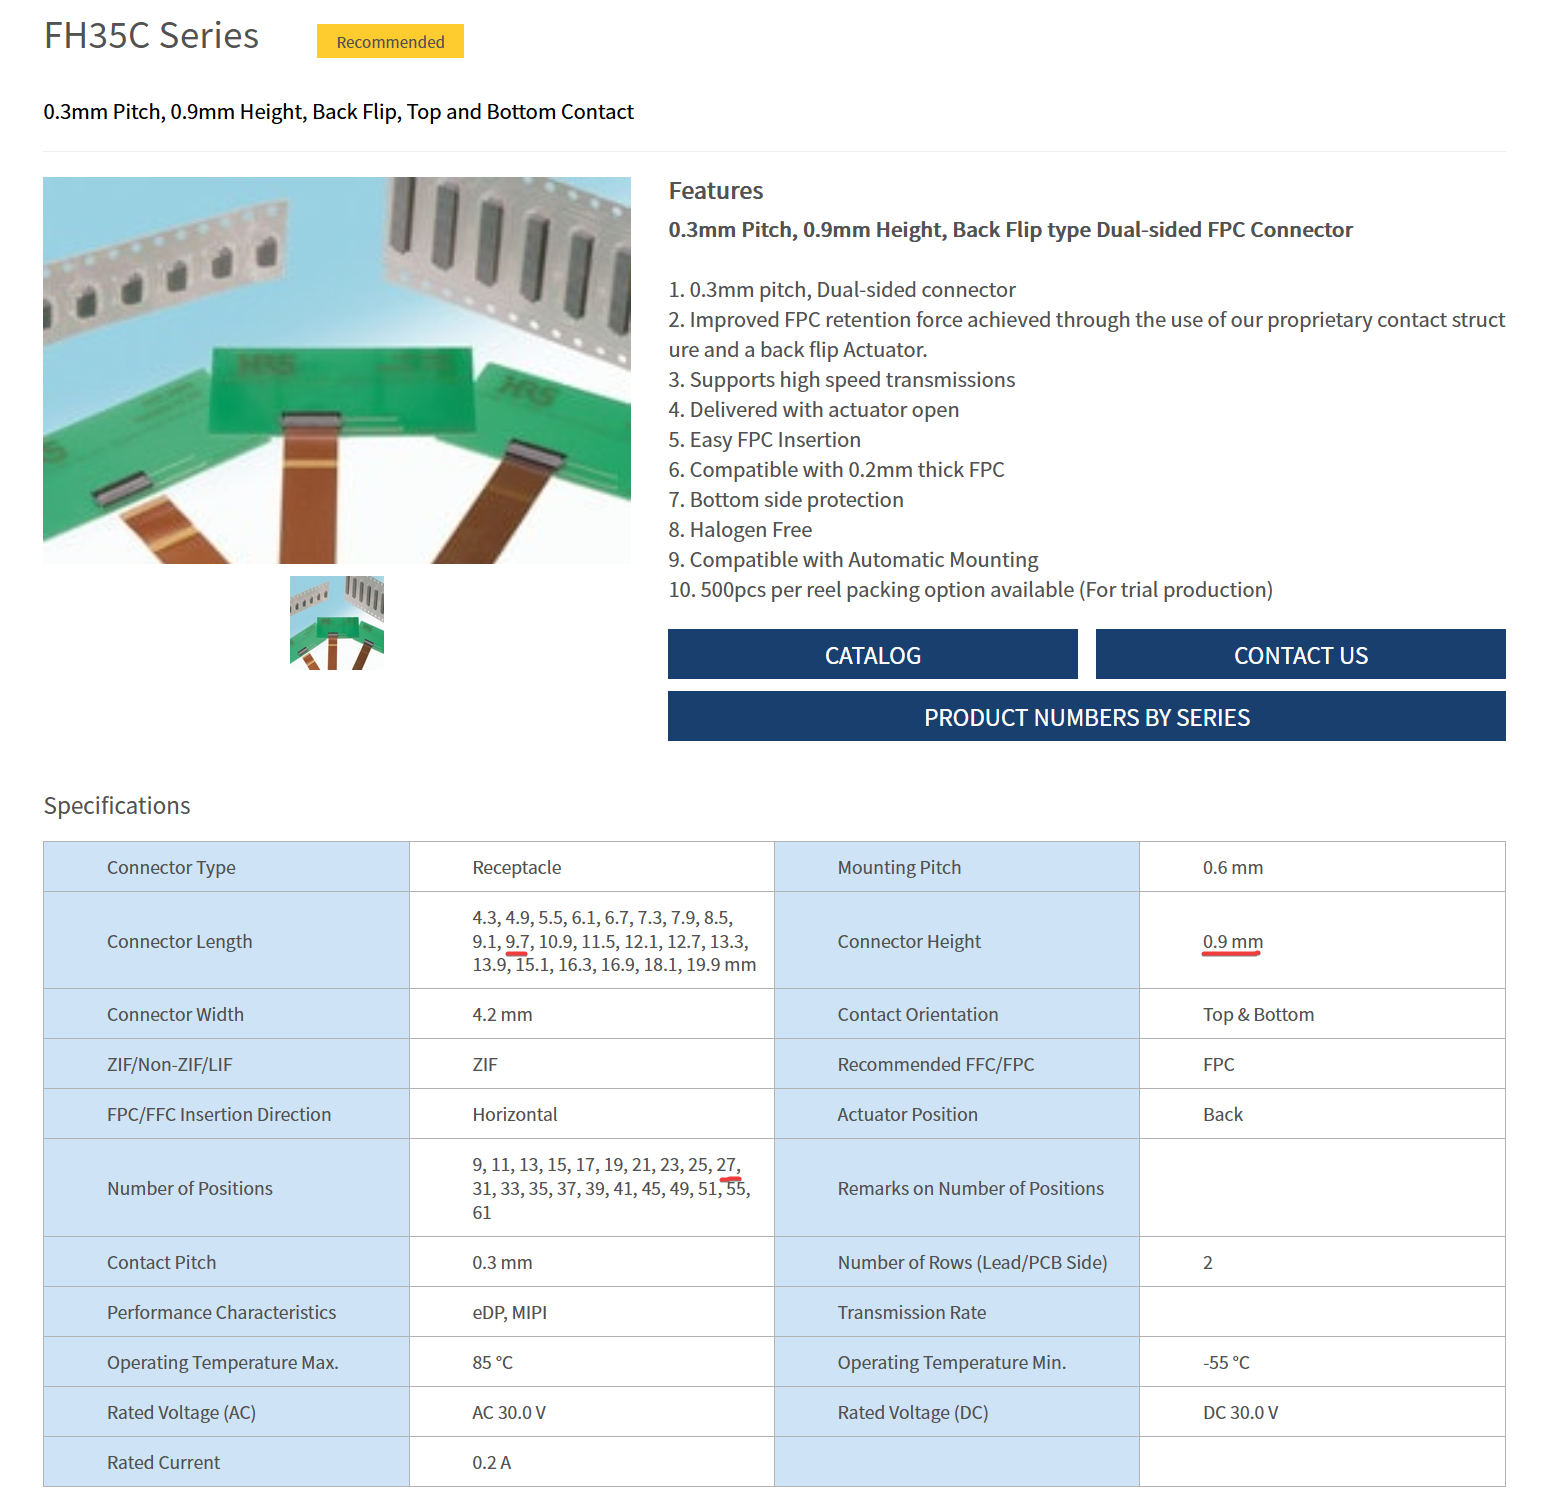
My best guess/conclusion is that the FH35C is a good direct replacement for the FFC/FPC connector.
Update 2023.01.31: I have confirmed that this is 100% the right part and it was extremely difficult to solder. My mom who is a professional solderer of 30 years took about an hour to replace this part. Taking out the old part was easy put putting in the replacement was the hard part.
Aliexpress FH35C-27S-0.3SH: https://www.aliexpress.us/item/2251832661601648.html?gatewayAdapt=glo2usa4itemAdapt&_randl_shipto=US
Mouser FH35C-27S-0.3SHW(99): https://mou.sr/3Ws6JTt
How I arrived at the conclusion above
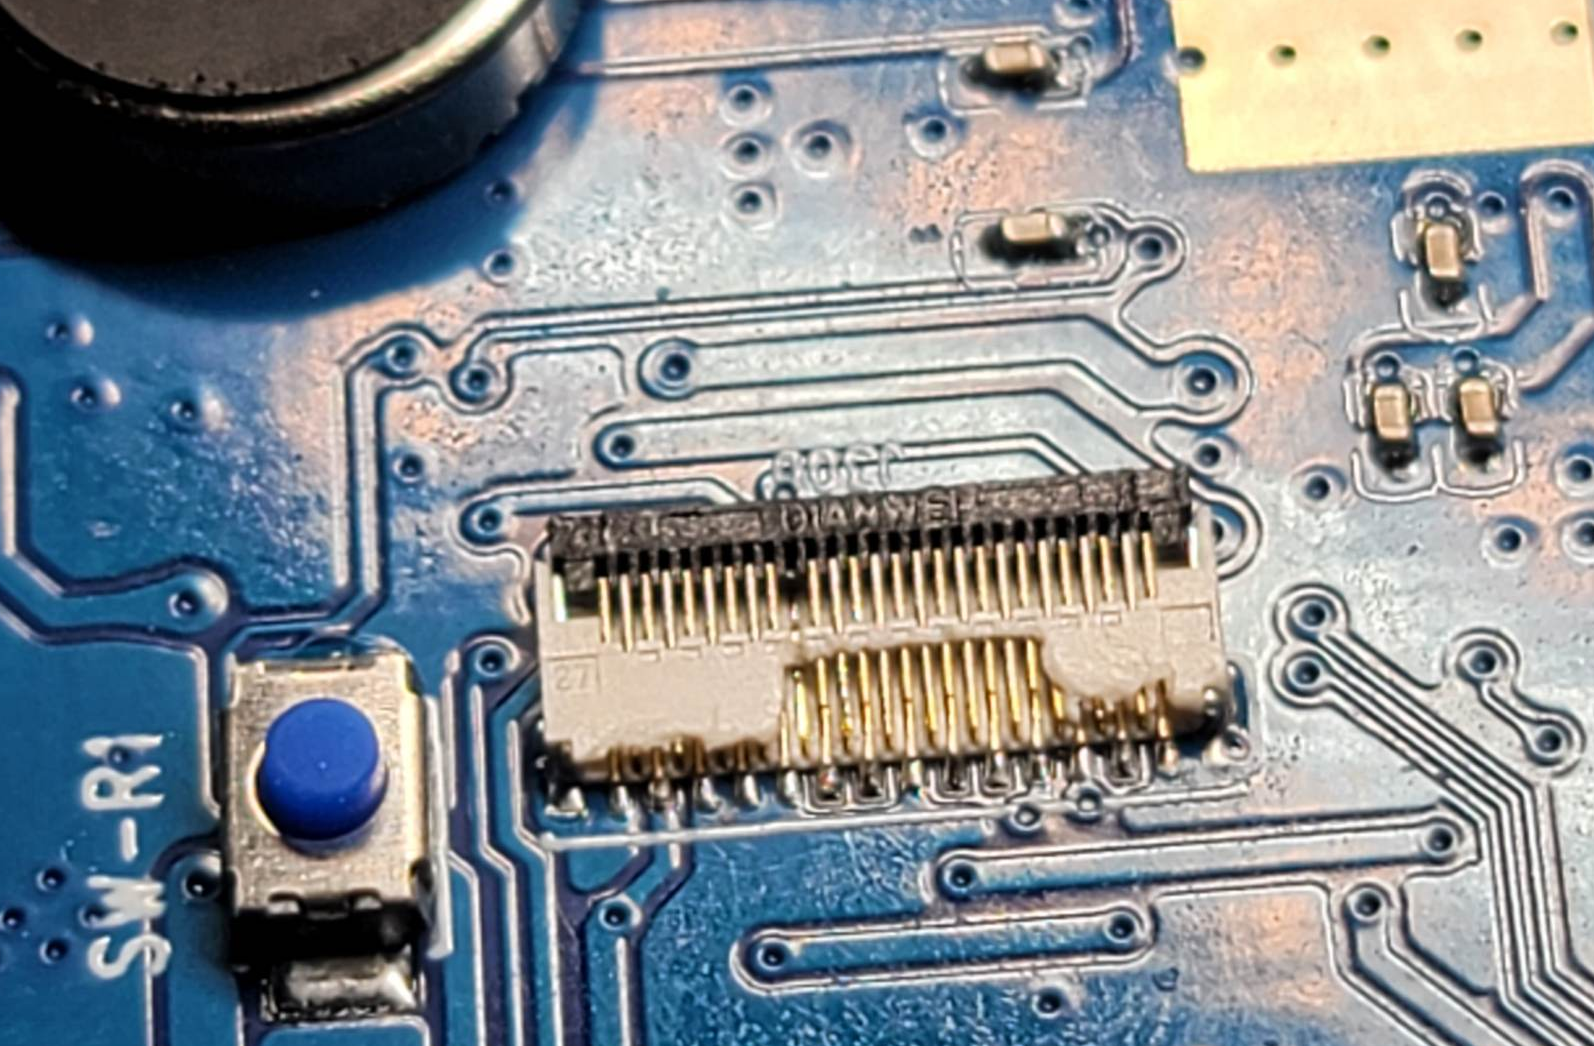
As you can see here in the first photo above,the connector has DIANWEI and 27 printed on it. It also measures about 1mm high from the board facing you.
I figured out it was by DIANWEI ELECTRONIC TECHNOLOGY CO.,LTD
From the DIANWEI ELECTRONIC TECHNOLOGY CO.,LTD catalog I found on Google: https://wiki.stoplagging.com/attachments/24
I was able to deduce it to be the 8.03A0.027200. or the 8.03A0.***200 series. This series has two substitutes, the HRS FH35C or the SCG BL143.
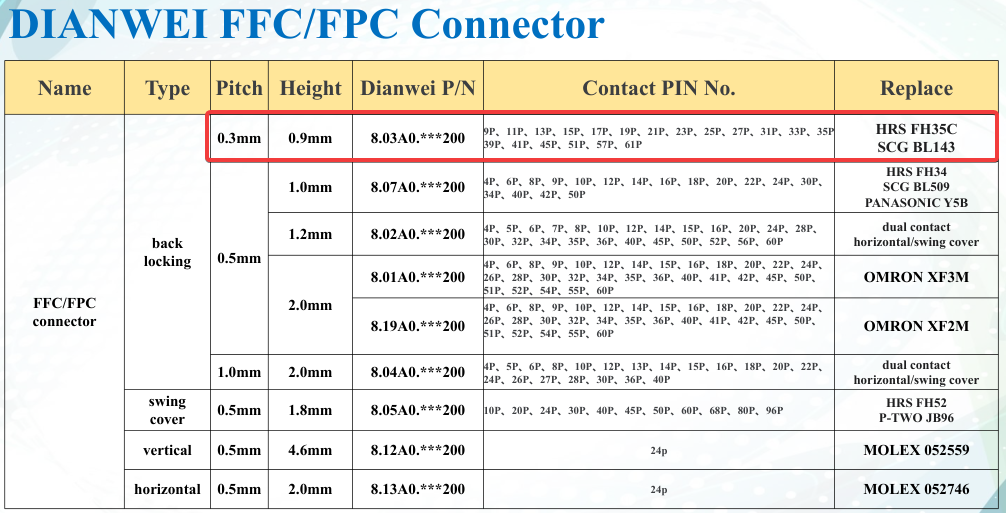
This deduction was made from the height being close to 0.9mm and the number pins being 27P. The only other one that had 27P was the 2.0mm height which is double the size. The 8.03A0.027200 can also use HRS FH35C or SCG BL143 as substitutes.
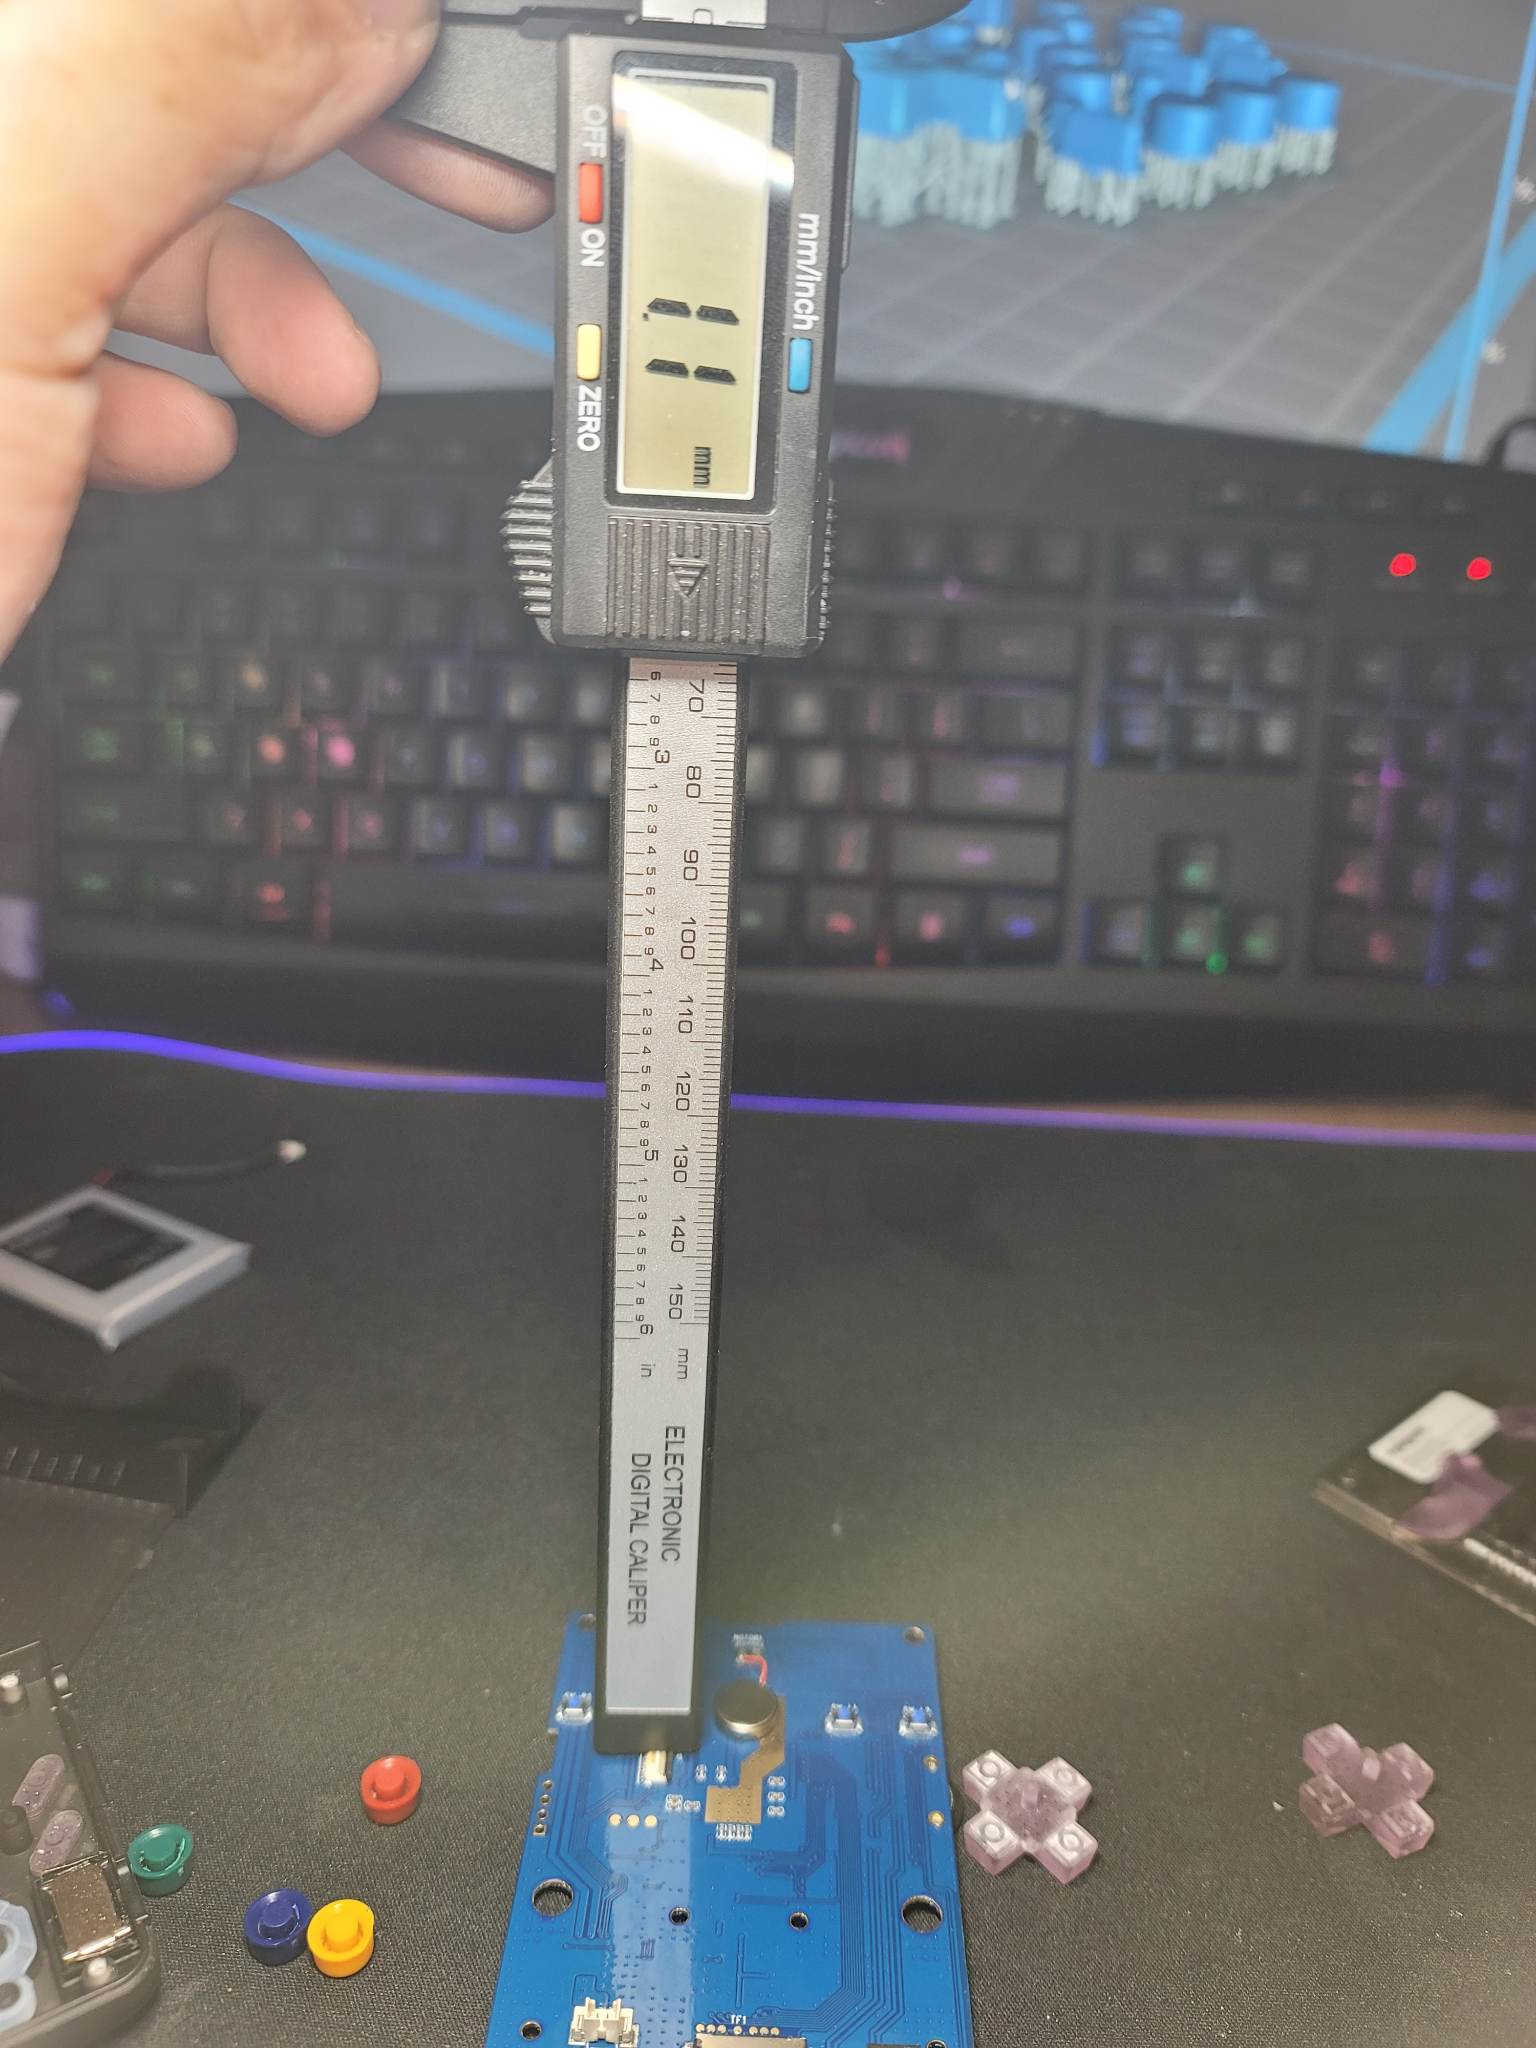

From here we can also see that a 27 pin FFC/FPC connector is 9.70mm in length. This matches the FH35C Series from https://www.hirose.com/product/series/FH35C
As you can see the [DIM A] matches the Connector length for the various pin counts. That's how i found out the FH35C series is an appropriate replacement connector.
Senior Shinobi NVR Stack configuration when getting new Gateway / Firewall
DNS
Freenom DNS records updated to new public IP
Ports Forwarded
If on Xfi Gateway this has to be done on xfinity mobile app. This is unfortunately the case for new XFI gateways.
80/tcp, 443/tcp, and 51820/tcp have to be forwarded to the server and has to done under the same IP.
Multiple ports can be added to the same IP in the XFi app so don't worry
IP Reservation
Reserved IPs are still configured on 10.0.0.1. Default login is admin //// password
Assign these IPs to the Cameras
UIDCAM4 = 10.0.0.71
UIDCAM3 = 10.0.0.16
UIDCAM2 = 10.0.0.253
UIDCAM1 = 10.0.0.242Check Reolink Client App
Make sure all FTP Surveillance is working and that all Cameras have a video feed.
IP Addresses reserved must match.
As of 2023.10.01 all 4 camera IPs are set as static IPs. On new comcast gateways they should retain the same internal IPs.
Shinobi Web App
Make sure each camera has the same reserved IPs.
Bonus
Fix client Wireguard config IP address range to 10.0.0.0/24
Update client Wireguard config to the new public IP address
x86 routers for Gigabit SQM with OpenWrt
If you're here. It's because you want to get SQM for 1400Mbps+ and connections. The reason I'm saying 1400Mbps+ is because that is my current maximum provided by my ISP. The set up has potential for more than 1400Mbps. This is a write up based on an Intel N100 CPU mini PC I've tested.
If your internet connection is between 160-630 Mbps it is more economical for you to get a NanoPi R4SE and follow the NanoPi guide instead. The NanoPi R6S is also cheaper and can do 1400Mbps+ as well, but keeps requiring constant CPU tweaks. For some reason it kept defaulting to the slower A55 cores instead of using the A76 cores every time I modify SQM settings.
Now on to the physical setup.
The diagram below demonstrates how you would install any x86 Mini PC as a router in your network stack. Building your home network infrastructure like this, is more reliable and better than consumer routers which try to combine the modem, routing, and wireless all in one.
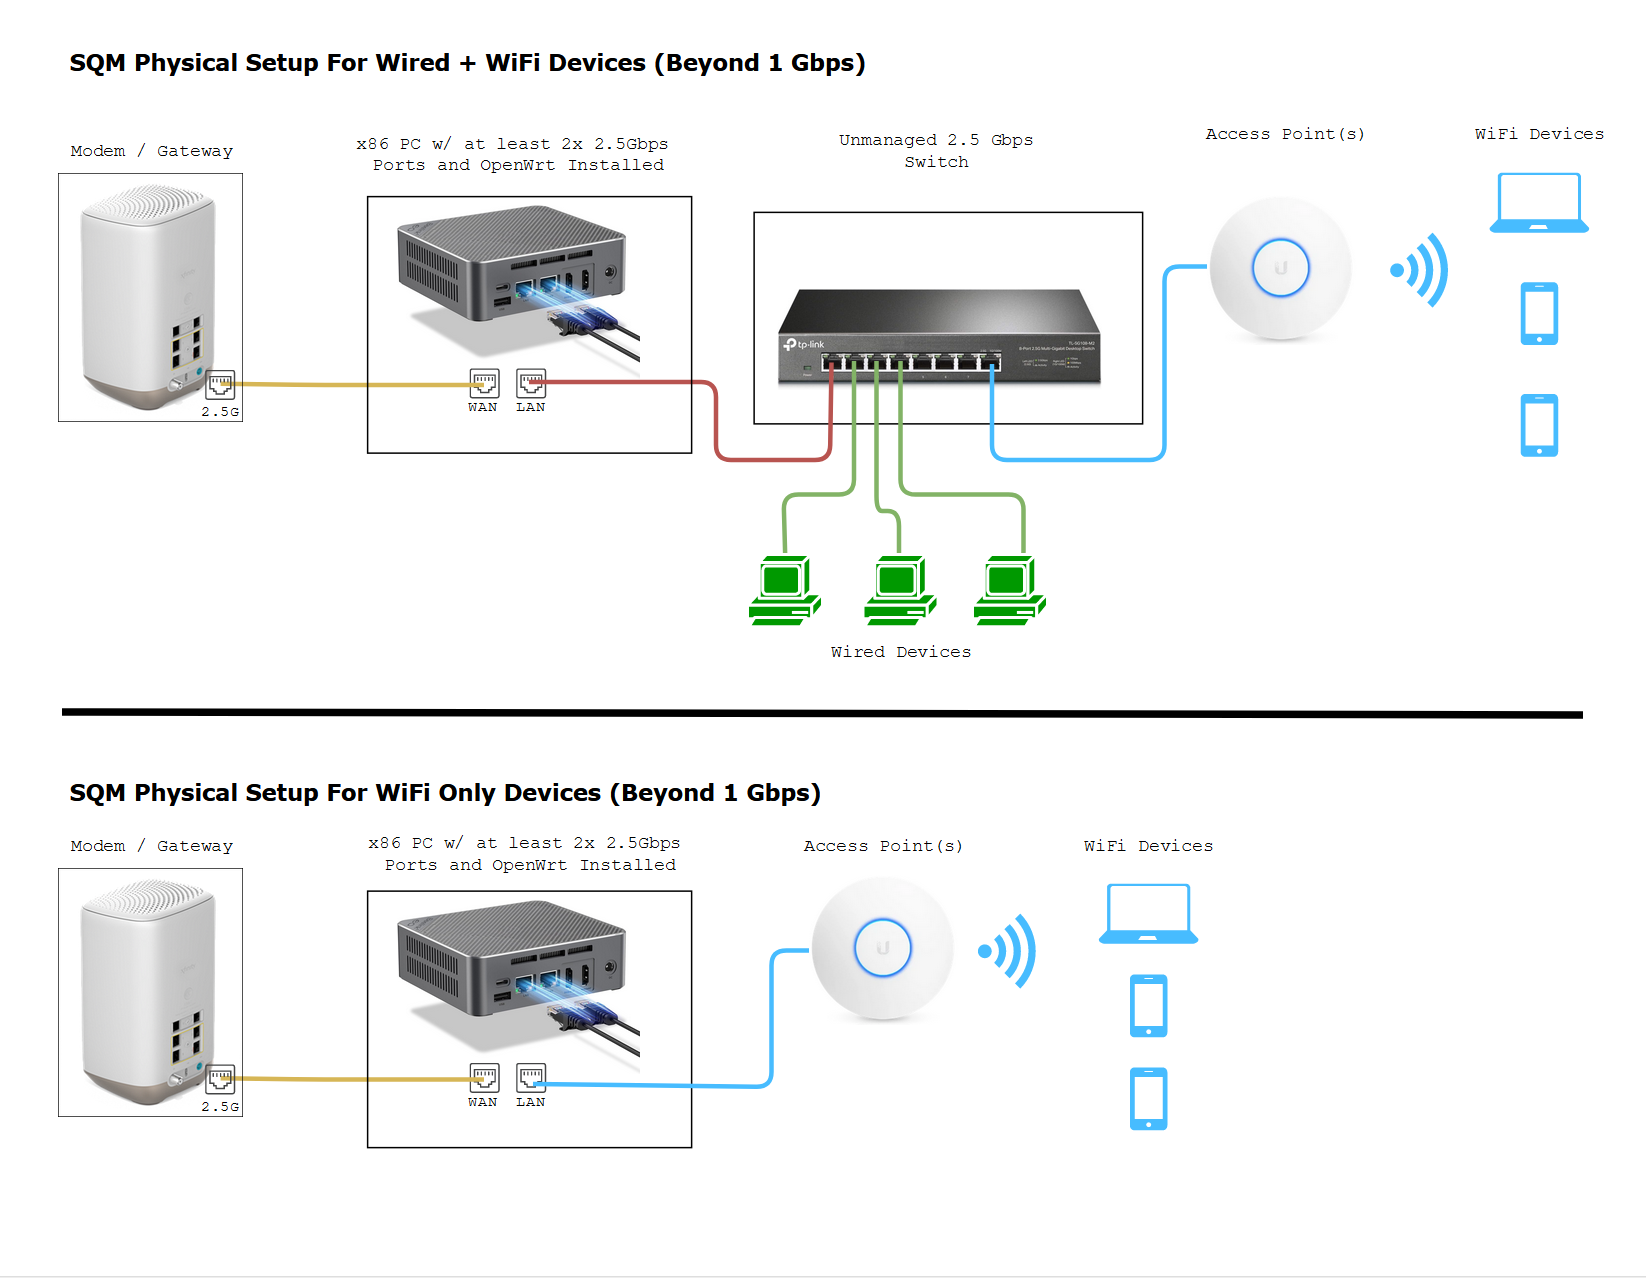
Pictured Switch - TP-Link 2.5Gbps 8 Port Multi-gigabit switch (Amazon Referral Link) I earn a small commission on these links thank you!
Pictured Access Point - Ubiquiti Unifi 6 Pro (Official Link) Note: If Ubiquiti is out of stock you or if you don't like them, I heard that the TP-Link EAP670 (Amazon Referral Link) from their Omada lines work just as great. A reader of mine prefers Omada over the Ubiquiti stuff. I just have never tried it myself so I can't say much.
Pictured OpenWrt Device - BeeLink EQ12 Intel N100 Mini-PC (Amazon Referral Link). If you're cheap and don't mind waiting you get an N100 x86 miniPC from Aliexpress. I had good experience with the one on the WooYi Storefront.
If you want a beefier PC that's probably overkill the AceMagician (Amazon Referral Link) with the AMD Ryzen 5800U or the Beelink EQR6 (Amazon Referral Link) would work. The over point is to make sure you get an x86 PC with at least 2, 1Gbps RJ-45 Ethernet ports.
What is bufferbloat and why do we not want it? It is lag or ping spikes in video games or zoom calls that is caused when you or someone else uses up all your bandwidth. It could be torrenting, 4k streaming, bulk downloads, or even a speedtest. SQM algorithms (fq_codel or cake) which are available on OpenWrt, can completely mitigate these pings and ensures low latency even under full load. Overall, you do sacrifice a little max speed 5-10% for guaranteed low latencies.
Hardware Requirements
The minimum requirement for choosing one of these x86 based PCs is as follows
1. Make sure it has at least 2x 1 Gbps Ethernet ports or better. Intel Ethernet ports are generally preferred over Realtek ports but Realtek ports will do. You might want to consider 2.5 Gbps if your ISP (Internet Service Provider) has the capability.
2. You also want to make sure it has a CPU Mark of 5000 or more. And a strong single core performance of 1200+. You can check here: https://www.cpubenchmark.net/cpu_list.php
3. Preferably it would be a low power device that uses < 25 Watts.
Intel Alder Lake N100 12th Generation Based Mini PCs
Performance of N100
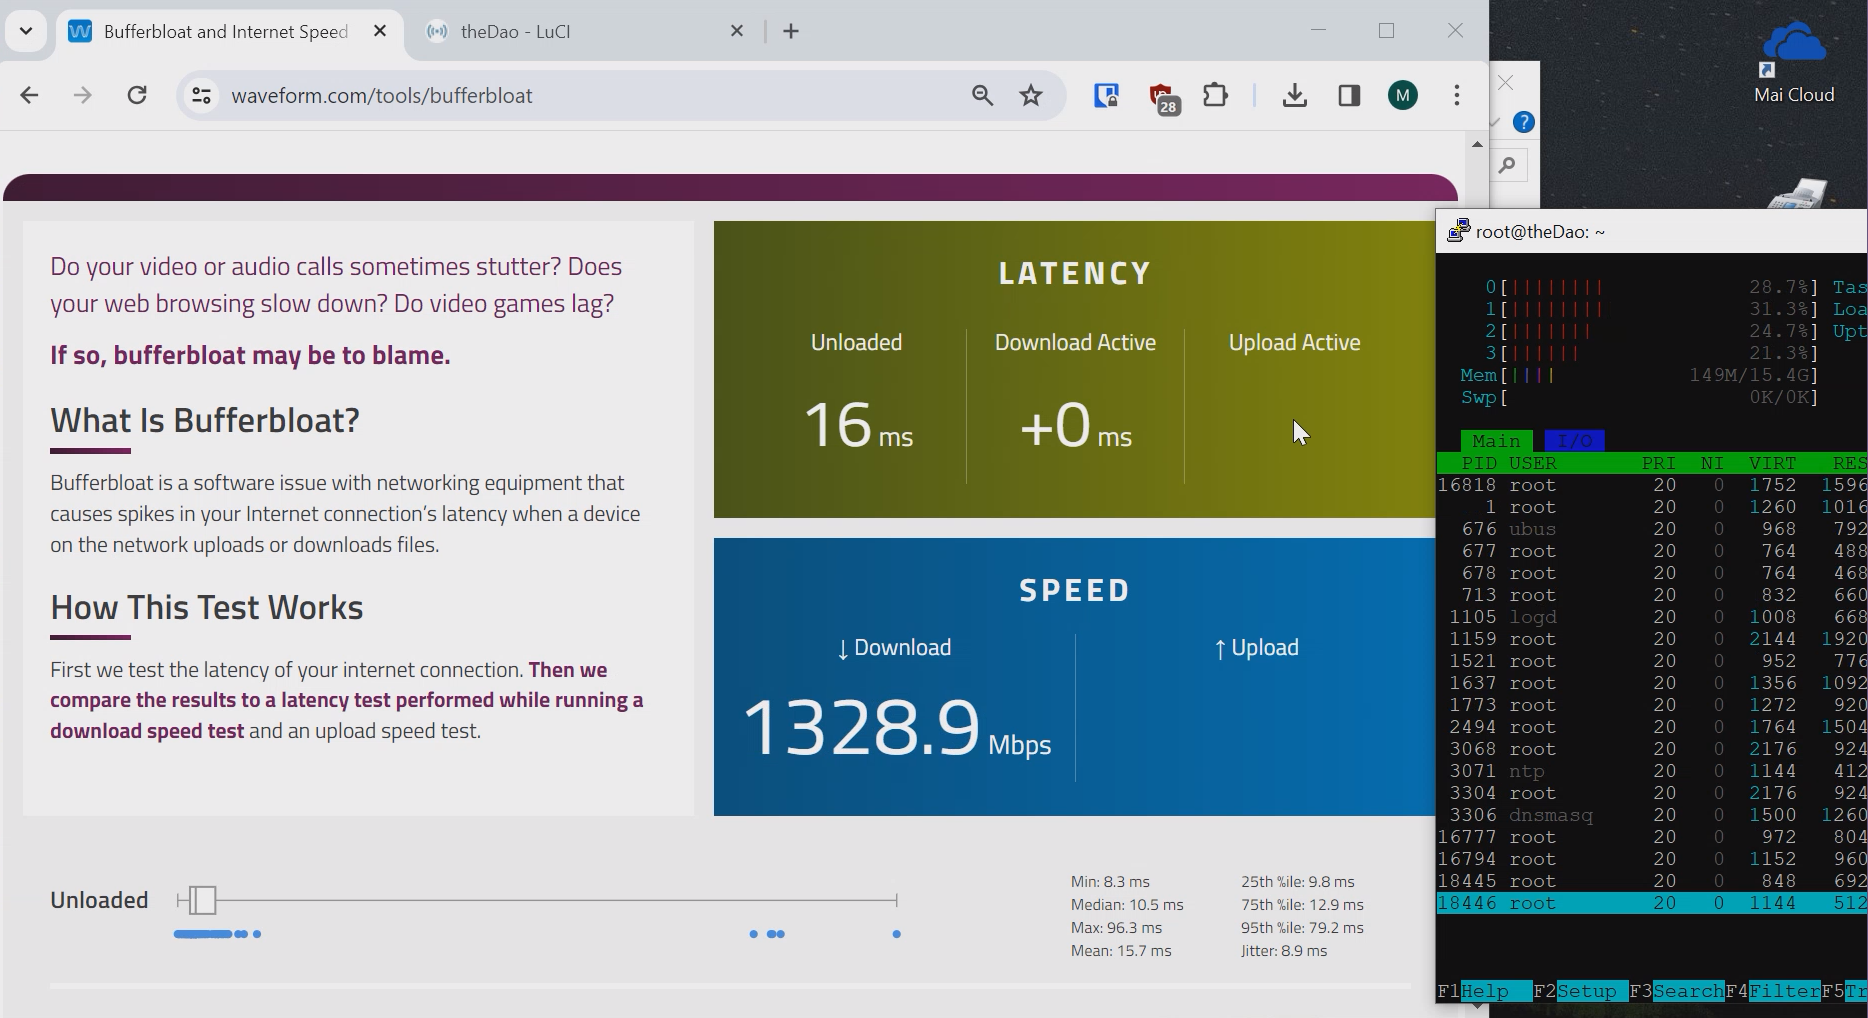
On my 1400 Mbps connection I was able to run cake SQM at 1350Mbps with up to 40% CPU Usage on a single CPU core so there's a lot of room for more Mbps!
Installing OpenWrt
As for installation of software. OpenWrt has an official written guide here: https://openwrt.org/docs/guide-user/installation/openwrt_x86
If you're lost on what to do no worries I can give some pointers. I typically choose the generic-squashfs-combined-efi.img.gz image
- I normally would take out the nVME SSD of my miniPC to an external enclosure.
- Plug it into my primary PC.
- Then flash the official image (using win32diskimager or balenaetcher for windows) it to my Router PC's nVME SSD inside the enclosure.
- Then I would take the nVME back out of the enclosure and install it back in the miniPC.
- That's pretty much it! OpenWrt should boot from there. The default ports for WAN and LAN may incorrect such as ETH0 being LAN and ETH1 being WAN but we can fix that.
Optional (Swapping ETH0 to WAN and ETH1 to LAN): This is done in Network > Interfaces -> Devices Tab -> Then hitting configure under the device called "br-lan"/

Attach eth1 as the bridge port. You can also attach eth2 eth3 if you have more ports, just make sure you detach eth0.
Then go back to Network > Interfaces. Edit "wan" and "wan6" so that they use eth0 instead of eth1.
Then save and apply. Plug your machine to ETH1 (or ETH2 ETH3 if you have those.... and Modem into ETH0.
Optional (Expand rootfs to use all SSD size) : Now the problem with all the openWrt images is that the root partition is small by defualt. The easiest thing you can do to expand this size is to boot a live ubuntu usb disk. Run gparted and expand the rootfs partition so you can utilize the full size of your SSD.
After OpenWrt is setup and running you just need to enable SQM via the official openWrt guide or my guide.
Either way feel free to improve it further with the advanced cake config section of this page
Gotchas
If you're not getting your beyond Gigabit speeds make sure you're using CAT6 or higher Ethernet cables and make sure the devices like the laptop you're using also have 2.5 Gbps ports.
In the diagram, I made sure that the example router, switch, and access point all had 2.5 Gbps ports!
What Access Point to Get?
I keep hearing raving reviews about the Ubiquiti APs and use one myself. I have extremely stable WiFi with these and never have to reboot them. Ubiquiti also advertises up to 200 concurrent users as well! If you have a recommendation better than these I'd like to know.
Ubiquiti Unifi 6 Pro (Official Link)
If you plan on only having one Ubiquti AP I recommend installing via the phone so you don't have to bother with more complicated things like AP Controllers.
If you're on a budget and can't buy a dedicated AP. You can try turning your old router into an access point by putting it into AP mode instead of routing mode. This is important because you should be letting the OpenWrt device do the routing to prevent bufferbloat not your old router.
Another option you could try that I've heard are good are the TP-Link EAP670 (Amazon Referral Link). I have no real world experience with these as I don't own any, but I heard they are solid products in the /r/homenetworking community.
Facts about WiFi
If you need more coverage you should get more APs not one single AP with a bunch of antennas, because those are marketing gimmicks.
WiFi has limited range due to the physics of their frequency bands.
5Ghz can handle more bandwidth, but will usually be about half the range of 2.4Ghz.
Advanced Cake Configuration
This section is for my own reference and these were recommended by the official docs: https://openwrt.org/docs/guide-user/network/traffic-shaping/sqm-details#sqmqueue_discipline_tab
It's not necessary to do this but if you want even further ping stability under load it might be worthwhile!
Under the Queue Discipline tab of SQM.
Enable the checkmark for advanced configuration and save& apply.
This turns on squash_dscp, squash_ingress, ECN on ingress and NOECN on egress. Leave them as defaults as they are good the way they are. (If you have symmetrical fiber then ECN can be enabled on egress.
Next checkmark and enable "Dangerous Configuration" which is below the "Advanced Configuration" section. We are going to disable triple-isolate and enable per host isolation... Here's a short explanation.
To quote the docs, by default, cake will use triple-isolate: “which will first make sure that no internal or internal host will hog too much bandwidth and then will still guarantee for fairness for each host. In that mode, Cake mostly does the right thing. It would ensure that no single stream and no single host could hog all the capacity of the WAN link. However, it can’t prevent a BitTorrent client – with multiple connections – from monopolizing most of the capacity.” You can enable per host isolation, which will identify all source/destination information.
To enable that, Add the following to the “Advanced option strings” (in the Interfaces → SQM-QoS page; Queue Discipline tab, look for the Dangerous Configuration options):
For queueing disciplines handling incoming packets from the internet (internet-ingress): nat dual-dsthost ingress
For queueing disciplines handling outgoing packets to the internet (internet-egress): nat dual-srchost
For me that means Qdisc options (ingress) I wrote in "nat dual-dsthost ingress" while for
Qdisc options (egress) I wrote in "nat dual-srchost"
Optional: Docker on x86
This section is for those of you who run docker containers.
For x86 machines you'll need to run the following commands in order for docker-compose to work and wg-easy docker container to work. For some reason the default opkg install docker-compose does not seem to work, so the solution is below.
The first command line:
opkg remove docker luci-app-dockerman docker-compose dockerd --autoremove --force-remove
Then command line:
opkg install docker luci-app-dockerman docker-compose dockerd --force-maintainer
opkg install luci-proto-wireguard
opkg install wireguard-toolsContact
If you need help or consultation please join my rocket.chat server at https://chat.stoplagging.com/invite/zaMu6X you can message me @Starfroz by looking me up under the globe icon after registering and logging in.